第1章 创建MyBatis工程
1.1 创建一个普通的maven项目,工程结构如下
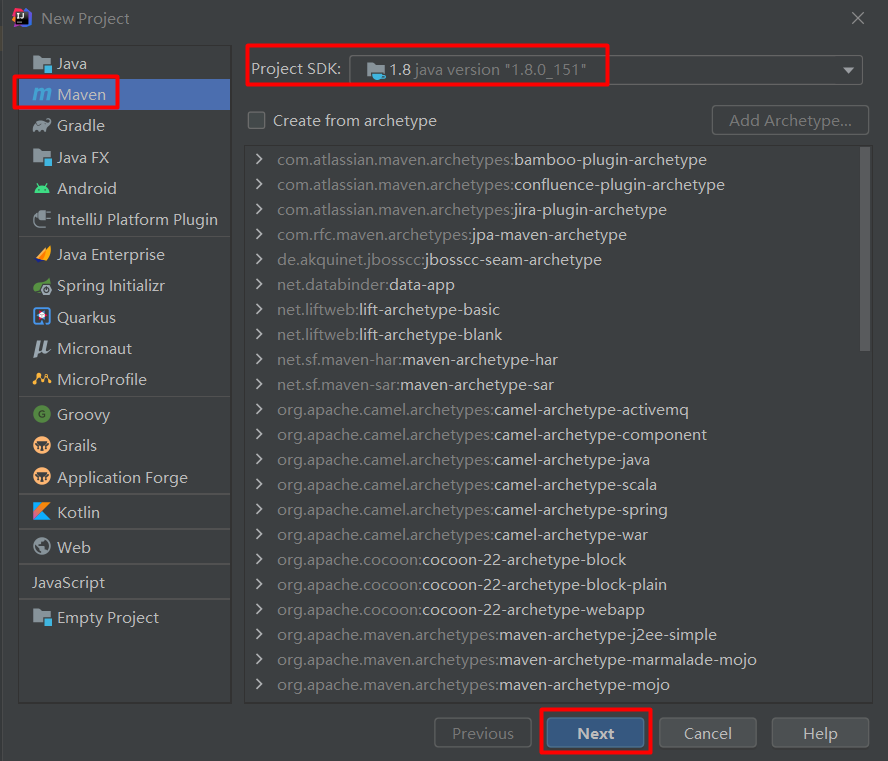
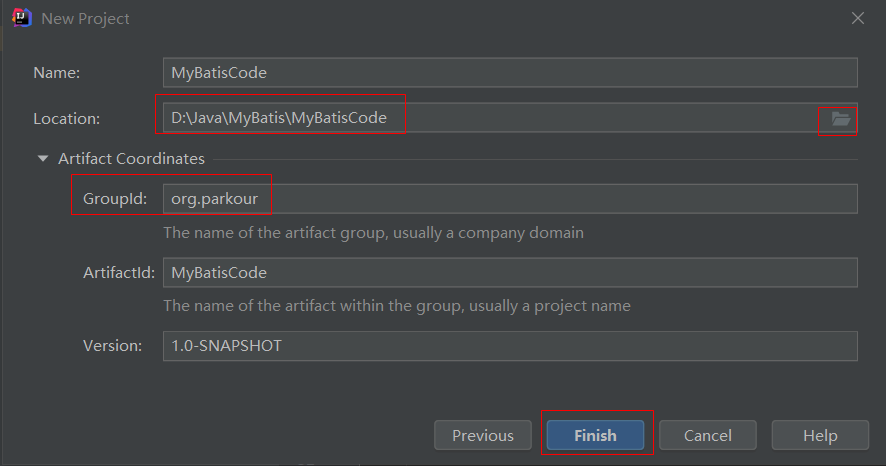
确保maven配置正确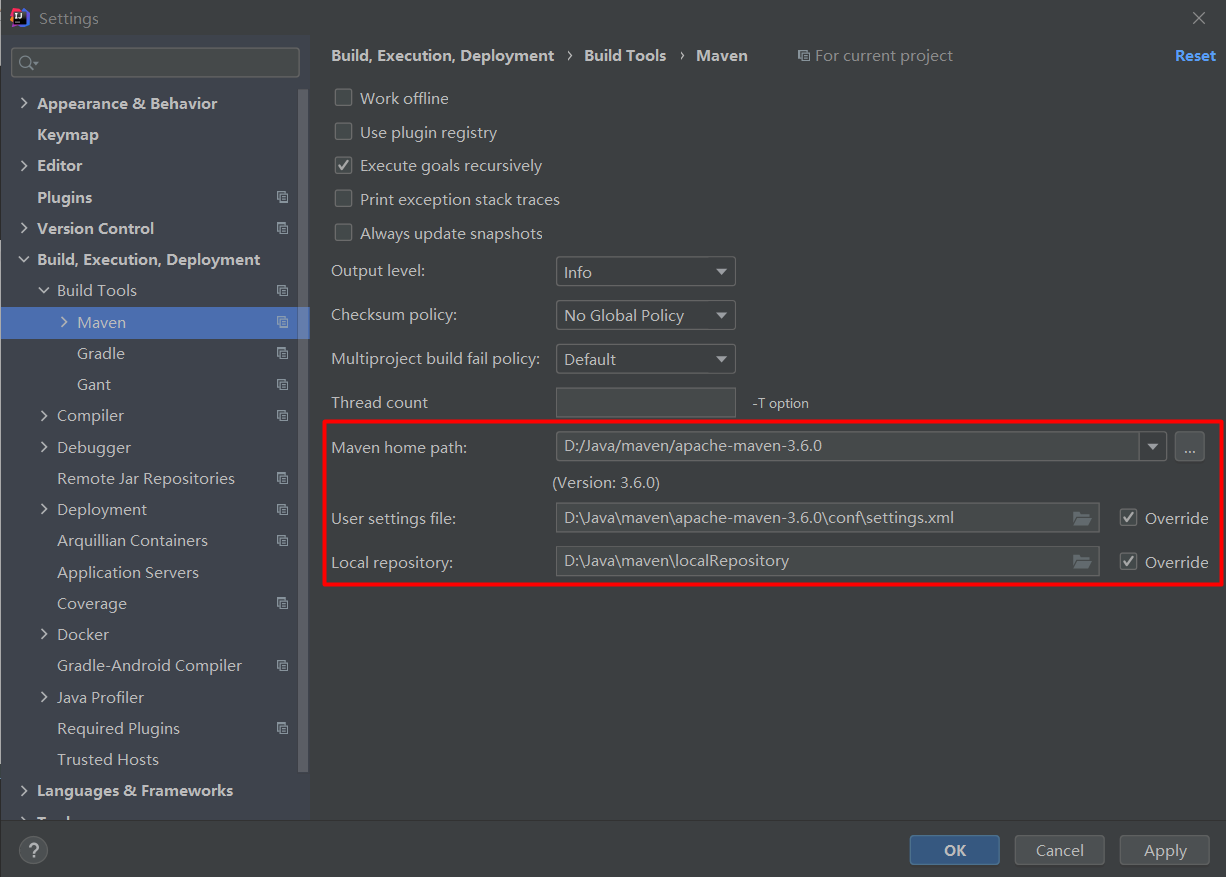
删除src目录, 这样就可以将该项目当做一个maven的父工程, 在下面新建一个一个的module进行不同功能的演示了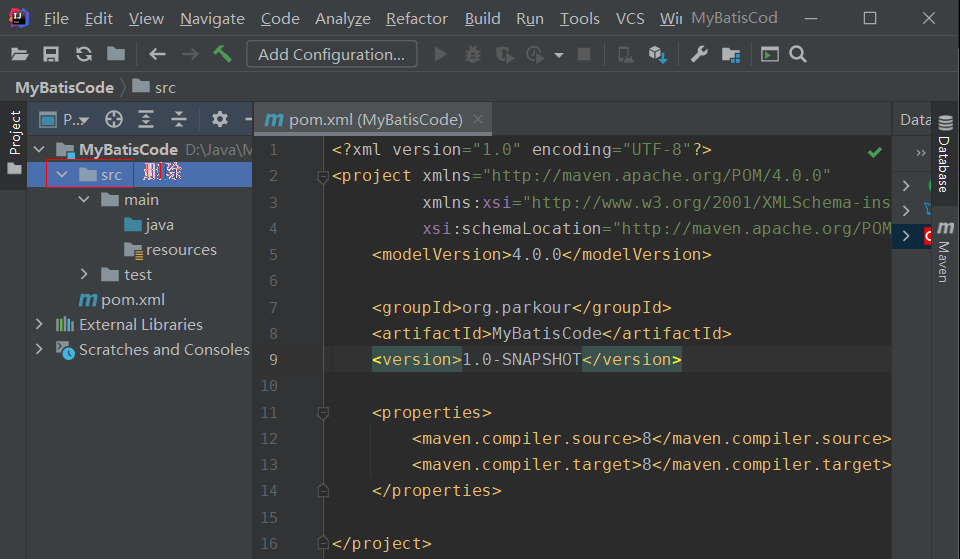
删除后,该项目下就只留一个pom文件, 作为父工程的pom文件, 在父工程下创建module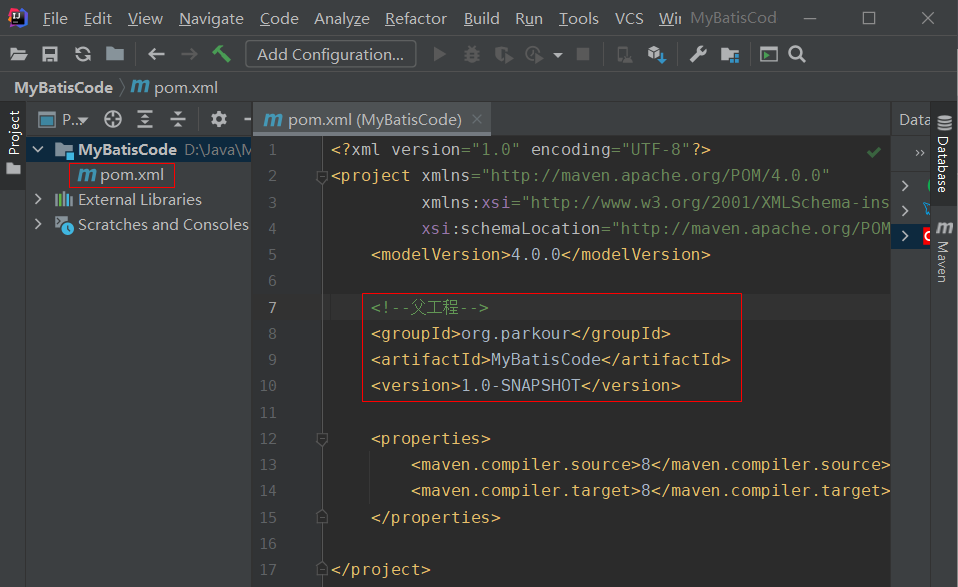
添加maven依赖
<!--导入依赖-->
<dependencies>
    <!--mysql驱动-->
    <dependency>
        <groupId>mysql</groupId>
        <artifactId>mysql-connector-java</artifactId>
        <version>5.1.47</version>
    </dependency>
    <!--mybatis-->
    <dependency>
        <groupId>org.mybatis</groupId>
        <artifactId>mybatis</artifactId>
        <version>3.5.2</version>
    </dependency>
    <!--lombok-->
    <dependency>
        <groupId>org.projectlombok</groupId>
        <artifactId>lombok</artifactId>
        <version>1.18.12</version>
    </dependency>
    <!--junit单元测试-->
    <dependency>
        <groupId>junit</groupId>
        <artifactId>junit</artifactId>
        <version>4.12</version>
        <scope>test</scope>
    </dependency>
</dependencies>
新建一个module(maven项目), 命名为mybatis-01-helloworld
这样子项目module中就不用再次导入依赖了, 它会去父项目中去查找依赖
父项目的pom文件中也会多出来一个module
创建mybatis的配置文件
在新创建好的module的resources下创建一个mybatis-config.xml文件
(该文件我已经配置了模本直接通过IDEA快捷方式创建)
mybatis-config.xml内容如下
<?xml version="1.0" encoding="UTF-8" ?>
<!DOCTYPE configuration
        PUBLIC "-//mybatis.org//DTD Config 3.0//EN"
        "http://mybatis.org/dtd/mybatis-3-config.dtd">
<configuration>
    <properties resource="db.properties"/>
    <settings>
        <setting name="logImpl" value="LOG4J"/>
    </settings>
    <typeAliases>
        <package name="xx.xx.domain"/>
    </typeAliases>
    <environments default="dev">
        <environment id="dev">
            <transactionManager type="JDBC"/>
            <dataSource type="POOLED">
                <property name="driver" value="${jdbc.driver}"/>
                <property name="url" value="${jdbc.url}"/>
                <property name="username" value="${jdbc.username}"/>
                <property name="password" value="${jdbc.password}"/>
            </dataSource>
        </environment>
    </environments>
    <mappers>
        <mapper resource="com/xx/xxMapper.xml"/>
    </mappers>
</configuration>
在新创建好的module的resources下创建db.properties保存数据库连接信息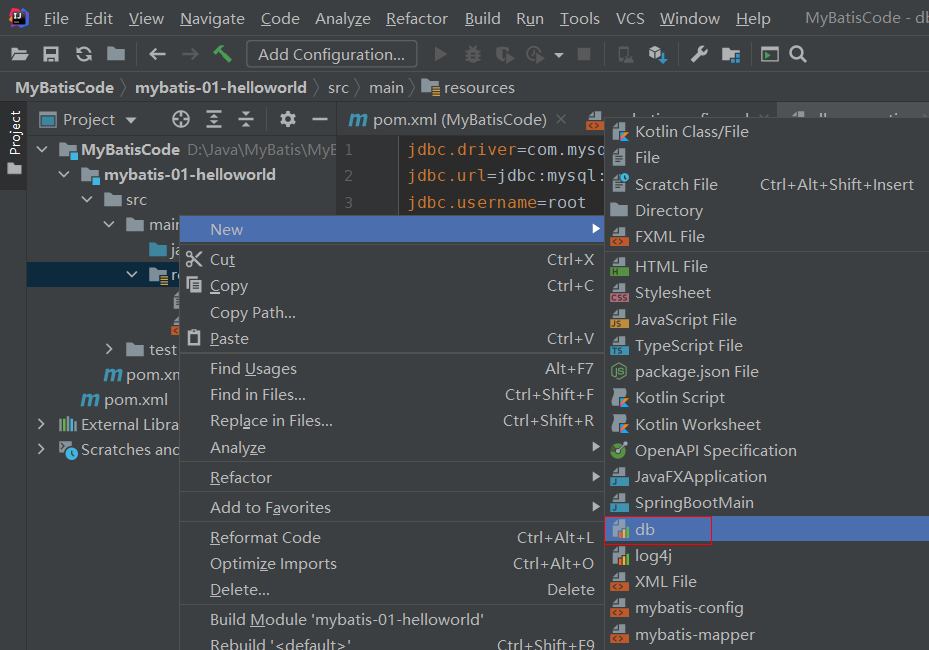
db.properties的内容如下
jdbc.driver=com.mysql.jdbc.Driver
jdbc.url=jdbc:mysql://localhost:3306/mybatis
jdbc.username=root
jdbc.password=root
分包,并创建domain对象和mapper文件
在src下创建包名com.parkour.mybatis.domain, 在domain下创建一个User.java
在src下创建包名com.parkour.mybatis.mapper, 在mapper下创建一个UserMapper.java接口
在resources下创建多级文件夹com/parkour/mybatis/mapper, 在mapper文件夹下创建一个UserMapper.xml文件
注意: Xxxmapper.xml文件必须放到 和 mapper接口一样的包结构下面
这样编译之后, 这两个文件才能在一个包下
注意在resources下创建多级包的操作, 是使用/而不是.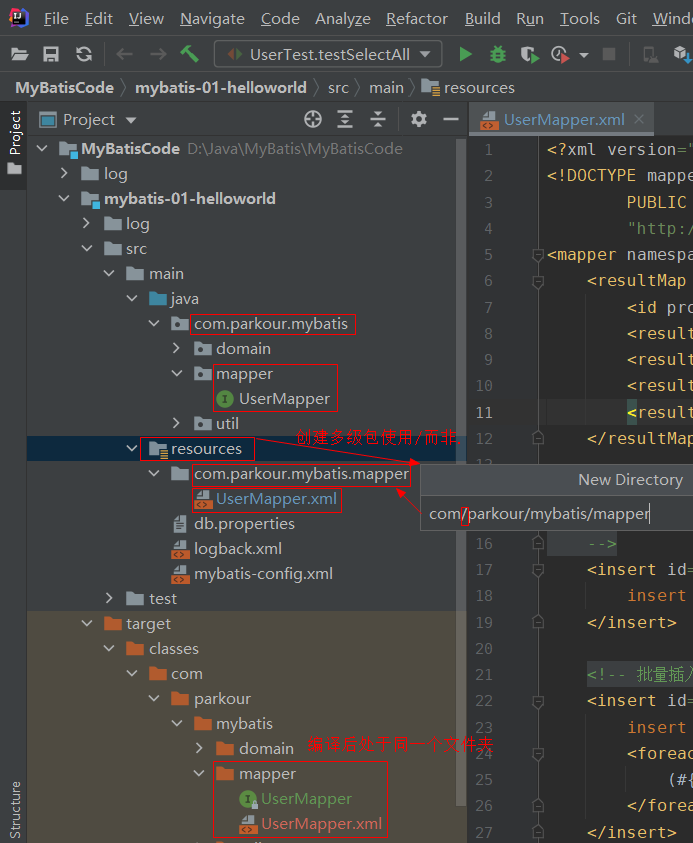
新建logback.xml日志配置文件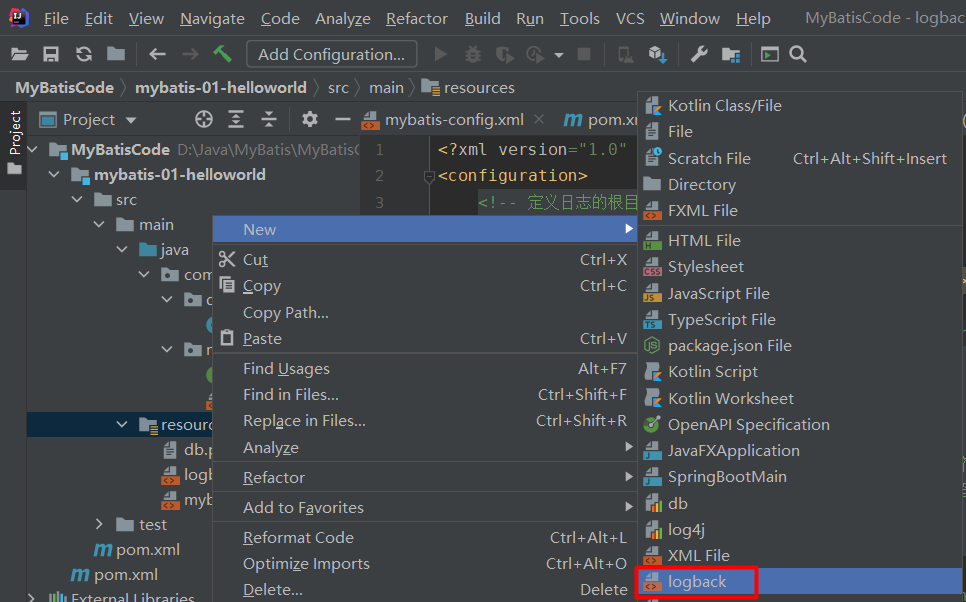
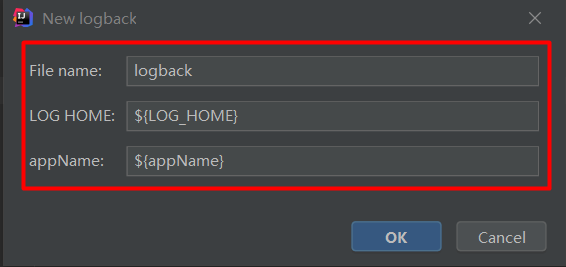
在生成的logback.xml文件中根据当前应用的实际情况修改value的值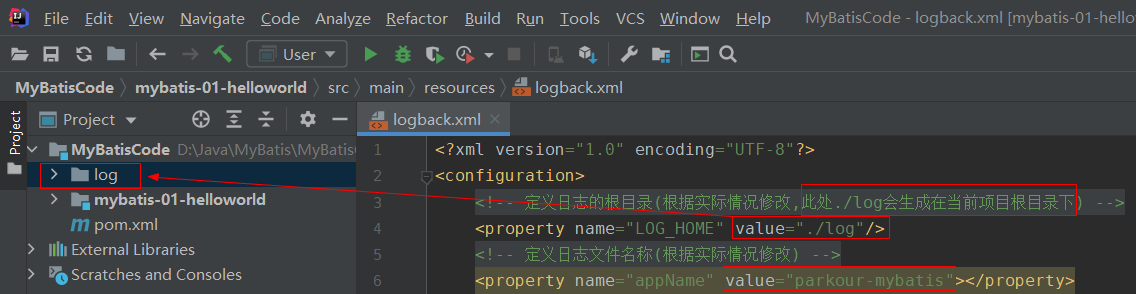
mybatis拷jar包的工程结构
mybatis-cfg.xml Xxmapper.xml db.properties log4j.properties
MybatisUtil类 涉及到的jar包 参见文末附件
新建一个普通的maven项目(不选择模板)

User.java
package com.parkour.mybatis.domain;

import lombok.*;

import java.math.BigDecimal;
@Getter
@Setter
@ToString
@NoArgsConstructor
@AllArgsConstructor
public class User {
    private Long id;
    private String name;
    private BigDecimal salary;

    public User(String name, BigDecimal salary) {
        this.name = name;
        this.salary = salary;
    }
}
UserMapper.java
package com.parkour.mybatis.mapper;

import com.parkour.mybatis.domain.User;

public interface UserMapper {
    User selectOne(Long id);
}
MybatisDemoTest.java
package com.parkour.mybatis.test;

import com.parkour.mybatis.domain.User;
import com.parkour.mybatis.mapper.UserMapper;
import com.parkour.mybatis.util.MybatisUtil;
import org.testng.annotations.Test;

public class MyBatisDemoTest {
    @Test
    public void testSelectOne(){

        UserMapper userMapper = MybatisUtil.getMapper(UserMapper.class);
        User user = userMapper.selectOne(1L);
        System.out.println(user);

    }
}
MybatisUtil.java
package com.parkour.mybatis.util;

import org.apache.ibatis.io.Resources;
import org.apache.ibatis.session.SqlSession;
import org.apache.ibatis.session.SqlSessionFactory;
import org.apache.ibatis.session.SqlSessionFactoryBuilder;

import java.io.IOException;
import java.io.InputStream;

public class MybatisUtil {
    private MybatisUtil() {
    }

    private static SqlSessionFactory sqlSessionFactory;

    static {
        InputStream config = null;
        try {
            config = Resources.getResourceAsStream("mybatis-cfg.xml");
        } catch (IOException e) {
            e.printStackTrace();
        }
        sqlSessionFactory = new SqlSessionFactoryBuilder().build(config);
    }

    public static SqlSession getSqlSession(){
        return sqlSessionFactory.openSession();
    }

    public static <T> T  getMapper(Class<T> mapperClass){
        return getSqlSession().getMapper(mapperClass);
    }

}
UserMapper.xml
<?xml version="1.0" encoding="UTF-8" ?>
<!DOCTYPE mapper
        PUBLIC "-//mybatis.org//DTD Mapper 3.0//EN"
        "http://mybatis.org/dtd/mybatis-3-mapper.dtd">
<mapper namespace="com.parkour.mybatis.mapper.UserMapper">
    <select id="selectOne" resultType="com.parkour.mybatis.domain.User">
        select * from mybatisdemo.user where id = #{id}
    </select>
</mapper>
db.properties
jdbc.driver=com.mysql.jdbc.Driver
jdbc.url=jdbc:mysql://localhost:3306/mybatisdemo
jdbc.username=root
jdbc.password=root
log4j.properties
log4j.rootLogger=ERROR,stdout
log4j.logger.com.parkour.mybatis=TRACE
log4j.appender.stdout=org.apache.log4j.ConsoleAppender
log4j.appender.stdout.layout=org.apache.log4j.PatternLayout
log4j.appender.stdout.layout.ConversionPattern=%5p [%t] - %m%n
mybatis-cfg.xml
<?xml version="1.0" encoding="UTF-8" ?>
<!DOCTYPE configuration
PUBLIC "-//mybatis.org//DTD Config 3.0//EN"
"http://mybatis.org/dtd/mybatis-3-config.dtd">
<configuration>
<properties resource="db.properties"/>
<settings>
<setting name="logImpl" value="LOG4J"/>
</settings>
<typeAliases>
<package name="xx.xx.domain"/>
</typeAliases>
<environments default="dev">
<environment id="dev">
<transactionManager type="JDBC"/>
<dataSource type="POOLED">
<property name="driver" value="${jdbc.driver}"/>
<property name="url" value="${jdbc.url}"/>
<property name="username" value="${jdbc.username}"/>
<property name="password" value="${jdbc.password}"/>
</dataSource>
</environment>
</environments>
<mappers>
<mapper resource="mapper/UserMapper.xml"/>
</mappers>
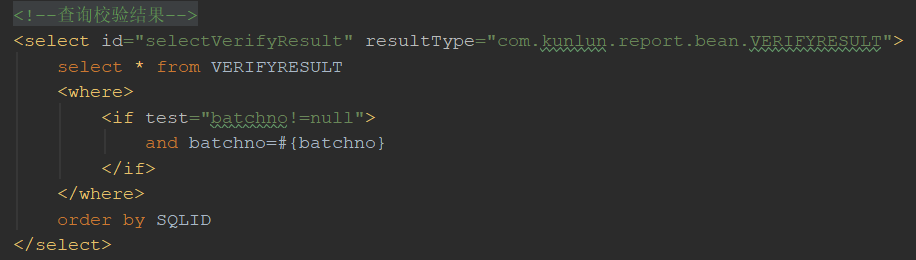
</configuration>1.2 数据库和创建表并插入3条基本数据
DROP DATABASE IF EXISTS `mybatis`;
CREATE DATABASE mybatis;
USE mybatis;
CREATE TABLE USER (
	id BIGINT ( 20 ) NOT NULL AUTO_INCREMENT,
	NAME VARCHAR ( 20 ),
	salary DECIMAL ( 8, 2 ),
PRIMARY KEY ( id )
);

INSERT INTO `user` VALUES (1, '张三', 800.00);
INSERT INTO `user` VALUES (2, '李四', 1000.00);
INSERT INTO `user` VALUES (3, '王五', 1200.00);
1.3 代码编写操作数据库
1.3.1 保存
1.3.1.1 保存单条记录
修改UserMapper.xml
保存操作并获取自动生成的主键
useGeneratedKeys=”true”
keyProperty=”主键” 获取主键值后给对象的哪一个属性值赋值。
<insert id="save" useGeneratedKeys="true" keyProperty="id">
    insert into mybatisdemo.user(name, salary) values(#{name},#{salary})
</insert>
UserMapper接口新增save方法
int save(User user);MyBatisDemoTest测试类新增testSave()方法
@Test
public void testSave(){
    UserMapper mapper = MybatisUtil.getMapper(UserMapper.class);
    mapper.save(new User("xiaoqinyun",new BigDecimal(2000)));
}
当数据库为Oracle时, 上述获取主键的方法就不适用了
由于Oracle没有自增主键这一说法, 主键自增是借用触发器实现的, 所以要获取主键id需要使用
<insert id="save">
    <selectKey resultType="INTEGER" order="BEFORE" keyProperty="userId">
        select seq_user.nextval as id from dual
    </selectKey>
    insert into mybatisdemo.user(name, salary) values(#{name},#{salary})
</insert>
1.3.1.2 保存多条记录
使用mysql保存多条记录的SQL语法如下
insert into mybatisdemo.user(name, salary) values (?,?) , (?,?)修改UserMapper.xml
<insert id="batchSave">
    insert into mybatisdemo.user(name, salary)
    values
    <foreach collection="list" item="user" separator=",">
        (#{user.name},#{user.salary})
    </foreach>
</insert>
UserMapper接口新增batchSave方法
int batchSave(List<User> userList);MyBatisDemoTest测试类新增testBatchSave()方法
@Test
public void testBatchSave(){
    UserMapper mapper = MybatisUtil.getMapper(UserMapper.class);

    List<User> userList = new ArrayList<>();
    userList.add(new User("Bob",new BigDecimal(3000)));
    userList.add(new User("Jack",new BigDecimal(4000)));

    mapper.batchSave(userList);
}
1.3.2 修改
1.3.2.1 普通修改(根据主键修改)
修改UserMapper.xml
<update id="update">
    update mybatisdemo.user set name = #{name},salary = #{salary} where id = #{id}
</update>
UserMapper接口新增update方法
int update(User user);MyBatisDemoTest测试类新增testUpdate()方法
@Test
public void testUpdate(){
    UserMapper mapper = MybatisUtil.getMapper(UserMapper.class);
    User user = new User(17L,"xiaoqin",new BigDecimal("5000"));
    mapper.update(user);
}
1.3.2.2 如果传入的对象的属性为空,则默认不修改原来数据库中对应的属性
只需要修改UserMapper.xml中的update方法即可
set 元素能根据set 中的sql 动态的去掉最后的逗号,并在前面添加set 关键字
<update id="update">
    update mybatisdemo.user
    <set>
        <if test="name!=null and name!=''">
            name = #{name},
        </if>
        <if test="name!=null and name!=''">
            name = #{name},
        </if>
    </set>
    where id = #{id}
</update>
1.3.3 删除
*注意: 有些业务数据的删除并不是真实的将数据删除, 而是在表中维护一个标志位存储数据是否被删除的状态. 不把数据删除的原因在于方便后期做数据分析, 另外删除容易导致索引失效. 所以, 会看到一个删除操作最后在后台写的是update而不是delete
修改UserMapper.xml
<delete id="deleteById">
    delete from mybatisdemo.user where id = #{id}
</delete>
UserMapper接口新增deleteById方法
int deleteById(Long id);MyBatisDemoTest测试类新增testDeleteById ()方法
@Test
public void testDeleteById(){
    UserMapper mapper = MybatisUtil.getMapper(UserMapper.class);
    mapper.deleteById(18L);
}
1.3.4 查询
查询操作必须要指定resultType或resultMap,配置完类型别名之后resultType可以简写
在mybatis-cfg.xml中配置类型别名的代码
<typeAliases>
    <package name="com.parkour.mybatis.domain"/>
</typeAliases>
1.3.4.1 查询单条数据
修改UserMapper.xml
<select id="selectOne" resultType="User">
    select * from mybatisdemo.user where id = #{id}
</select>
UserMapper接口新增selectOne方法
User selectOne(Long id);MyBatisDemoTest测试类新增testSelectOne ()方法
@Test
public void testSelectOne(){
    UserMapper userMapper = MybatisUtil.getMapper(UserMapper.class);
    User user = userMapper.selectOne(1L);
    System.out.println(user);
}
1.3.4.2 查询多条数据
修改UserMapper.xml
<select id="selectAll" resultType="User">
    select * from mybatisdemo.user
</select>
UserMapper接口新增selectAll方法
User selectAll();MyBatisDemoTest测试类新增testSelectAll ()方法
@Test
public void testSelectAll(){
    UserMapper userMapper = MybatisUtil.getMapper(UserMapper.class);
    User userList = userMapper.selectAll();
    System.out.println(userList);
}
第2章 MyBatis常用配置
2.1 别名配置
修改mybatis-config.xml 文件:
给一个包(包含子包)中所有的类起别名。
<package name="cn.wolfcode.mybatis"/>如果一个项目下两个不同包下有相同的类,可以在类上使用@Alias注解指定别名,以区分这两个不同包下的同名类
2.1.1 系统自带别名
| 映射的类型 | 别名 |
|---|---|
| int | _int |
| Integer | int |
| Long | long |
| String | string |
| Double | double |
| Boolean | boolean |
| Date | date |
| Bigdecimal | bigdecimal |
| map | Map |
| hashmap | HashMap |
| list | List |
| arraylist | ArrayList |
2.1.2 别名的应用
2.1.2.1 查询结果总数
<select id="queryCount" resultType="int">
    SELECT count(*) FROM t_user
</select>
2.1.2.2 将结果集封装成一个map并返回
<select id="queryMap" resultType="map">
    SELECT id AS uid,name AS uname,salary AS usalary FROM t_user
</select>
2.2 resultMap处理表中的列名和对象中的属性名不匹配的问题
修改UserMapper.xml
<resultMap id="baseResultMap" type="User">
    <id column="u_id" property="id"/>
    <result column="u_name" property="name"/>
    <result column="u_salary" property="salary"/>
</resultMap>

<select id="queryOne" resultMap="baseResultMap">
    select * from mybatisdemo.t_user where u_id = #{id}
</select>
2.3 @Param 注解处理多个或一个参数
不管参数是一个还是多个,都统一使用@Param处理参数
Mapper接口
User login(@Param("username") String username, @Param("password") String password);Mapper文件
<select id="login" resultType="User">
    select * from mybatisdemo.user where username = #{username} and password = #{password}
</select>
2.4 传递集合或数组参数的处理
当传递一个List 对象或数组对象参数给MyBatis 时,MyBatis 会自动把它包装到一个Map 中,
此时List 对象会以list 作为key,数组对象会以array 作为key,也可以使用Param 注解设置key 名。
在动态SQL 中foreach 元素再讲。
第3章 动态SQL
3.1 if
需求: 查询工资高于等于1000 的员工
<select id="query" resultType="Employee">
    select id,name,sn,salary from employee where 1 = 1
    <if test="minSalary!=null and minSalary!=’’">
        and salary >= #{minSalary}
    </if>
</select>
3.2 where
where 元素,如果查询条件没有”WHERE“关键字,则自动在查询条件之前插入”WHERE“。
如果查询条件以“AND”或“OR”开头,那么就会使用WHERE 关键字替换
需求:查询工资在1000~2000 的员工
<select id="query" resultType="Employee">
select id,name,sn,salary from employee
<where>
<if test="minSalary!=null">
and salary >= #{minSalary}
</if>
<if test="maxSalary!=null">
and salary <= #{maxSalary}
</if>
</where>
</select>3.3 choose… when… otherwise
choose… when… otherwise类似if-else语句
需求: 根据id查询员工,如果id为空则根据名字查询员工
<select id="query" resultType="Employee">
    SELECT id,name,salary FROM employee WHERE 1 = 1
    <choose>
        <when test="id != null and id != ''">
            AND id = #{id}
        </when>
        <otherwise>
            AND name = #{name}
        </otherwise>
    </choose>
</select>
3.4 set
set 元素同where 元素相似,也能根据set 中的sql 动态的去掉最后的逗号,并在前面添加set 关键字,
如果没有内容,也会选择忽略set 语句
<update id="update">
    UPDATE employee
    <set>
        <if test="name!=null">
            name = #{name},
        </if>
        <if test="salary!=null">
            salary = #{salary},
        </if>
    </set>
    WHERE id = #{id}
</update>
3.5 foreach
foreach元素用于迭代数组或集合
所有SQL中有foreach遍历的都需要先判断list的大小是否大于0,
大于0才遍历, 否则查询is null
<!-- 根据ID列表查询 -->
<select id="selectAllByIds" resultMap="UserMap">
    SELECT id,name,age,birthday,salary FROM mybatis.user
    <where>
        <choose>
            <when test="idsList.size()>0">
                and id in
                <foreach collection="idsList" item="id" open="(" separator="," close=")">
                    #{id}
                </foreach>
            </when>
            <otherwise>
                and id is null
            </otherwise>
        </choose>
    </where>
</select>
3.5.1 批量删除
需求: 删除id为10,20,30号的员工
Mapper接口
void batchDelete(@Param(“ids”)Long[] ids);Mapper文件
<delete id="batchDelete">
    DELETE FROM employee WHERE id IN
    <foreach collection="ids" open="(" close=")" separator="," item="id">
        #{id}
    </foreach>
</delete>
3.5.2 批量插入(MySQL版本)
MySQL批量插入的语法如下
insert into user(name,salary) values ('小A',800.00),('小B',700.00),('小C',600.00)Mapper接口
void batchInsert(@Param(“userList”) List<User> userList);Mapper文件
<insert id="batchInsert">
    INSERT INTO user (name,salary) VALUES
    <foreach collection="userList" separator="," item="user">
        (#{user.name},#{user.salary})
    </foreach>
</insert>
3.5.3 批量插入(Oracle版本)
Oracle批量插入语法如下
(因为Oracle主键自增需要使用到序列,所以id也要写上,并且数据库中还要先创建对应的序列才行)
insert into user(id,name,salary)
select user_sequence.nextval, u.* from
( select ‘张三’, 200.00 from dual
union all
select ‘李四’, 400.00 from dual
) u
Mapper接口
void batchInsert(@Param(“userList”) List<User> userList);Mapper文件
<insert id="batchInsert">
    INSERT INTO user (id,name,salary)
    select user_sequence.nextval,u.* from
    (
        <foreach collection="userList" separator="union all" item="user">
            select #{user.name},#{user.salary} from dual
        </foreach>
    ) u
</insert>
3.6 bind
bind可以用来绑定一个变量并且在之后使用
需求: 查询名字中包含某个keyword的用户
方式一: 使用concat函数
<select id="query" resultType="User">
    select * from user
    <where>
        <if test="name != null">
            and name like concat('%',#{keyword},'%')
        </if>
    </where>
</select>
方式二: 使用bind元素
使用bind绑定一个变量, 注意: bind是单标签元素
<select id="query" resultType="User">
    select * from user
    <where>
        <if test="name != null">
            <bind name="keywordLike" value="'%'+keyword+'%'"/>
            and name like #{keywordLike}
        </if>
    </where>
</select>
3.7 sql和include
sql元素用来包含一段可以重复使用的SQL片段
使用include指令可以引入重复的SQL片段
比如: 在高级查询和分页查询中使用
<!--多个查询共同使用的SQL-->
<sql id="base_where">
<where>
<if test="keyword!=null">
<bind name="bindkeyword" value="'%'+keyword+'%'"/>
and name like #{bindkeyword}
</if>
<if test="minSalary!=null">
and salary >= #{minSalary}
</if>
<if test="maxSalary!=null">
and salary <= #{maxSalary}
</if>
</where>
</sql>
<select id="queryForList" resultType="User">
select * from mybatisdemo.user
<include refid="base_where"/>
<if test="pageSize>0"> <!--如果pageSize>0才做分页,否则查询所有-->
limit #{start},#{pageSize}
</if>
</select>
<select id="queryForCount" resultType="int">
select count(1) from mybatisdemo.user
<include refid="base_where"/>
</select>第4章 高级查询和分页查询
4.1 高级查询
所谓的高级查询就是在查询时带上多种不同条件进行的查询,比如在查询条件中包含模糊查询和范围查询等
需求: 1.按照user的name中是否包含某个关键字进行查询 2.按照工资范围进行查询
比如: 查询user姓名中包含有”李”字的, 并且工资在1000到5000范围内的所有user
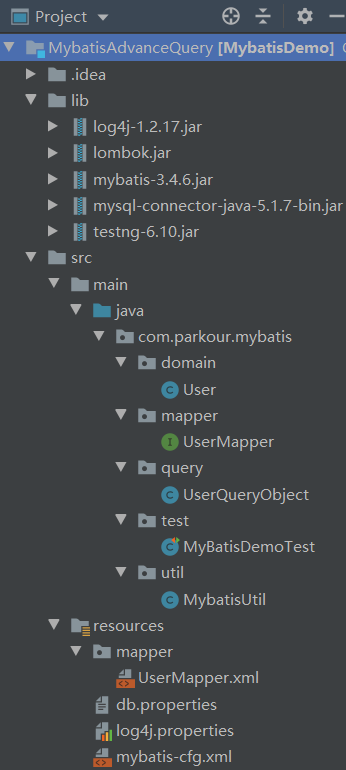
4.1.1项目结构
4.1.2 创建查询条件对象UserQueryObject
/**
 * 封装user的高级查询信息
 */
@Getter
@Setter
public class UserQueryObject {

    private String keyword;
    private BigDecimal minSalary;
    private BigDecimal maxSalary;

    public void setKeyword(String keyword) {
        this.keyword = empty2null(keyword);
    }

    /**
     * 对字符串的处理方法
     * 如果传入的字符串对象为空 或 为空字符串 或 字符串全部由空格组成 则返回null 否则返回该字符串本身
     */
    private String empty2null(String str){
        return str!=null && !"".equals(str.trim())?str:null;
    }
}
4.1.3 UserMapper接口新增advanceQuery方法,传入查询对象
//高级查询
List<User> advanceQuery(UserQueryObject userQueryObject);
4.1.4 UserMapper.xml中新增advanceQuery方法
<select id="advanceQuery" resultType="User">
select * from mybatisdemo.user
<where>
<if test="keyword!=null">
<bind name="bindkeyword" value="'%'+keyword+'%'"/>
and name like #{bindkeyword}
</if>
<if test="minSalary!=null">
and salary >= #{minSalary}
</if>
<if test="maxSalary!=null">
and salary <= #{maxSalary}
</if>
</where>
</select>4.1.5 创建查询对象设置查询条件进行查询
public class MyBatisDemoTest {

    private UserMapper userMapper = MybatisUtil.getMapper(UserMapper.class);

    /* 需求:
     * 1.按照user的name是否包含某个关键字来查询
     * 2.按照user的工资范围进行查询
     */
    @Test
    public void advanceQueryTest(){
        //封装查询对象
        UserQueryObject queryObject = new UserQueryObject();
        queryObject.setKeyword("李");
        queryObject.setMinSalary(new BigDecimal(1000));
        queryObject.setMaxSalary(new BigDecimal(5000));

        List<User> users = userMapper.advanceQuery(queryObject);
        System.out.println(users);
    }

}
4.2 分页查询(MySQL版)
MySQL的分页主要是通过limit关键字实现的,语法如下
-- limit 查询第n页的起始记录start,每页显示记录数pageSize
-- start=(currentPage-1)*pageSize
select * from user limit 0,3; -- 查询第一页
select * from user limit 3,3; -- 查询第二页
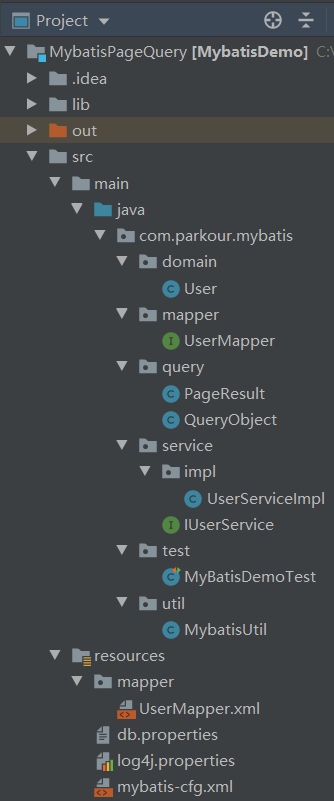
select * from user limit 6,3; -- 查询第三页4.2.1 项目结构
4.2.2 创建PageResult封装分页查询结果和参数
/**
 * 封装分页查询结果和参数
 */
@Getter
public class PageResult {
    //需要传入的参数
    private List<?> result; //每一页的结果集
    private int totalCount; //记录总数
    private int currentPage = 1; //当前页,默认查询第一页
    private int pageSize; //每页显示记录数
    //需要通过计算获取的参数
    private int prevPage; //前一页
    private int nextPage; //后一页
    private int totalPage; //总页码
    public PageResult(List<?> result, int totalCount, int currentPage, int pageSize) {
        this.result = result;
        this.totalCount = totalCount;
        this.currentPage = currentPage;
        this.pageSize = pageSize;

        this.totalPage = totalCount%pageSize == 0?(totalCount/pageSize):(totalCount/pageSize)+1;
        this.prevPage = currentPage==1?1:currentPage-1;
        this.nextPage = currentPage==totalPage?currentPage:currentPage+1;

        currentPage = currentPage>totalPage?totalPage:currentPage;
    }
}
4.2.3 创建QueryObject封装分页查询条件
@Getter
@Setter
public class QueryObject {
    private int currentPage = 1; //由前端传入,查询第几页,默认查询第一页
    private int pageSize = 3; //由前端传入,每页记录数,默认每页显示3条记录
    /**获取分页的limit的第一个参数
     *
     * MySQL分页查询语法:
     * select * from user limit (currentPage-1)*pageSize,pageSize
     */
    public int getStart(){
        return (currentPage-1)*pageSize;
    }

}
4.2.4 UserMapper接口增加查询结果集 和 查询结果总数的方法
//查询结果集
List<User> queryForList(QueryObject qo);

//查询结果总数
int queryForCount(QueryObject qo);
4.2.5 UserMapper.xml文件编写查询结果集SQL 和 查询结果总数的SQL
<select id="queryForList" resultType="User">
    select * from user
    <if test="pageSize>0"> <!--如果pageSize>0才做分页,否则查询所有-->
        limit #{start},#{pageSize}
    </if>
</select>

<select id="queryForCount" resultType="int">
    select count(1) from user
</select>
4.2.6 编写查询服务接口IUserService
public interface IUserService {
    PageResult query(QueryObject qo);
}
4.2.7 编写查询服务接口实现类
public class UserServiceImpl implements IUserService {

    UserMapper userMapper = MybatisUtil.getMapper(UserMapper.class);

    @Override
    public PageResult query(QueryObject qo) {
        int totalCount = userMapper.queryForCount(qo);

        //如果查询结果总数为0,则返回一个空的PageResult对象
        if (totalCount==0){
            return new PageResult(Collections.emptyList(),0,qo.getCurrentPage(),qo.getPageSize());
        }

        List<User> userList = userMapper.queryForList(qo);

        return new PageResult(userList,totalCount,qo.getCurrentPage(),qo.getPageSize());

    }
}
4.2.8 测试分页查询
public class MyBatisDemoTest {

    private UserMapper userMapper = MybatisUtil.getMapper(UserMapper.class);

    /**
     * 测试分页查询
     */
    @Test
    public void queryForPageTest(){
        //封装查询对象
        QueryObject queryObject = new QueryObject();

        //设置查询第1页和每页显示2条记录
        queryObject.setCurrentPage(1);
        queryObject.setPageSize(2);

        IUserService userService = new UserServiceImpl();

        PageResult pageResult = userService.query(queryObject);
        List<?> result = pageResult.getResult();
        System.out.println(result);
    }

}
4.3 分页查询(Oracle版)
Oracle中要实现分页查询,需要借助伪列rownum实现,语法如下
/*
需求: 分页查询emps表中的数据, 每页显示5条记录
Oracle中要实现分页查询,需要借助伪列rownum
  内层查询中 where rownum<=currentPage*pageSize
  外层查询中 where rn>=(currentPage-1)*pageSize+1
*/
-- 查询第一页
select * from
    (SELECT e.*,rownum rn from EMPS e where rownum<=5)
where rn>=1;

-- 查询第二页
select * from
    (SELECT e.*,rownum rn from EMPS e where rownum<=10)
where rn>=6;

-- 查询第三页
select * from
    (SELECT e.*,rownum rn from EMPS e where rownum<=15)
where rn>=11;
4.4 带分页的高级查询
4.5 PageHelper分页插件
1. pagehelper插件, 分页出现混乱的问题,在分页代码之后的查询必须要排序
第5章 对象关系映射
5.1 多对一
5.1.1 保存操作
5.1.2 内联映射
5.1.3 额外SQL
5.1.4 1+N问题
5.2 延迟加载
5.3 关联对象配置选择
5.4 多对多
5.4.1 保存操作
5.4.2 查询操作
5.4.3 删除操作
第6章 MyBatis其他知识点
6.1 #和$
使用#传递的参数会被单引号引起来, 使用$会将参数直接作为SQL语句的一部分
select * from mybatisdemo.user where salary > #{salary} order by ${orderby}

-- select * from mybatisdemo.user where salary > ‘1000.00’ order by name
6.2 附件: MyBatis相关配置
6.2.1 mybatis-cfg.xml文件模板(可通过idea直接右键新建)
<?xml version="1.0" encoding="UTF-8" ?>
<!DOCTYPE configuration
        PUBLIC "-//mybatis.org//DTD Config 3.0//EN"
        "http://mybatis.org/dtd/mybatis-3-config.dtd">
<configuration>
    <properties resource="db.properties"/>
    <settings>
        <setting name="logImpl" value="LOG4J"/>
    </settings>
    <typeAliases>
        <package name="xx.xx.domain"/>
    </typeAliases>
    <environments default="dev">
        <environment id="dev">
            <transactionManager type="JDBC"/>
            <dataSource type="POOLED">
                <property name="driver" value="${jdbc.driver}"/>
                <property name="url" value="${jdbc.url}"/>
                <property name="username" value="${jdbc.username}"/>
                <property name="password" value="${jdbc.password}"/>
            </dataSource>
        </environment>
    </environments>
    <mappers>
        <mapper resource="com/xx/xxMapper.xml"/>
    </mappers>
</configuration>
6.2.2 Xxmapper.xml文件模板(也通过idea直接右键新建)
<?xml version="1.0" encoding="UTF-8" ?>
<!DOCTYPE mapper
        PUBLIC "-//mybatis.org//DTD Mapper 3.0//EN"
        "http://mybatis.org/dtd/mybatis-3-mapper.dtd">
<mapper namespace="">

</mapper>
6.2.3 db.properties文件模板(也通过idea直接右键新建)
jdbc.driver=com.mysql.jdbc.Driver
jdbc.url=jdbc:mysql://localhost:3306/mybatisdemo
jdbc.username=root
jdbc.password=root
6.2.4 log4j.properties文件模板(也通过idea直接右键新建)
关于log4j.properties配置的详细解释参见 Log4j&Logback.md
log4j.rootLogger=ERROR,stdout
log4j.logger.whichPackage=TRACE
log4j.appender.stdout=org.apache.log4j.ConsoleAppender
log4j.appender.stdout.layout=org.apache.log4j.PatternLayout
log4j.appender.stdout.layout.ConversionPattern=%5p [%t] - %m%n
6.2.5 MybatisUtil类
public class MybatisUtil {
    private MybatisUtil() {
    }

    private static SqlSessionFactory sqlSessionFactory;

    static {
        InputStream config = null;
        try {
            config = Resources.getResourceAsStream("mybatis-config.xml");
        } catch (IOException e) {
            e.printStackTrace();
        }
        sqlSessionFactory = new SqlSessionFactoryBuilder().build(config);
    }

    public static SqlSession getSqlSession(){
        return sqlSessionFactory.openSession(true);
    }

    public static <T> T  getMapper(Class<T> mapperClass){
        return getSqlSession().getMapper(mapperClass);
    }

}
4.3 MyBatis相关学习资源
MyBatis中文文档https://mybatis.org/mybatis-3/zh/getting-started.html
MyBatis与Spring(包括SpringBoot)整合的中文文档http://mybatis.org/spring/zh/index.html
第4章 MyBatisGenerator代码生成器
第4章 MyBatis整合Spring
第5章 MyBatis整合SpringBoot
1. SpringBoot整合Mybatis,TypeAliases配置失败的问题
问题描述
在应用MyBatis时,使用对象关系映射,将对象和Aliase映射起来。
在Mybatis的文档明确写出,如果你没有明确定义实体类的Aliase,框架会自动将Class Name自动作为别名。
那么问题来了,当使用java -jar xxx.jar启动的时候,会报出以下错误,
Error resolving class. Cause: org.apache.ibatis.type.TypeException: Could not resolve type alias 'XXXXX'.Cause: java.lang.ClassNotFoundException: Cannot find class: XXXXX从异常信息来看,明显就是无法从本地检索到alise对应的类,并最终导致sqlSessionFactory等初始化失败。而且诡异的是,直接在Idea中启动是没有问题的,启动jar包才会出现这个问题
解决方法
参考博主A_Beaver的文章,原来mybatis的facroty需要加载SpringBoot独特的虚拟文件系统,才能识别类路径
public SpringBootVFS() {
    this.resourceResolver = new PathMatchingResourcePatternResolver(getClass().getClassLoader());
}
从以上代码看,其实是通过PathMatchingResourcePatternResolver实现资源的加载
修复该问题只需要在mybatis的配置类中,设置一下factory即可
@Bean(name = "masterSqlSessionFactory")
@Primary
public SqlSessionFactory sqlSessionFactory(@Qualifier("masterDataSource") DataSource dataSource) throws Exception {
    SqlSessionFactoryBean bean = new SqlSessionFactoryBean();
    bean.setDataSource(dataSource);
    bean.setVfs(SpringBootVFS.class);//设置SpringBootVFS
    bean.setTypeAliasesPackage("com.fulan.domain.red");
    // ...
}
2.SpringBoot+Mybatis+MySql整合
-- 首先创建数据库
CREATE DATABASE test;
-- 建表以及插入初始数据(sql是从navicat中导出的)
CREATE TABLE `user` (
  `id` int(11) NOT NULL AUTO_INCREMENT,
  `user_name` varchar(255) NOT NULL,
  `user_password` varchar(255) DEFAULT NULL,
  PRIMARY KEY (`id`)
) ENGINE=InnoDB AUTO_INCREMENT=13 DEFAULT CHARSET=latin1;

INSERT INTO `user` VALUES (1, 'dalaoyang', '13');
INSERT INTO `user` VALUES (2, 'xiaoli', '123');
INSERT INTO `user` VALUES (3, 'xiaoxiongmao', '123');
下图为项目目录结构,
java—
controller包负责测试整合
dao包作为数据操作层
entity作为数据实体类
resources—
mapper写dao层对应实现的sql
mybatis里面是mybatis配置,包含typeAlias等等
sql里面放的是上面写的建表数据及sql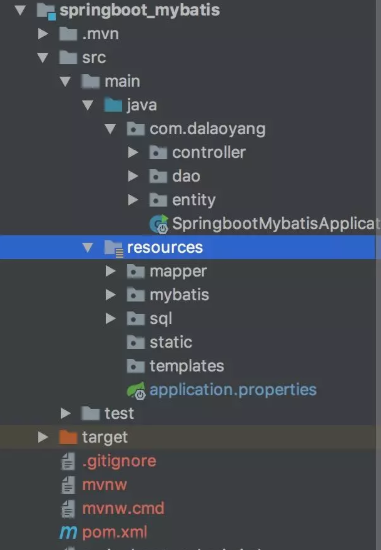
接下来直接上代码,启动类没有修改,代码如下
package com.dalaoyang;
import org.mybatis.spring.annotation.MapperScan;import org.springframework.boot.SpringApplication;import org.springframework.boot.autoconfigure.EnableAutoConfiguration;import org.springframework.boot.autoconfigure.SpringBootApplication;import org.springframework.boot.autoconfigure.jdbc.DataSourceAutoConfiguration;
@SpringBootApplicationpublic class SpringbootMybatisApplication {
    public static void main(String[] args) {
        SpringApplication.run(SpringbootMybatisApplication.class, args);
    }
}
application.properties包含了数据库配置,mybatis配置,代码如下:
##端口号
server.port=8888
##检查 mybatis 配置是否存在,一般命名为 mybatis-config.xml
mybatis.check-config-location =true##配置文件位置
mybatis.config-location=classpath:mybatis/mybatis-config.xml## mapper xml 文件地址
mybatis.mapper-locations=classpath*:mapper/*Mapper.xml##日志级别
logging.level.com.yang.dao=debug
##数据库url
spring.datasource.url=jdbc:mysql://localhost:3306/test?characterEncoding=utf8&useSSL=false##数据库用户名
spring.datasource.username=root##数据库密码
spring.datasource.password=root##数据库驱动
spring.datasource.driver-class-name=com.mysql.jdbc.Driver
实体类User
package com.dalaoyang.entity;
import org.apache.ibatis.type.Alias;
@Alias("user")
public class User {
    private int id;
    private String user_name;
    private String user_password;
    public User(String user_name, String user_password) {
        this.user_name = user_name;
        this.user_password = user_password;
    }
    public User(int id, String user_name, String user_password) {
        this.id = id;
        this.user_name = user_name;
        this.user_password = user_password;
    }
    public int getId() {
        return id;
    }
    public void setId(int id) {
        this.id = id;
    }
    public String getUser_name() {
        return user_name;
    }
    public void setUser_name(String user_name) {
        this.user_name = user_name;
    }
    public String getUser_password() {
        return user_password;
    }
    public void setUser_password(String user_password) {
        this.user_password = user_password;
    }
}
dao层代码
@Mapperpublic interface UserMapper {
    User findUserByUsername(String username);
    void updateUserByUsername(User user);
    void deleteUserByUsername(String username);
    void saveUser(User user);
    List<User> getUserList();
}
UserMapper.xml代码
<?xml version="1.0" encoding="UTF-8" ?><!DOCTYPE mapper PUBLIC "-//mybatis.org//DTD Mapper 3.0//EN" "http://mybatis.org/dtd/mybatis-3-mapper.dtd" ><mapper namespace="com.dalaoyang.dao.UserMapper">
    <resultMap id="user" type="com.dalaoyang.entity.User"/>
    <parameterMap id="user" type="com.dalaoyang.entity.User"/>
    <select id="findUserByUsername" parameterType="String" resultMap="user">
        SELECT * FROM user
        WHERE user_name=#{1}
    </select>
    <update id="updateUserByUsername" parameterMap="user">
        UPDATE USER SET USER_PASSWORD=#{user_password} WHERE USER_NAME=#{user_name}
    </update>
    <delete id="deleteUserByUsername" parameterType="String">
        DELETE FROM USER WHERE USER_NAME=#{1}
    </delete>
    <!-- 使用alias自定义的parameterType-->
    <insert id="saveUser" parameterType="user">
        INSERT INTO USER (user_password,user_name) VALUES (#{user_password},#{user_name})
    </insert>
    <select id="getUserList" resultMap="user">
        SELECT  * FROM USER
    </select></mapper>
mybatis-config.xml
<?xml version="1.0" encoding="UTF-8"?><!DOCTYPE configuration PUBLIC "-//mybatis.org//DTD SQL Map Config 3.0//EN"
        "http://mybatis.org/dtd/mybatis-3-config.dtd"><configuration>
    <typeAliases>
        <typeAlias alias="Integer" type="java.lang.Integer" />
        <typeAlias alias="Long" type="java.lang.Long" />
        <typeAlias alias="HashMap" type="java.util.HashMap" />
        <typeAlias alias="LinkedHashMap" type="java.util.LinkedHashMap" />
        <typeAlias alias="ArrayList" type="java.util.ArrayList" />
        <typeAlias alias="LinkedList" type="java.util.LinkedList" />
        <typeAlias alias="user" type="com.dalaoyang.entity.User"/>
    </typeAliases></configuration>
pom文件
<?xml version="1.0" encoding="UTF-8"?><project xmlns="http://maven.apache.org/POM/4.0.0" xmlns:xsi="http://www.w3.org/2001/XMLSchema-instance"
         xsi:schemaLocation="http://maven.apache.org/POM/4.0.0 http://maven.apache.org/xsd/maven-4.0.0.xsd">
    <modelVersion>4.0.0</modelVersion>
    <groupId>com.dalaoyang</groupId>
    <artifactId>springboot_mybatis</artifactId>
    <version>0.0.1-SNAPSHOT</version>
    <packaging>jar</packaging>
    <name>springboot_mybatis</name>
    <description>springboot_mybatis</description>
    <parent>
        <groupId>org.springframework.boot</groupId>
        <artifactId>spring-boot-starter-parent</artifactId>
        <version>1.5.9.RELEASE</version>
        <relativePath/> <!-- lookup parent from repository -->
    </parent>
    <properties>
        <project.build.sourceEncoding>UTF-8</project.build.sourceEncoding>
        <project.reporting.outputEncoding>UTF-8</project.reporting.outputEncoding>
        <java.version>1.8</java.version>
    </properties>
    <dependencies>
        <dependency>
            <groupId>org.springframework.boot</groupId>
            <artifactId>spring-boot-starter-web</artifactId>
        </dependency>
        <dependency>
            <groupId>org.mybatis.spring.boot</groupId>
            <artifactId>mybatis-spring-boot-starter</artifactId>
            <version>1.3.1</version>
        </dependency>
        <dependency>
            <groupId>org.springframework.boot</groupId>
            <artifactId>spring-boot-devtools</artifactId>
            <scope>runtime</scope>
        </dependency>
        <dependency>
            <groupId>mysql</groupId>
            <artifactId>mysql-connector-java</artifactId>
            <scope>runtime</scope>
        </dependency>
        <dependency>
            <groupId>org.springframework.boot</groupId>
            <artifactId>spring-boot-starter-test</artifactId>
            <scope>test</scope>
        </dependency>
    </dependencies>
    <build>
        <plugins>
            <plugin>
                <groupId>org.springframework.boot</groupId>
                <artifactId>spring-boot-maven-plugin</artifactId>
            </plugin>
        </plugins>
    </build>
</project>
UserController
@RestControllerpublic class UserController {
    @Autowired
    UserMapper userMapper;
    //http://localhost:8888/getUser?username=xiaoli2
    @RequestMapping("/getUser")
    public String getUser(String username){
        User user =userMapper.findUserByUsername(username);
        return user!=null ? username+"的密码是:"+user.getUser_password():"不存在用户名为"+username+"的用户";
    }
    //http://localhost:8888/updateUser?username=xiaoli2&password=123
    @RequestMapping("/updateUser")
    public String updateUser(String password,String username){
        User user = new User(username,password);
        userMapper.updateUserByUsername(user);
        return "success!";
    }
    //http://localhost:8888/addUser?username=xiaoli2&password=123
    @RequestMapping("/addUser")
    public String addUser(String username,String password){
        User user = new User(username,password);
        userMapper.saveUser(user);
        return "success!";
    }
    //http://localhost:8888/addUser?username=xiaoli2
    @RequestMapping("/deleteUser")
    public String deleteUser(String username){
        userMapper.deleteUserByUsername(username);
        return "success!";
    }
    //http://localhost:8888/getUserList
    @RequestMapping("/getUserList")
    public List getUserList(String username, String password){
        return userMapper.getUserList();
    }
}
启动项目,访问controller上面对应的注释上的地址即可以测试,
其中包含了简单的增删改查,SpringBoot整合Mybatis就这样完成了。
3.SpringBoot+Mybatis+PageHelper整合
pom文件中加入pagehelper依赖
<!--pagehelper -->
<dependency>
    <groupId>com.github.pagehelper</groupId>
    <artifactId>pagehelper-spring-boot-starter</artifactId>
    <version>1.2.5</version>
</dependency>
配置文件增加PageHelper的配置,由于demo很简单,只用到了分页,所以没有增加其他配置,只设置了分页方言,完整代码如下:
##端口号
server.port=8888
##日志级别
logging.level.com.dalaoyang.dao.UserMapper=debug
##数据库url
spring.datasource.url=jdbc:mysql://localhost:3306/test?characterEncoding=utf8&useSSL=false##数据库用户名
spring.datasource.username=root##数据库密码
spring.datasource.password=root##数据库驱动
spring.datasource.driver-class-name=com.mysql.jdbc.Driver
#pagehelper分页插件配置
pagehelper.helperDialect=mysql
实体类User代码如下:
@Alias("user")public class User {
    private int id;
    private String user_name;
    private String user_password;
    public User(String user_name, String user_password) {
        this.user_name = user_name;
        this.user_password = user_password;
    }
    public User(int id, String user_name, String user_password) {
        this.id = id;
        this.user_name = user_name;
        this.user_password = user_password;
    }
    public int getId() {
        return id;
    }
    public void setId(int id) {
        this.id = id;
    }
    public String getUser_name() {
        return user_name;
    }
    public void setUser_name(String user_name) {
        this.user_name = user_name;
    }
    public String getUser_password() {
        return user_password;
    }
    public void setUser_password(String user_password) {
        this.user_password = user_password;
    }
}
启动类代码如下:
@SpringBootApplicationpublic class SpringbootMybatisPagehelperApplication {
    public static void main(String[] args) {
        SpringApplication.run(SpringbootMybatisPagehelperApplication.class, args);
    }
}
新建一个UserMapper,之前介绍的整合mybatis是使用的mapper方式,本文选择使用注解方式,代码如下:
@Mapper
public interface UserMapper {
    @Select("SELECT * FROM USER")
    Page<User> getUserList();
}
使用controller作为测试,代码如下:
@RestControllerpublic class UserController {
    @Autowired
    UserMapper userMapper;
    //http://localhost:8888/getUserList?pageNum=1&pageSize=2
    @RequestMapping("/getUserList")
    public Page<User> getUserList(Integer pageNum, Integer pageSize){
        PageHelper.startPage(pageNum, pageSize);
        Page<User>  userList= userMapper.getUserList();
        return userList;
    }
}
到这里项目就完全创建完成了。
测试
浏览器访问http://localhost:8888/getUserList?pageNum=1&pageSize=2,结果如下:
控制台
第6章使用druid做连接池
第7章其他待分类
7.1 MALFORMED OGNL EXPRESSION: PARAM1.SHR != NULL问题解决方法
一次在开发过程中,发现报错Malformed OGNL expression: param1.shr != null
报错原因:
这是同事创建的表,其中shr字段表示“审核人”,我仔细查看了实体类、Mybatis配置文件,都没有错,后来才知道shr是Mybatis的保留关键字。
mybatis的保留关键字如下:
| 关键字 | 说明 |
|---|---|
| bor | 字符竖线的英文 |
| xor | 字符^的英文 |
| and | 字符&& |
| band | 字符& |
| eq | 字符== |
| neq | 字符!= |
| lt | 字符< |
| gt | 字符> |
| lte | 字符<= |
| gte | 字符>= |
| shl | 字符 << |
| shr | 字符>> |
| shr | 字符>>> |