maven的安装与配置
下载安装配置环境变量
下载maven安装好后配置MAVEN_HOME环境变量(配置到bin目录),
随便在任意位置打开一个cmd输入mvn -v测试maven是否安装成功,环境变量是否生效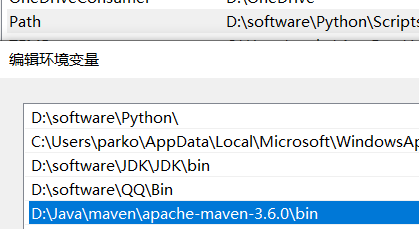

修改setting配置文件
修改本地仓库地址
<localRepository>D:\Java\maven\localRepository</localRepository>使用阿里云maven仓库,加速下载依赖
<mirrors>
     <mirror>
      <id>nexus-aliyun</id>
      <mirrorOf>*,!jeecg,!jeecg-snapshots</mirrorOf>
      <name>Nexus aliyun</name>
      <url>http://maven.aliyun.com/nexus/content/groups/public</url>
     </mirror>
</mirrors>
maven项目标准完整的目录结构
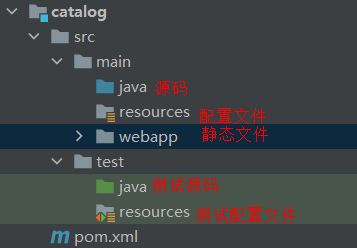
注意: 如果是普通的java项目, 那就没有webapp目录
maven常用命令
compile将项目java文件和resource下的配置文件编译后生成到target目录
test 一般选择跳过测试
clean 删除target目录
package 将项目按照pom文件中指定的打包方式进行打包并将打包后的文件生成到target目录下
install 将项目打包后安装到本地仓库供其他模块或项目调用
maven插件
maven编译插件
<!--插件配置-->
<build>
    <plugins>
        <!-- jdk1.8编译插件 -->
        <plugin>
            <groupId>org.apache.maven.plugins</groupId>
            <artifactId>maven-compiler-plugin</artifactId>
            <version>3.8.1</version>
            <configuration>
                <source>1.8</source>
                <target>1.8</target>
                <encoding>UTF-8</encoding>
            </configuration>
        </plugin>
    </plugins>
</build> 
tomcat插件
这个好像没必要配置,因为IDEA集成了tomcat
安装好后右边可以直接点击tomcat7:run运行该模块的项目
<!--插件配置-->
<build>
    <plugins>
        <!-- tomcat7插件 -->
        <plugin>
            <groupId>org.apache.tomcat.maven</groupId>
            <artifactId>tomcat7-maven-plugin</artifactId>
            <version>2.2</version>
            <configuration>
                <port>8080</port>
                <path>/</path>
                <uriEncoding>UTF-8</uriEncoding>
            </configuration>
        </plugin>
    </plugins>
</build>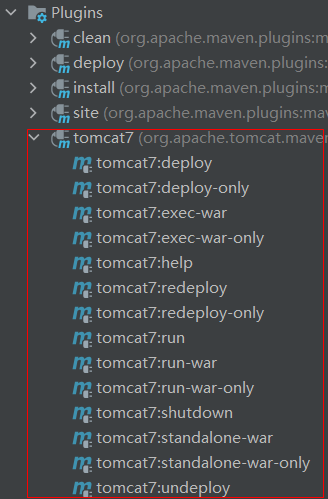
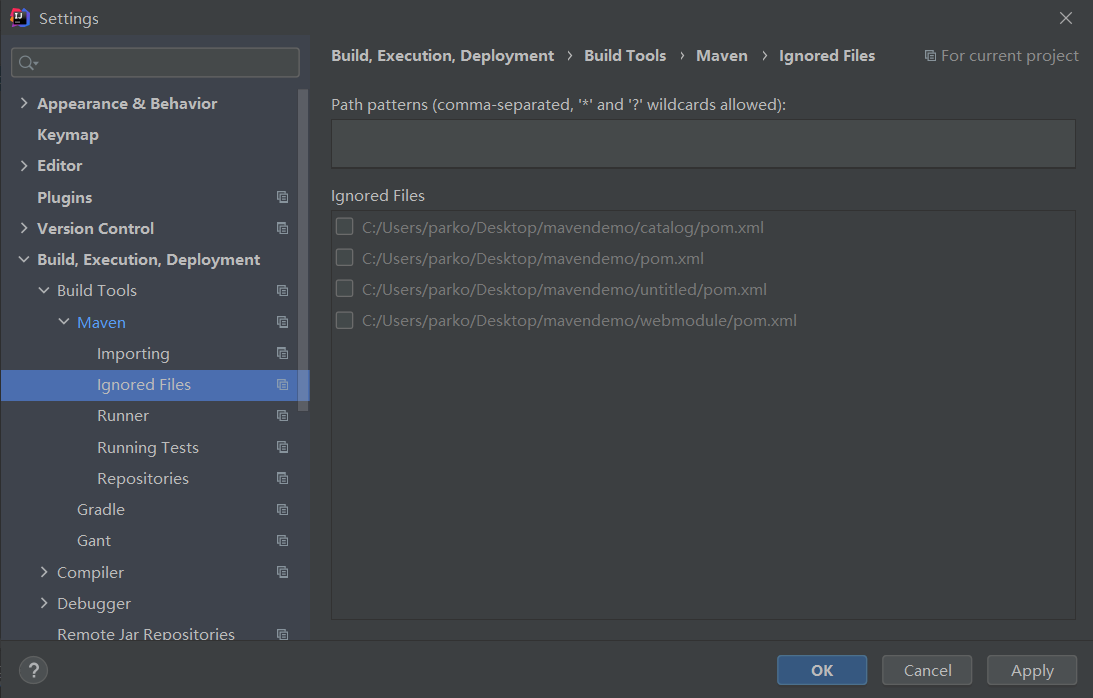
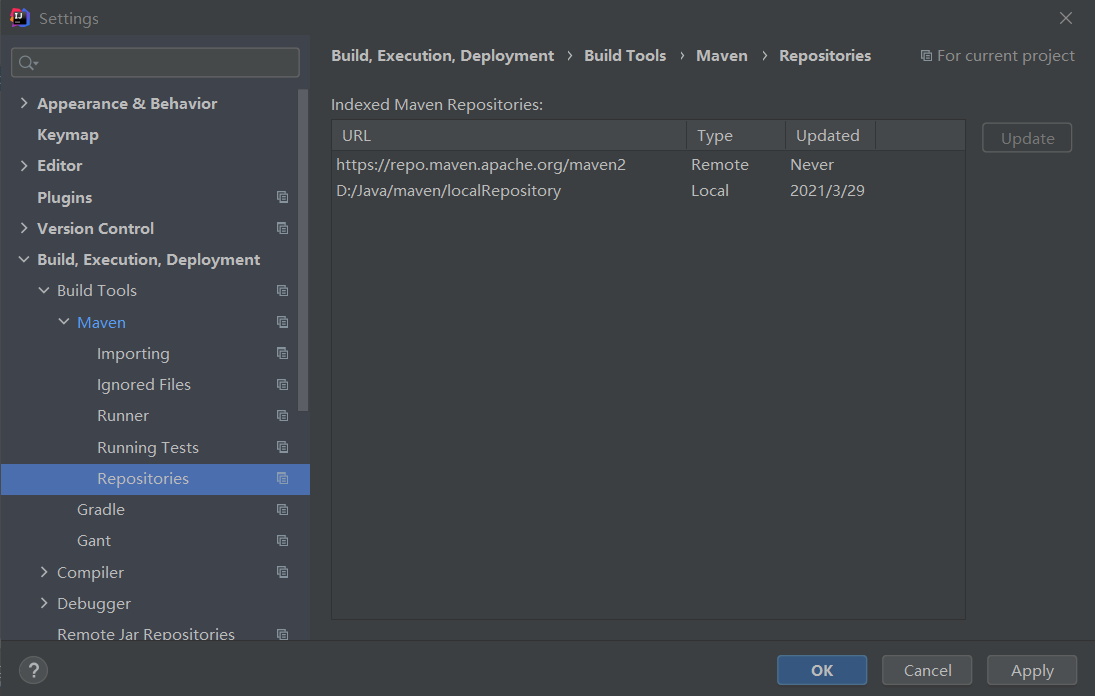
IDEA中maven的配置和常见图标所表达的意思
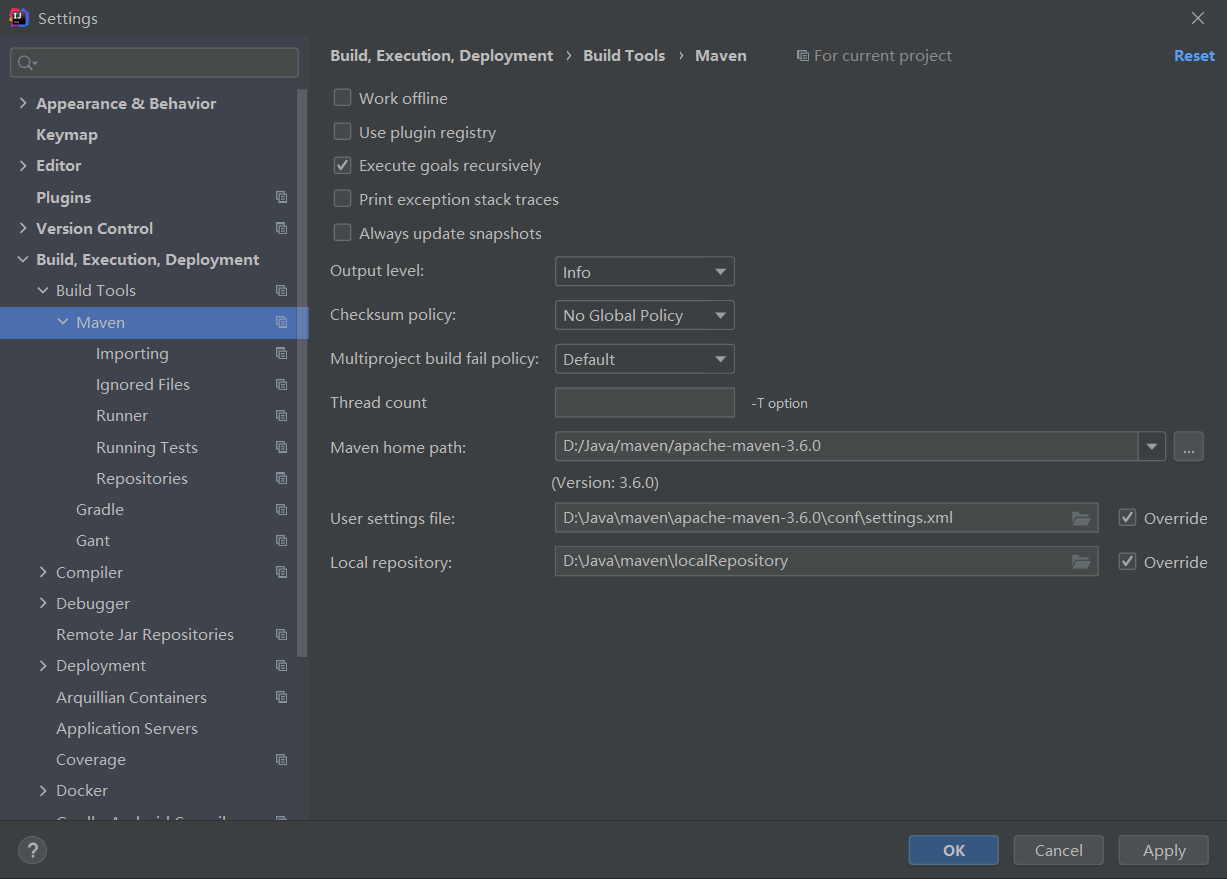
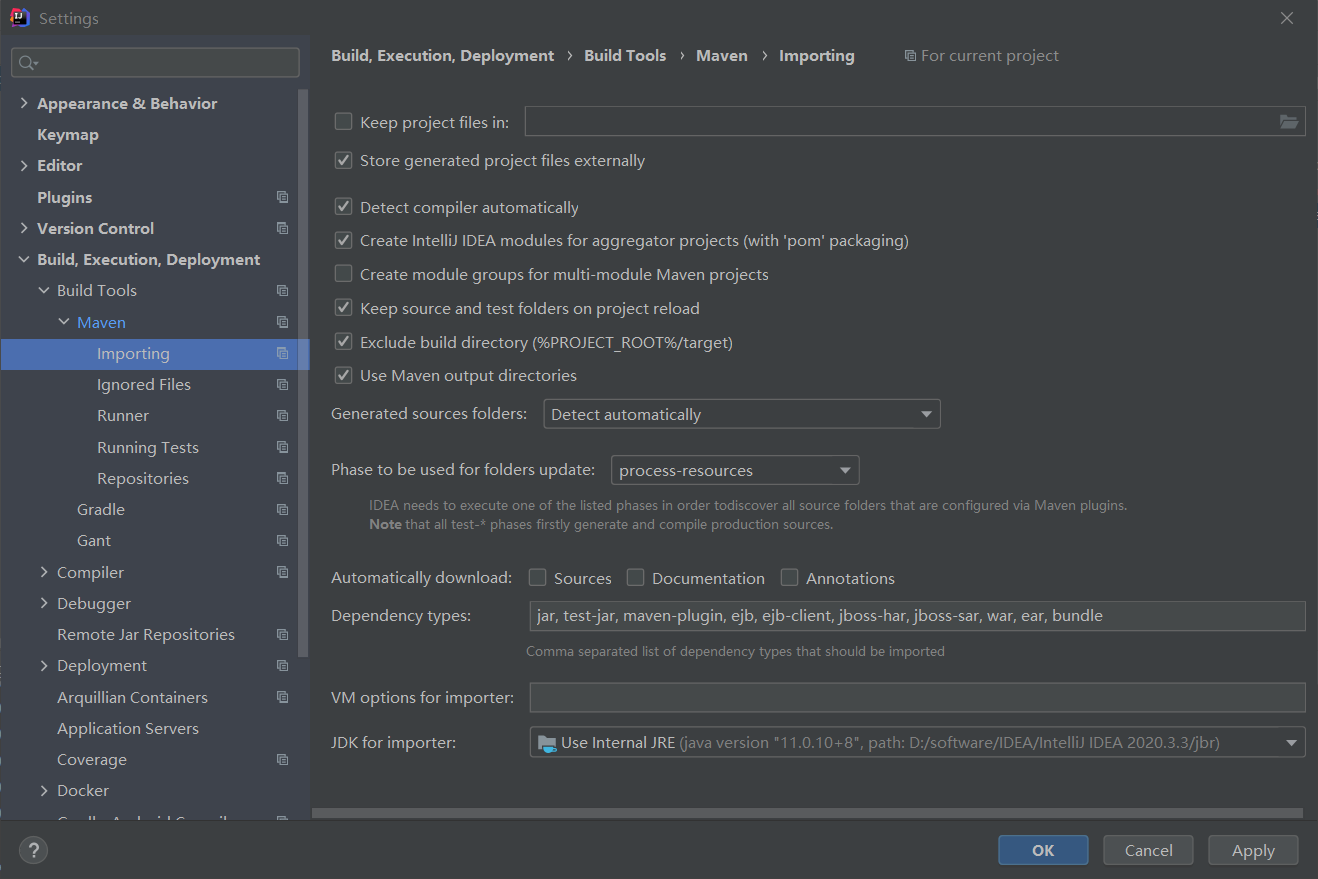
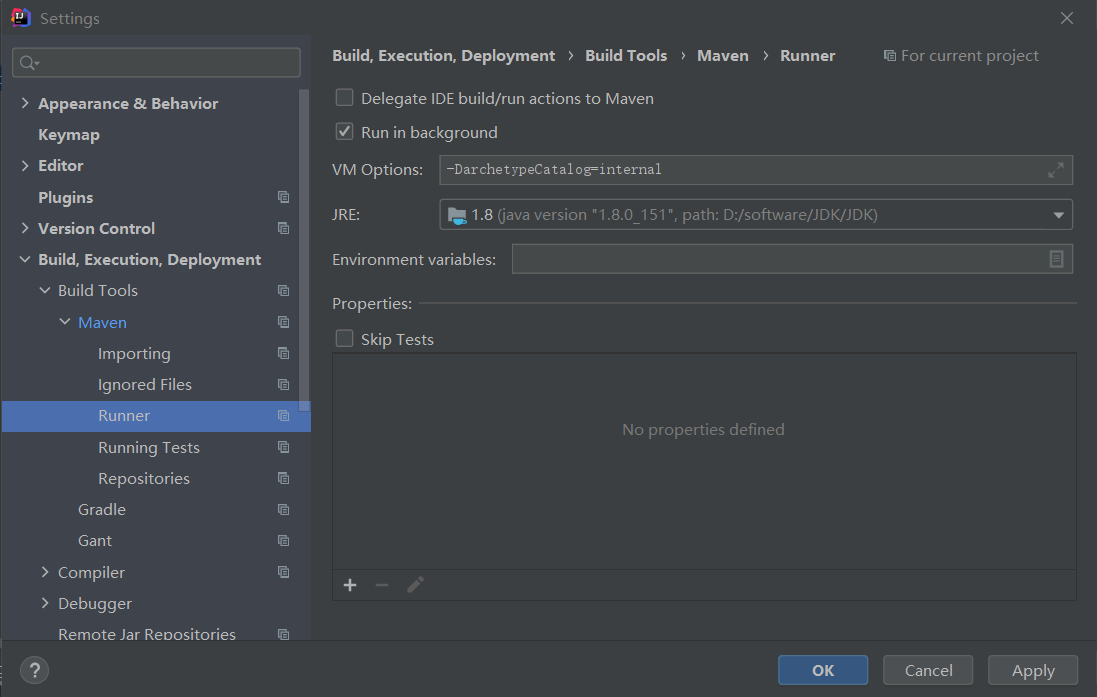
记得一定勾选上run in background, 并在VM Options中输入-DarchetypeCatalog=internal
这样能够确保在没有联网的情况下我们也能使用maven骨架创建maven项目
只要我们之前使用过这个骨架, 就不用重新下载了
maven的pom文件中相关标签的解释
scope依赖范围
scop的取值有compile/provided/runtime/test/system
test: junit, testng, spring-test(测试有效)
runtime: jdbc驱动jar包比如mysql驱动包和oracle驱动包(测试、运行时 有效)
*注意: oracle驱动包在maven中央仓库中没有,必须自己使用maven命令手动安装到本地仓库中使用
provided: servlet-api 、jsp-api(编译、测试 有效, 运行时无效 防止和tomcat下的servelet-api和jsp-api的jar包冲突)
compile: 默认引入的jar包【默认范围 可以不写】(编译、测试、运行 期间都有效)
除了以下依赖需要指定其scope外, 其他依赖可以不指定(默认是compile)
<!--junit单元测试-->
<dependency>
    <groupId>junit</groupId>
    <artifactId>junit</artifactId>
    <version>${junit.version}</version>
    <scope>test</scope>
</dependency>
<!--testng单元测试-->
<dependency>
    <groupId>org.testng</groupId>
    <artifactId>testng</artifactId>
    <version>${testng.version}</version>
    <scope>test</scope>
</dependency>
<!--spring框架单元测试-->
<dependency>
    <groupId>org.springframework</groupId>
    <artifactId>spring-test</artifactId>
    <version>${spring-test.version}</version>
    <scope>test</scope>
</dependency>

<!--servlet-api-->
<dependency>
    <groupId>javax.servlet</groupId>
    <artifactId>javax.servlet-api</artifactId>
    <version>${servlet-api.version}</version>
    <scope>provided</scope>
</dependency>
<!--jsp-api-->
<dependency>
    <groupId>javax.servlet.jsp</groupId>
    <artifactId>javax.servlet.jsp-api</artifactId>
    <version>${jsp-api.version}</version>
    <scope>provided</scope>
</dependency>

<!--mysql驱动-->
<dependency>
    <groupId>mysql</groupId>
    <artifactId>mysql-connector-java</artifactId>
    <version>${mysql-connector-java.version}</version>
    <scope>runtime</scope>
</dependency>
<!--oracle驱动-->
<dependency>
    <groupId>com.oracle</groupId>
    <artifactId>ojdbc14</artifactId>
    <version>${ojdbc.version}</version>
    <scope>runtime</scope>
</dependency>
packing打包方式
packing 打包类型,取值有 pom(父工程),jar(除web外的其他模块),war(web模块)
version依赖版本号
集中定义依赖版本号 可以只用${xx.version}获取集中管理的版本号
<!--集中定义依赖版本号-->
<properties>
    <mybatis.version>3.5.2</mybatis.version>
</properties>

<!--依赖管理-->
<dependencies>
    <!--mybatis-->
    <dependency>
        <groupId>org.mybatis</groupId>
        <artifactId>mybatis</artifactId>
        <version>${mybatis.version}</version>
    </dependency>
</dependencies>
snapshot快照版本, 非正式版本
release正式发布版
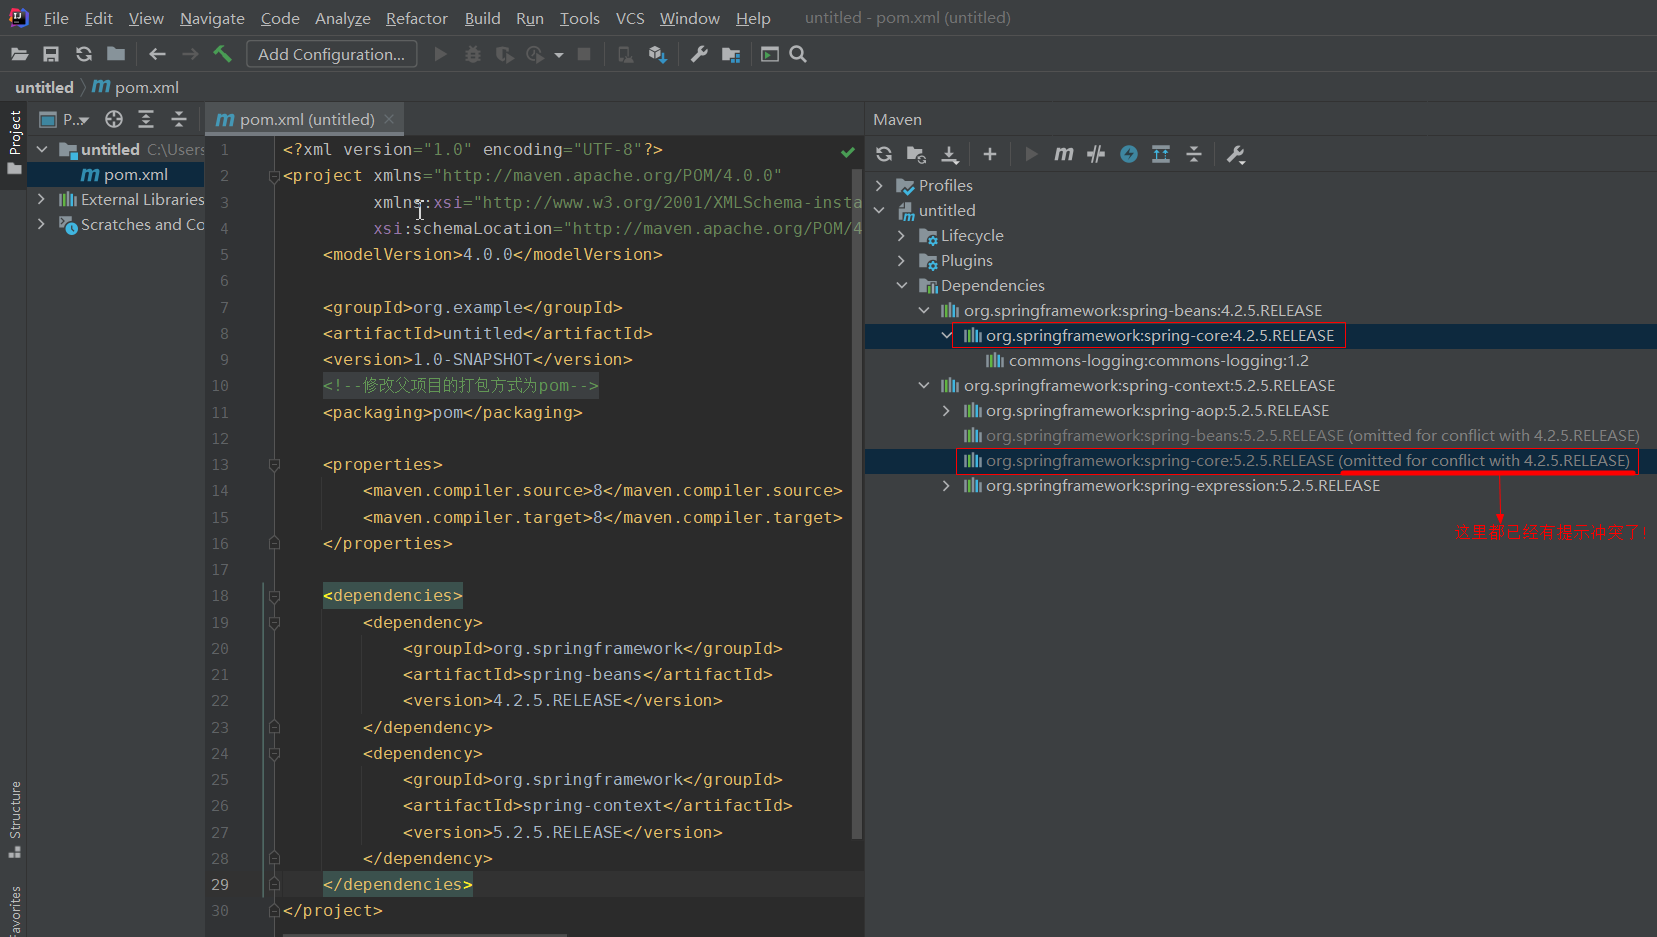
exclusion依赖排除(解决依赖jar包版本冲突)
当项目中传递依赖导入了两个相同的jar包,但版本不一致时,就会出现依赖jar包版本冲突的问题, 此时就需要进行依赖排除
展示当前项目各个jar包的互相依赖情况图(可以根据这个图解决jar包版本冲突的问题)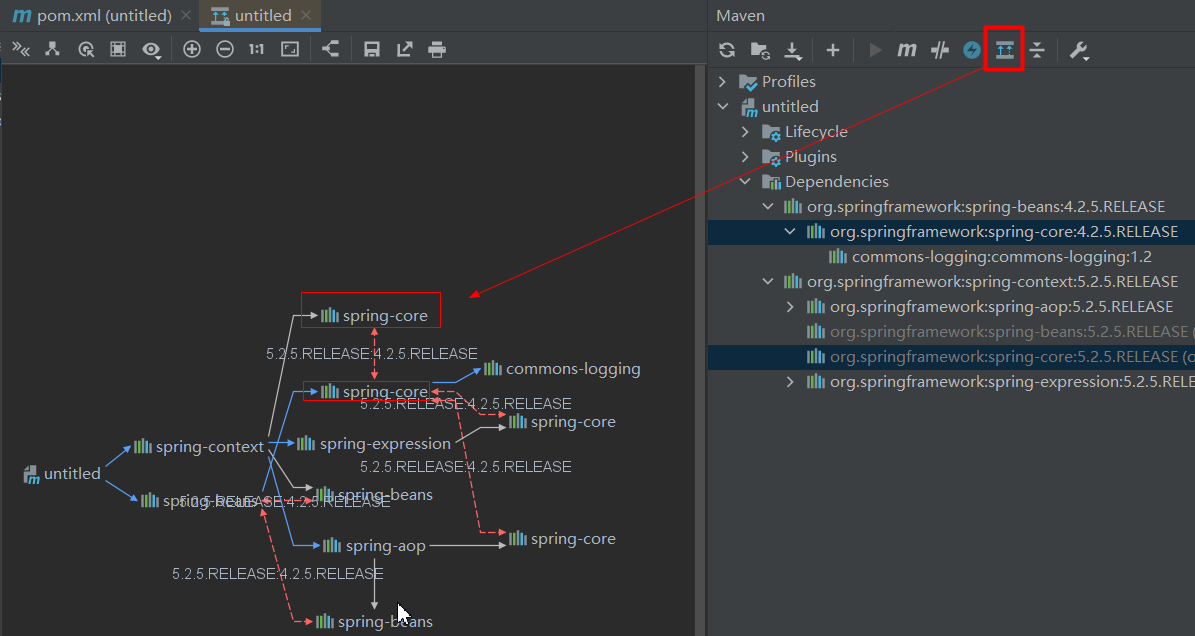
比如上图可以看出在导入spring-context时会导入spring-core
在导入spring-beans时也会导入spring-core
但这两个导入的spring-core版本不一致,就会导致版本冲突, 比如我现在想用上面5.2.5版本
就需要将上面spring-beans导入的4.2.5版本的spring-core依赖给排除掉
可以直接在pom文件中编写exclusion标签进行排除,也可以像下图一样直接选中要排除依赖版本jar包后右键点击exclude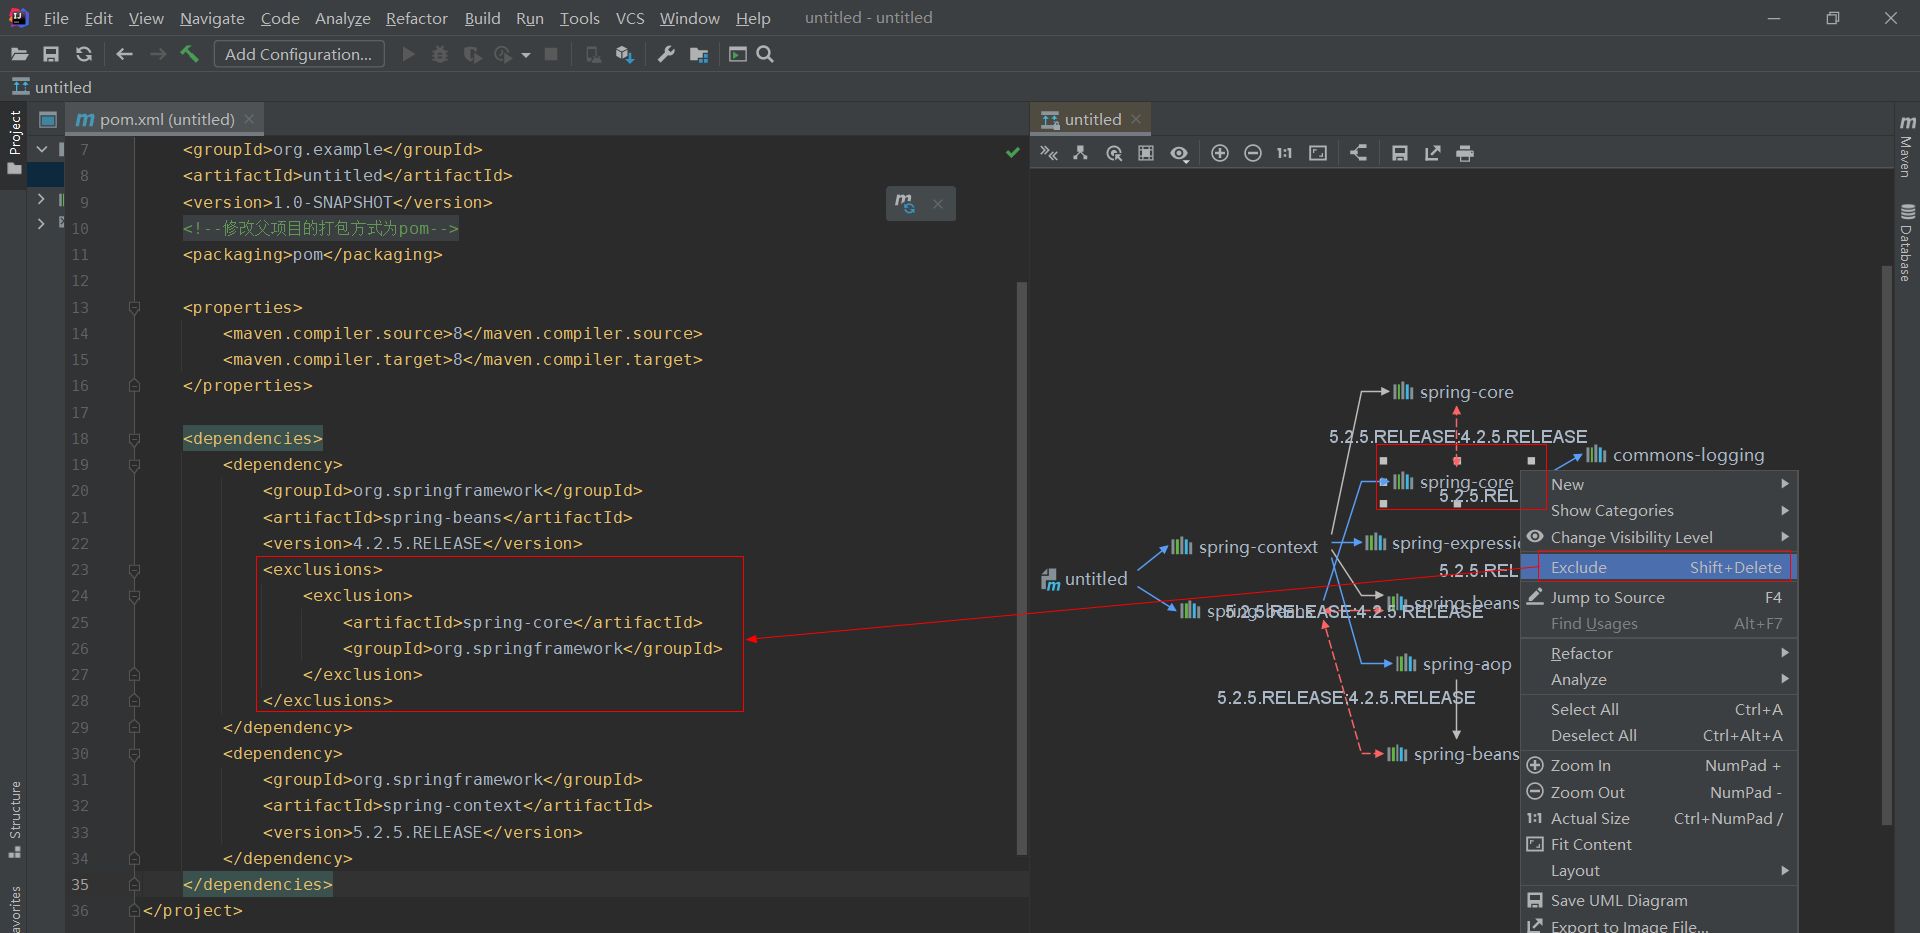
我记得日志的地方有涉及到jar包冲突, 到时候将出现jar包冲突的情况截图放过来
创建Maven父子工程
创建父工程
啥模板都不勾选,直接next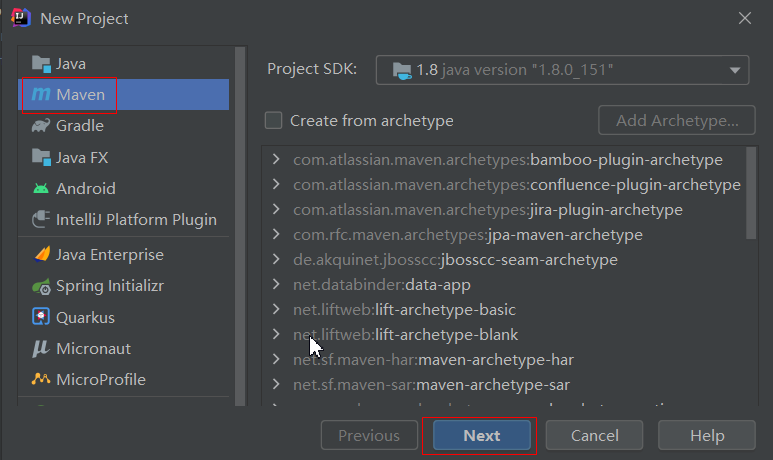
创建完毕之后,删除src目录即可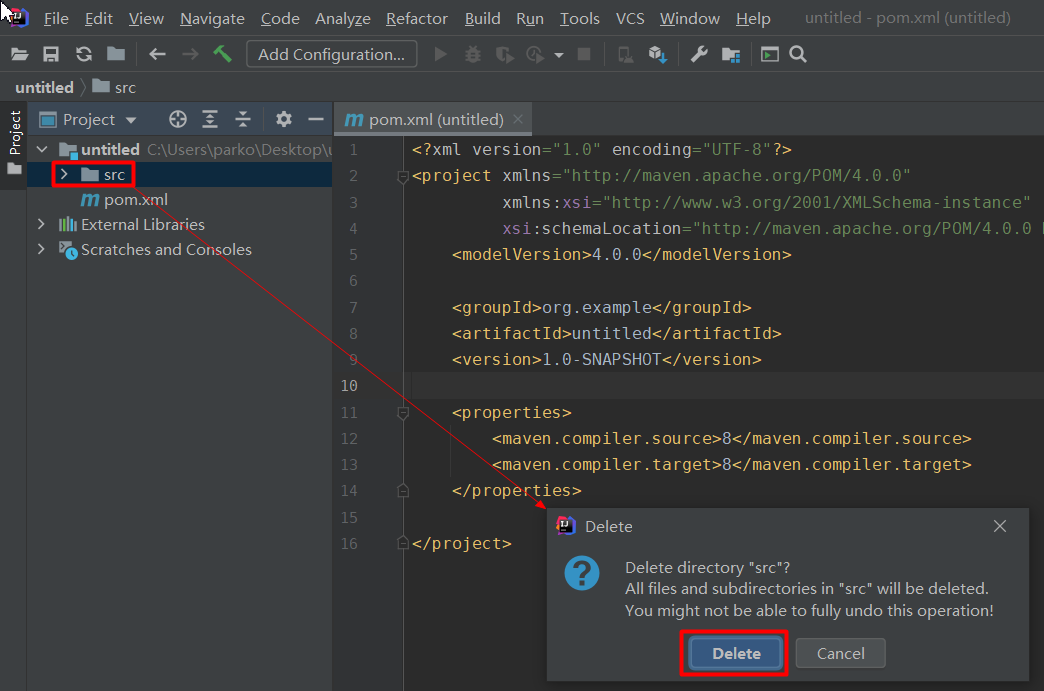
查看打包方式,如果不是pom则修改为pom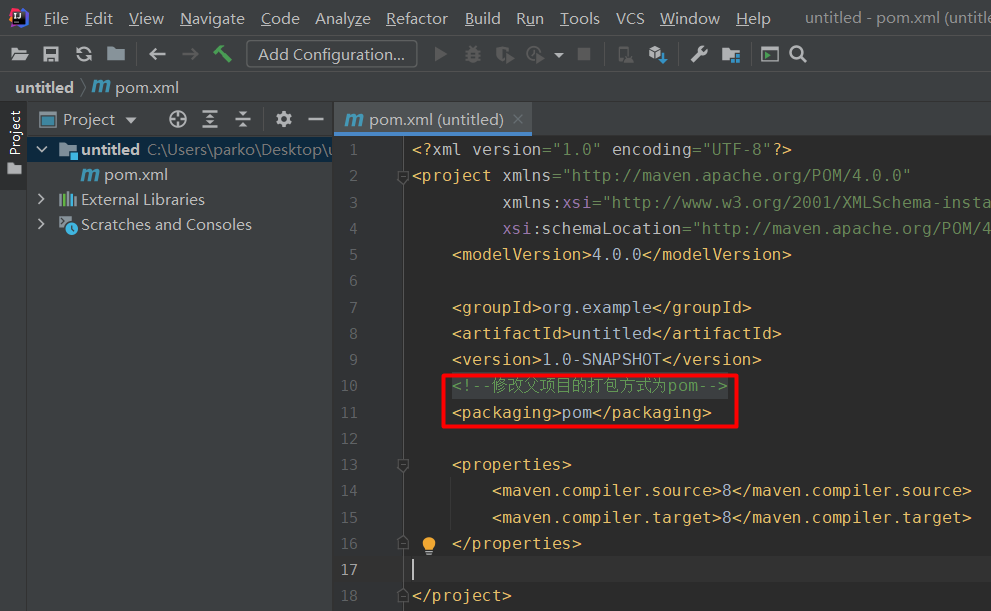
创建bean模块
pom文件如下
<?xml version="1.0" encoding="UTF-8"?>
<project xmlns="http://maven.apache.org/POM/4.0.0"
         xmlns:xsi="http://www.w3.org/2001/XMLSchema-instance"
         xsi:schemaLocation="http://maven.apache.org/POM/4.0.0 http://maven.apache.org/xsd/maven-4.0.0.xsd">
    <parent>
        <artifactId>untitled</artifactId>
        <groupId>org.example</groupId>
        <version>1.0-SNAPSHOT</version>
    </parent>
    <modelVersion>4.0.0</modelVersion>

    <artifactId>bean</artifactId>

    <properties>
        <maven.compiler.source>8</maven.compiler.source>
        <maven.compiler.target>8</maven.compiler.target>
    </properties>

</project>
创建dao模块
pom文件如下
<?xml version="1.0" encoding="UTF-8"?>
<project xmlns="http://maven.apache.org/POM/4.0.0"
         xmlns:xsi="http://www.w3.org/2001/XMLSchema-instance"
         xsi:schemaLocation="http://maven.apache.org/POM/4.0.0 http://maven.apache.org/xsd/maven-4.0.0.xsd">
    <parent>
        <artifactId>untitled</artifactId>
        <groupId>org.example</groupId>
        <version>1.0-SNAPSHOT</version>
    </parent>
    <modelVersion>4.0.0</modelVersion>

    <artifactId>dao</artifactId>

    <properties>
        <maven.compiler.source>8</maven.compiler.source>
        <maven.compiler.target>8</maven.compiler.target>
    </properties>

</project>
创建service模块
pom文件如下
<?xml version="1.0" encoding="UTF-8"?>
<project xmlns="http://maven.apache.org/POM/4.0.0"
         xmlns:xsi="http://www.w3.org/2001/XMLSchema-instance"
         xsi:schemaLocation="http://maven.apache.org/POM/4.0.0 http://maven.apache.org/xsd/maven-4.0.0.xsd">
    <parent>
        <artifactId>untitled</artifactId>
        <groupId>org.example</groupId>
        <version>1.0-SNAPSHOT</version>
    </parent>
    <modelVersion>4.0.0</modelVersion>

    <artifactId>service</artifactId>

    <properties>
        <maven.compiler.source>8</maven.compiler.source>
        <maven.compiler.target>8</maven.compiler.target>
    </properties>

</project>
创建web模块
选择org.apache.maven.archetypes:maven-archetype-webapp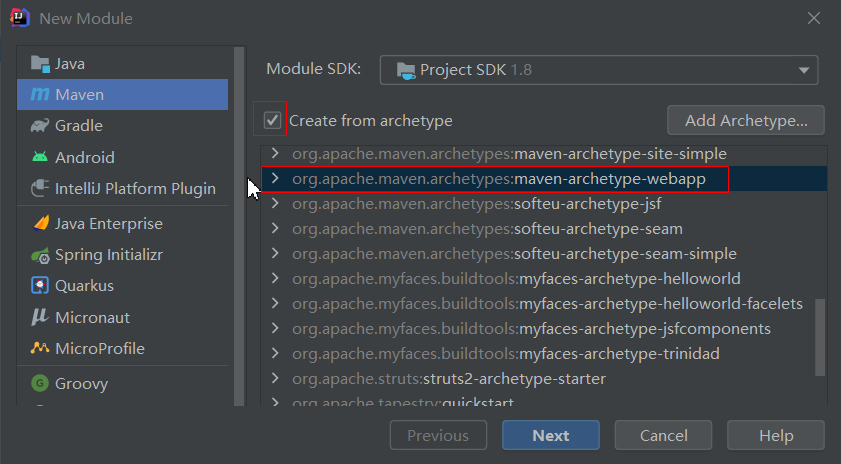
生成的目录结构如下
(在mvc中的三层架构dao,service,controller中的conroller层一般采用这个模板)
src/main/webapp/目录
src/main/webapp/index.jsp文件
src/main/webapp/WEB-INF/web.xml文件
一个packaging为war且带有junit依赖声明的pom.xml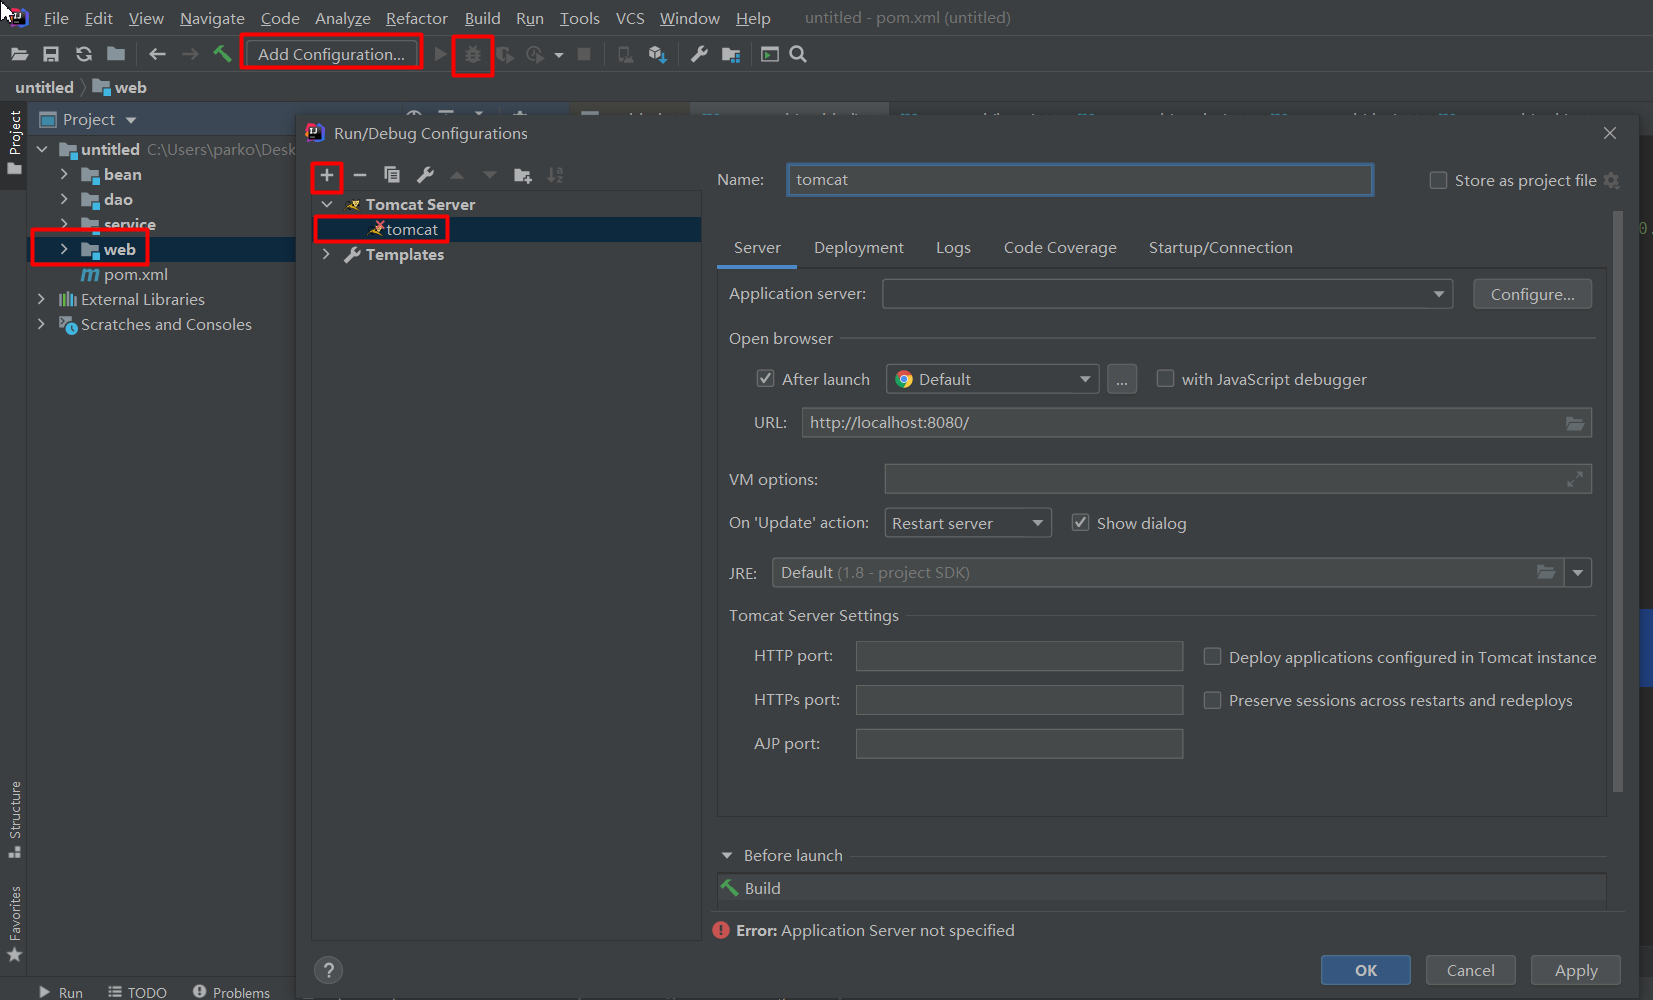
pom文件如下(删除一些自动生成不要的标签)
<?xml version="1.0" encoding="UTF-8"?>

<project xmlns="http://maven.apache.org/POM/4.0.0" xmlns:xsi="http://www.w3.org/2001/XMLSchema-instance"
  xsi:schemaLocation="http://maven.apache.org/POM/4.0.0 http://maven.apache.org/xsd/maven-4.0.0.xsd">
  <modelVersion>4.0.0</modelVersion>

  <groupId>org.example</groupId>
  <artifactId>web</artifactId>
  <version>1.0-SNAPSHOT</version>
  <packaging>war</packaging>

  <properties>
    <project.build.sourceEncoding>UTF-8</project.build.sourceEncoding>
    <maven.compiler.source>1.7</maven.compiler.source>
    <maven.compiler.target>1.7</maven.compiler.target>
  </properties>

</project>
此时回过头来再看父工程的pom文件中会添加上旗下有哪些子模块module
<?xml version="1.0" encoding="UTF-8"?>
<project xmlns="http://maven.apache.org/POM/4.0.0"
         xmlns:xsi="http://www.w3.org/2001/XMLSchema-instance"
         xsi:schemaLocation="http://maven.apache.org/POM/4.0.0 http://maven.apache.org/xsd/maven-4.0.0.xsd">
    <modelVersion>4.0.0</modelVersion>

    <groupId>org.example</groupId>
    <artifactId>untitled</artifactId>
    <version>1.0-SNAPSHOT</version>
    <modules>
        <module>bean</module>
        <module>service</module>
        <module>dao</module>
        <module>web</module>
    </modules>
    <!--修改父项目的打包方式为pom-->
    <packaging>pom</packaging>

<properties>
        <maven.compiler.source>8</maven.compiler.source>
        <maven.compiler.target>8</maven.compiler.target>
    </properties>

</project>
最后一步: install父工程, 将所有的module模块都导包install到本地仓库
比如web模块需要依赖service模块,则如果没有install这一步,则web模块启动是会报错的
使用本地tomcat启动maven项目(当然也可以使用maven-tomcat7插件启动)
maven使用Nexus创建的私服
Linux下载-安装-启动Nexus
1 Nexus 安装
(1) 创建解压文件夹:
mkdir nexus-2.4.0-09(2) 解压tar.gz文件:
tar zxvf nexus-2.4.0-09-bundle.tar.gz -C nexus-2.4.0-09注: nexus-2.4.0-09 内有两个文件夹 nexus-2.4.0-09 和 sonatype-work
(3) 拷贝至/opt/目录下:
sudo mv nexus-2.4.0-09 /opt/2 Nexus 启动
nexus启动是在bin目录下,首先看一下启动/关闭/重启等命令, 输入命令:
/opt/nexus-2.4.0-09/nexus-2.4.0-09/bin/nexus出现如下选项:
启动nexus:
/opt/nexus-2.4.0-09/nexus-2.4.0-09/bin/nexus start
3 关闭nexus:
/opt/nexus-2.4.0-09/nexus-2.4.0-09/bin/nexus stop4 Nexus 验证
启动nexus后,在浏览器输入地址: http://192.168.10.11:8081/nexus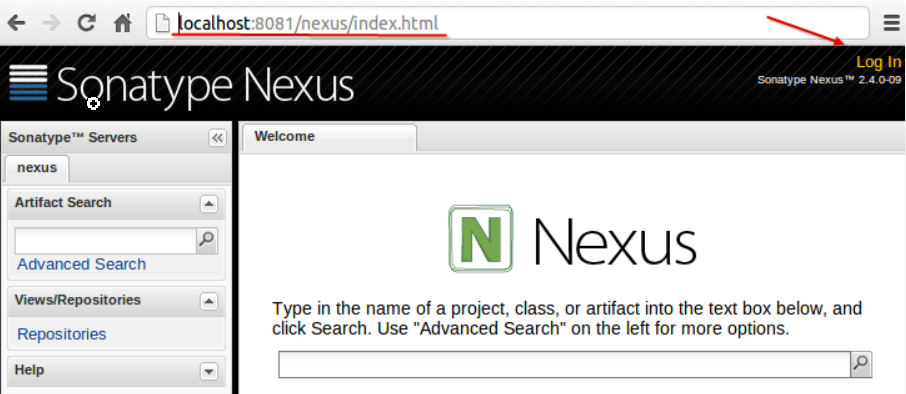
出现上述页面,说明配置nexus成功!
5 开启远程索引
新搭建的neuxs环境只是一个空的仓库,需要手动和远程中心库进行同步,nexus默认是关闭远程索引下载,
最重要的一件事情就是开启远程索引下载。登陆nexus系统,默认用户名密码为admin/admin123。
点击左边Administration菜单下面的Repositories,找到右边仓库列表中的三个仓库Apache Snapshots、Codehaus Snapshots、Central,
然后在每一个仓库的configuration下把Download Remote Indexes修改为true。然后在这三个仓库上分别右键,选择Repair Index,这样Nexus就会去下载远程的索引文件。
Windows下载-安装-启动Nexus
去nexus官网:https://www.sonatype.com/ ,下载然后进行解压即可,官网下载比较慢,也有可能无法进行下载,如果无法下载,右键选择链接打开迅雷下载.下载成功后解压出现如下图两个文件夹:上面一个是nexus安装目录,work是一个工作目录, 我们的仓库和jar包就放到work目录。
已管理员身份打开cmd进入到nexus的安装目录下的bin目录下,
执行nexus.bat install命令安装nexus, 然后在执行nexus.bat start命令启动服务
服务启动完毕之后可以在Windows的任务管理器中的服务中找到nexus服务。
卸载nexus命令, 也是要以管理员身份打开cmd进入到nexus的安装目录下的bin目录下,再执行nexus.bat uninstall命令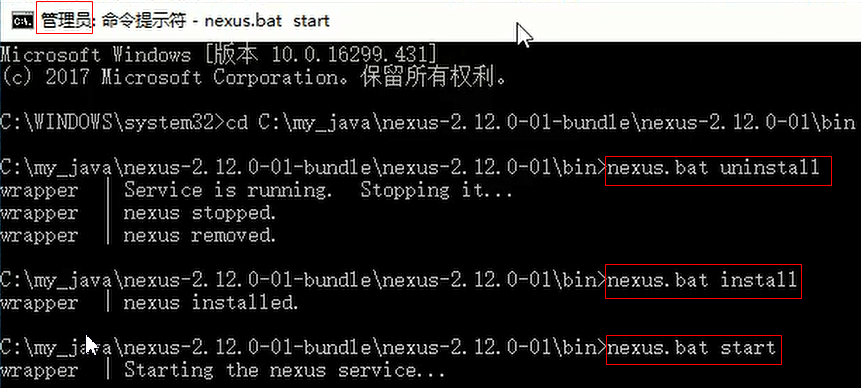
启动成功在浏览器输入localhost:8081即可出现nexus页面(nexus默认端口是8081)。进入如下界面: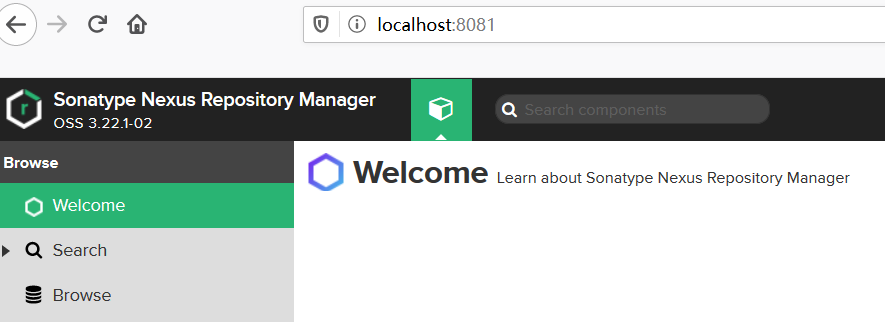
使用默认账号admin密码admin123登录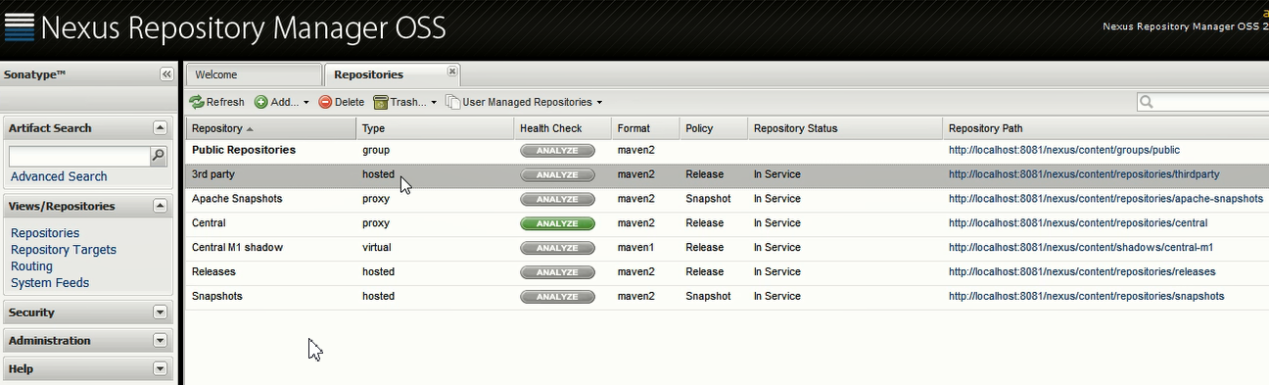
nexus默认给我们创建了如下几个仓库repository
| Central | 中央仓库 |
|---|---|
| 3rd party | 存放第三方公司的jar包的仓库, 非本公司研发的jar包 |
| Releases | 存放本公司正式发行版jar包仓库, 存放我们生产上线代码打的jar包 |
| Snapshots | 存放本公司测试版jar包仓库, 存放我们测试版代码打的jar包 |
| Apache Snapshots | Apache下正式发行版jar包仓库(不用管) |
| Central M1 shadow | 中央仓库(maven1版本那时的中央仓库,不用管,现在几乎不用) |
| Public Repositories | 仓库组(包含其他仓库) |
type是指仓库的类型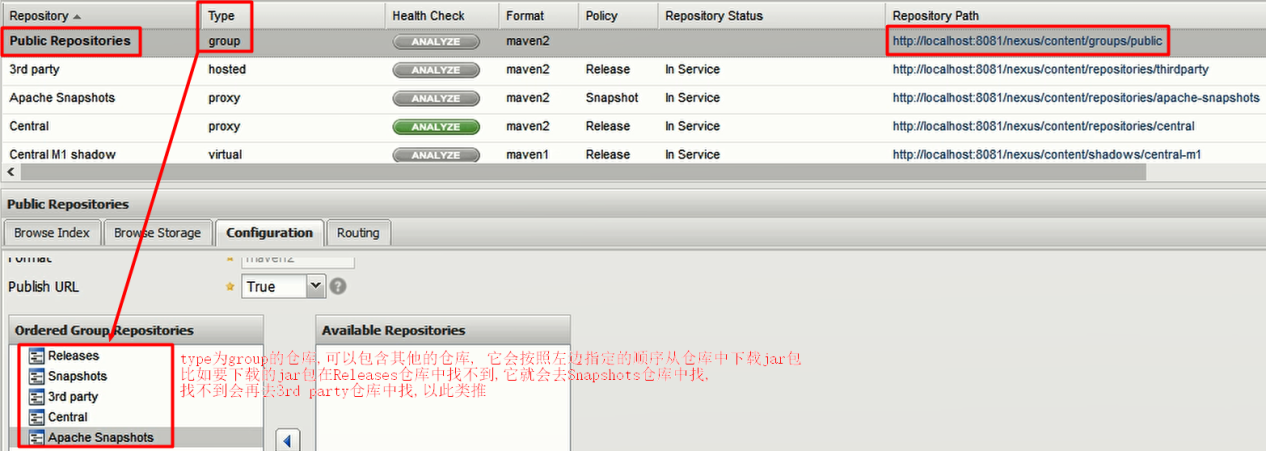
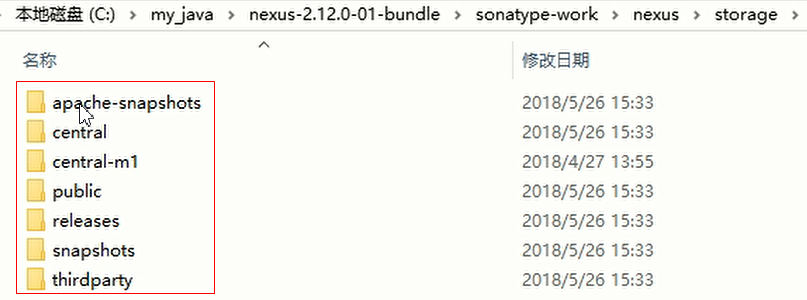
从本地也可以看到仓库, 路径如下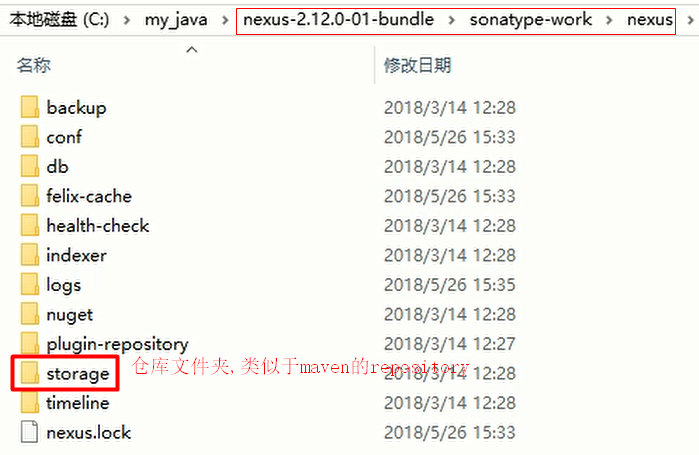
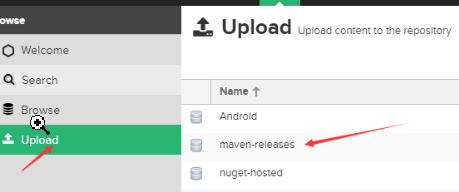
上传jar包到Nexus
1.打好jar包并放在本地某个路径下, 通过nexus界面手动上传

2.打好jar包并放在本地某个路径下, 通过命令上传
红色的部分需要替换
mvn deploy:deploy-file -DgroupId=net.sf -DartifactId=json-lib -Dversion=2.4 -Dpackaging=jar -Dfile=E:/json-lib-2.4.jar -Durl=http://192.168.1.222/nexus/repository/releases/ -DrepositoryId=releases3.直接将maven项目(或者module)打成jar包上传到nexus中
只需要配置两个地方即可。
在maven的conf/settings.xml文件中的如下节点中配置如下内容:
<servers>
    <!-- conf private maven repository in there,server可以配置多个-->
    <server>
        <id>releases</id>
        <!-- nexus登录的用户名和密码-->
        <username>admin</username>
        <password>admin123</password>
    </server>
</servers>
此外需要在要上传jar的项目的pom.xml文件中,配置上传路径:
<!--nesxus上传jar到私服-->
<distributionManagement>
    <repository>
        <!--这个id需要和上面settings.xml中配置的id一致-->
        <id>releases</id>
        <url>http://localhost:8081/repository/testnesxus/</url>
</repository>
</distributionManagement>
配置完成之后可以直接点击IDEA右边maven生命周期中的deploy按钮,或者cmd进入项目目录中执行mvn deploy命令就可以将jar上传到私服中了。
但有时会上传失败,如果上传失败了注意以下几点:
- 创建的仓库类型一定要是hosted类型的,否则无法上传。
- Snapshot库发布的版本必须以SNAPSHOT结尾。
- release发布的版本不能以SNAPSHOT结尾。
从nexus中下载jar包
在修改maven的settings.xml配置文件, 添加如下内容:
<profiles>
<!--可以配置多个profile -->
<profile>
<id>helloworld</id>
<!--远程仓库列表-->
<repositories>
<repository>
<id>down1</id>
<url>http://localhost:8081/repository/testnesxus/</url>
<releases>
<enabled>true</enabled>
</releases>
</repository>
</repositories>
</profile>
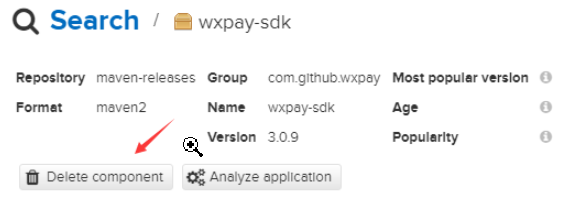
</profiles>在项目pom中引入要下载的jar包坐标后刷新maven即可
<dependency>
    <groupId>com.github.wxpay</groupId>
    <artifactId>wxpay-sdk</artifactId>
    <version>3.0.9</version>
</dependency>
删除nexus仓库中已上传的jar包

maven与Jenkins持续集成
maven中的其他知识
jar包对应maven坐标查询网站
手动安装jar包到本地仓库命令
mvn install:install-file -Dfile=d:\dubbo-2.8.4.jar -DgroupId=com.alibaba -DartifactId=dubbo -Dversion=2.8.4 -Dpackaging=jardependencies和dependencyManagement的区别
dependencyManagement写在项目的最顶层的父pom中:管理依赖版本号
1.dependencyManagement里只是声明依赖,并不实现引入,因此子项目需要显示的声明需要用的依赖。如果不在子项目中声明依赖,是不会从父项目中继承下来的;只有在子项目中写了该依赖项,并且没有指定具体版本,才会从父项目中继承该项,并且version和scope都读取自父pom;另外如果子项目中指定了版本号,那么会使用子项目中指定的jar版本。
2.dependencies会将jar包引入. 即使在子项目中不写该依赖项,那么子项目仍然会从父项目中继承该依赖项(全部继承)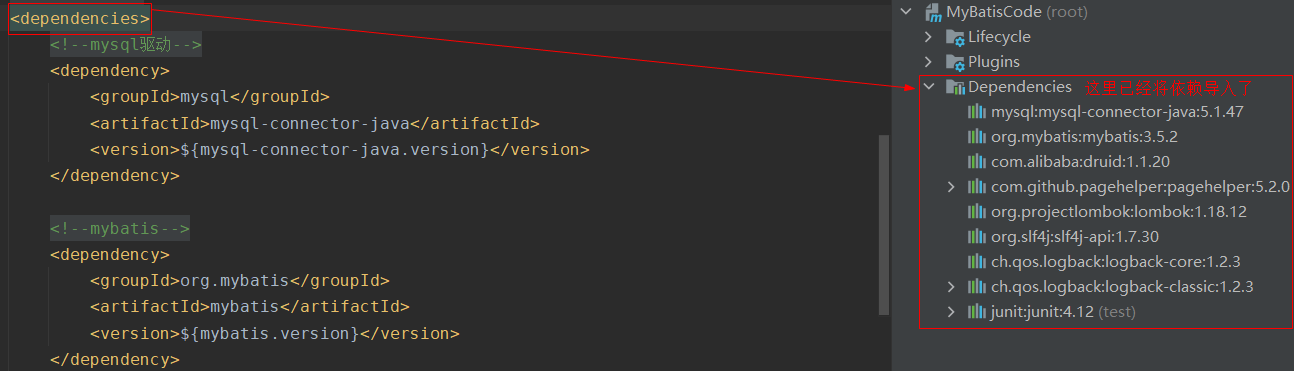
3.书写顺序dependencyManagement需要包裹写在dependencies的外面, 比如
<dependencyManagement>
    <dependencies>
        <dependency>
            <groupId>org.mybatis</groupId>
            <artifactId>mybatis</artifactId>
            <version>${mybatis.version}</version>
      </dependency>
    </dependencies>
</dependencyManagement>
jar包拉取不下来报错的解决办法
could not transfer artifact log4j:log4j:pom:1.2.17 from/to huangzhongsheng_account
(https://fz.artifactory.cibt:443/artifactory/c107x0-maven-virtual): PKIX path building failed:
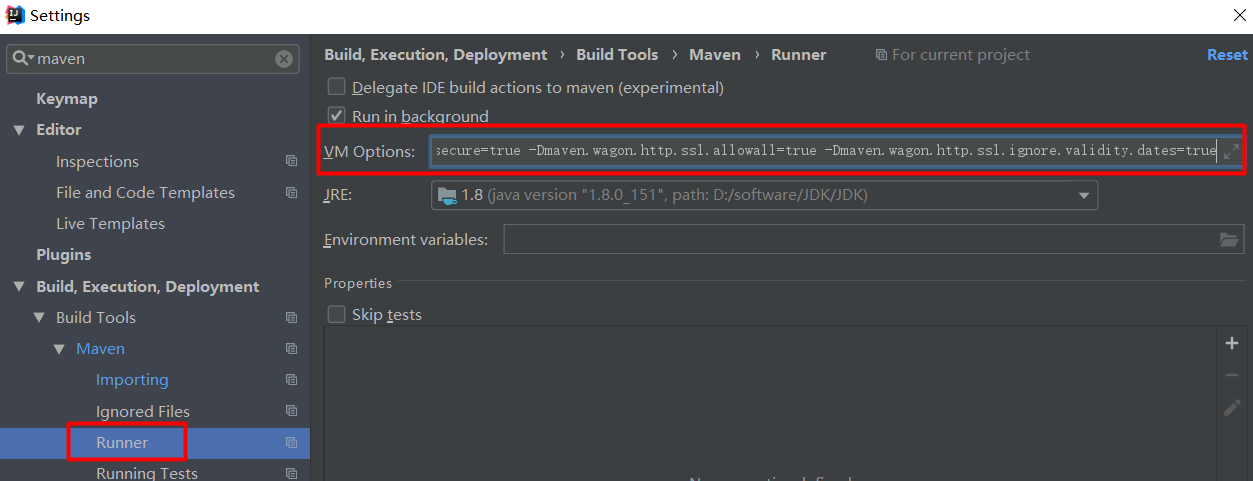
xxxxxException: unable to find valid certification path to requested target在电脑上配置一个系统变量MAVEN_OPTS值为:
-Dmaven.wagon.http.ssl.insecure=true -Dmaven.wagon.http.ssl.allowall=true -Dmaven.wagon.http.ssl.ignore.validity.dates=true然后再IDEA中以下两处也增加上这个系统变量, 重新刷新即可下载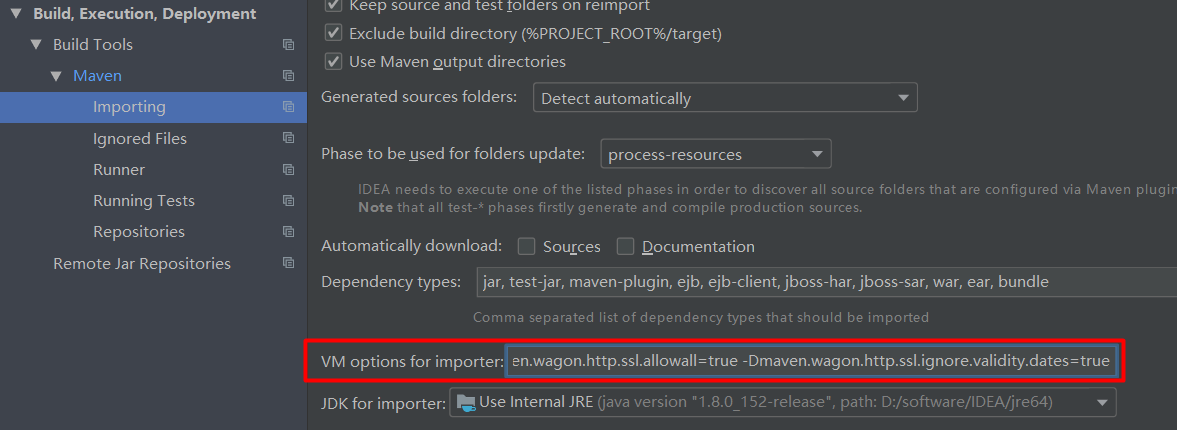
maven常用坐标
常用jar包坐标
MyBatis
<dependency>
    <groupId>org.mybatis</groupId>
    <artifactId>mybatis</artifactId>
</dependency>
MySQL
<dependency>
    <groupId>mysql</groupId>
    <artifactId>mysql-connector-java</artifactId>
    <scope>runtime</scope>
</dependency>
Oracle
<dependency>
    <groupId>com.oracle</groupId>
    <artifactId>ojdbc14</artifactId>
    <scope>runtime</scope>
</dependency>
Druid
<dependency>
    <groupId>com.alibaba</groupId>
    <artifactId>druid</artifactId>
</dependency>
Junit4
<dependency>
    <groupId>junit</groupId>
    <artifactId>junit</artifactId>
    <scope>test</scope>
</dependency>
Junit5
<dependency>
    <groupId>org.junit.jupiter</groupId>
    <artifactId>junit-jupiter</artifactId>
    <version>5.5.2</version>
    <!--<scope>test</scope>-->
</dependency>
TestNG
<dependency>
    <groupId>org.testng</groupId>
    <artifactId>testng</artifactId>
    <scope>test</scope>
</dependency>
lombok
<dependency>
    <groupId>org.projectlombok</groupId>
    <artifactId>lombok</artifactId>
    <scope>provided</scope>
</dependency>
logback
<dependency>
    <groupId>ch.qos.logback</groupId>
    <artifactId>logback-classic</artifactId>
</dependency>
SpringBoot
<dependencies>
    <!-- SpringBoot web启动器(必须) -->
    <dependency>
        <groupId>org.springframework.boot</groupId>
        <artifactId>spring-boot-starter-web</artifactId>
    </dependency>
    <!-- SpringBoot单元测试启动器(必须) -->
    <dependency>
        <groupId>org.springframework.boot</groupId>
        <artifactId>spring-boot-starter-test</artifactId>
    </dependency>
    <!-- lombok(必须) -->
    <dependency>
        <groupId>org.projectlombok</groupId>
        <artifactId>lombok</artifactId>
    </dependency>
    <!-- SpringBoot热部署(必须) -->
    <dependency>
        <groupId>org.springframework.boot</groupId>
        <artifactId>spring-boot-devtools</artifactId>
    </dependency>
    <!-- SpringBoot配置处理器(非必须) -->
    <dependency>
        <groupId>org.springframework.boot</groupId>
        <artifactId>spring-boot-configuration-processor</artifactId>
        <optional>true</optional>
    </dependency>
    <!-- SpringBoot应用状态监控管理服务(非必须) -->
    <dependency>
        <groupId>de.codecentric</groupId>
        <artifactId>spring-boot-admin-starter-server</artifactId>
        <version>2.1.4</version>
    </dependency>
    <!-- thymeleaf(非必须) -->
    <dependency>
        <groupId>org.springframework.boot</groupId>
        <artifactId>spring-boot-starter-thymeleaf</artifactId>
    </dependency>
</dependencies>
Spring
<!--Spring依赖-->
<dependency>
    <groupId>org.springframework</groupId>
    <artifactId>spring-beans</artifactId>
    <version>5.2.5.RELEASE</version>
</dependency>
<dependency>
    <groupId>org.springframework</groupId>
    <artifactId>spring-core</artifactId>
    <version>5.2.5.RELEASE</version>
</dependency>
<dependency>
    <groupId>commons-logging</groupId>
    <artifactId>commons-logging</artifactId>
    <version>1.2</version>
</dependency>
常用webjar依赖坐标
jQuery
<dependency>
    <groupId>org.webjars</groupId>
    <artifactId>jquery</artifactId>
    <version>3.3.1</version>
</dependency>