第1章 Spring Boot 概要
1.1 Spring Boot 介绍
Spring Boot是一个用来简化Spring开发,使用特定的配置快速搭建一个Spring应用的框架
1.2 Spring Boot优点
- 快速创建独立运行的Spring项目以及与主流框架集成
- 使用嵌入式的Servlet容器,应用无需打成WAR包
- starters自动依赖与版本控制
- 大量的自动配置,简化开发,也可修改默认值
- 无需配置XML,无代码生成,开箱即用
- 准生产环境的运行时应用监控
- 与云计算的天然集成
1.3 Spring Boot版本说明
基本版本号说明
软件版本号: 2.0.2. RELEASE
2 主版本号 当功能模块有较大更新或者整体架构发生变化时,主版本号会更新
0 次版本号 次版本表示只是局部的一些变动
2 修改版本号 一般是bug的修复或者是小的变动
RELEASE 希腊字母版本号, RELEASE代表发布版本
希腊字母版本号
BASE:设计阶段。只有相应的设计没有具体的功能实现。
ALPHA:软件的初级版本。存在较多的bug
BATE:表示相对ALPHA有了很大的进步,消除了严重的bug,但还存在一些潜在的bug
RELEASE:表示最终版(我们选择的)
版本发布计划说明
| 代号 | 版本 | 说明 |
|---|---|---|
| BUILD-XXX | 开发版 | 一般是开发团队内部使用 |
| SNAPSHOT | 不稳定版 | 不稳定尚处于开发中 |
| GA | 稳定版 | 内部开发到一定阶段了,各个模块集成后,经过全面测试发现没有问题,可对外发行,基本可以用 |
| PRE(M1 M2) | 里程碑版 | 由于GA还不属于公开发行版,里面还有些功能不完善或者bug,于是就有了miltestone(里程碑版), miltestone版主要修复了一些bug调整.一个GA后一般会有多个里程碑版.例如M1 M2 M3 |
| RC | 候选发布版 | 该阶段的是最终发行前的一个观察期,该期间只对一些发现的等级高的bug进行修复,发布RC1 RC2等版本 |
| SR | 正式发布版 | 公开正式发布.正式发布版一般也有多个发布,例如SR1 SR2 SR3等,一般是用来修复的bug或者优化 |
第2章 Spring Boot 入门开发
2.1 环境要求
- jdk1.8 (Spring Boot 推荐jdk1.8及以上): java version “1.8.0_151”
- Maven 3.x (maven 3.2 以上版本):Apache Maven 3.3.9
- IntelliJ IDEA :IntelliJ IDEA 2018.2.2 x64
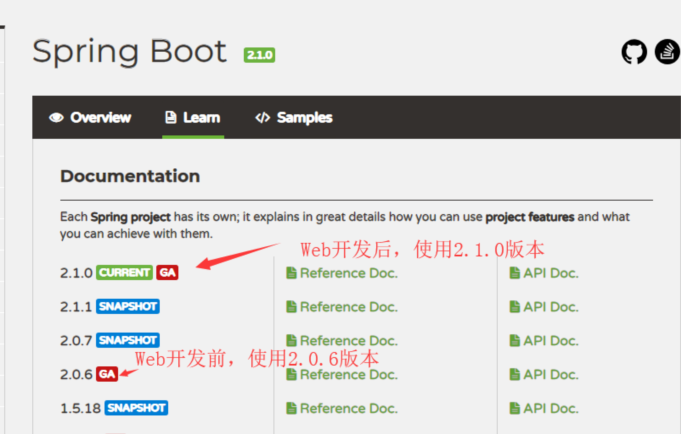
- SpringBoot 使用当前最新稳定版本:第5章web开发前 2.0.6.RELEASE ,后面使用 2.1.0.RELEASE
2.2 修改Maven配置文件
在 Maven 安装目录下的 settings.xml 配置文件中, 添加如下配置
<!--开始处更改下载依赖的存放路径, 以下目录需要已经创建-->
<localRepository>D:\javasource\maven-repository</localRepository>
<!--在 mirrors 标签下 添加阿里云maven私服库-->
<mirrors>
<mirror>
<id>alimaven</id>
<mirrorOf>central</mirrorOf>
<name>aliyun maven</name>
<url>http://maven.aliyun.com/nexus/content/groups/public/</url>
</mirror>
</mirrors>
<!-- 在 profiles 标签下指定jdk版本 -->
<profile>
<id>jdk-1.8</id>
<activation>
<activeByDefault>true</activeByDefault>
<jdk>1.8</jdk>
</activation>
<properties>
<maven.compiler.source>1.8</maven.compiler.source>
<maven.compiler.target>1.8</maven.compiler.target>
<maven.compiler.compilerVersion>1.8</maven.compiler.compilerVersion>
</properties>
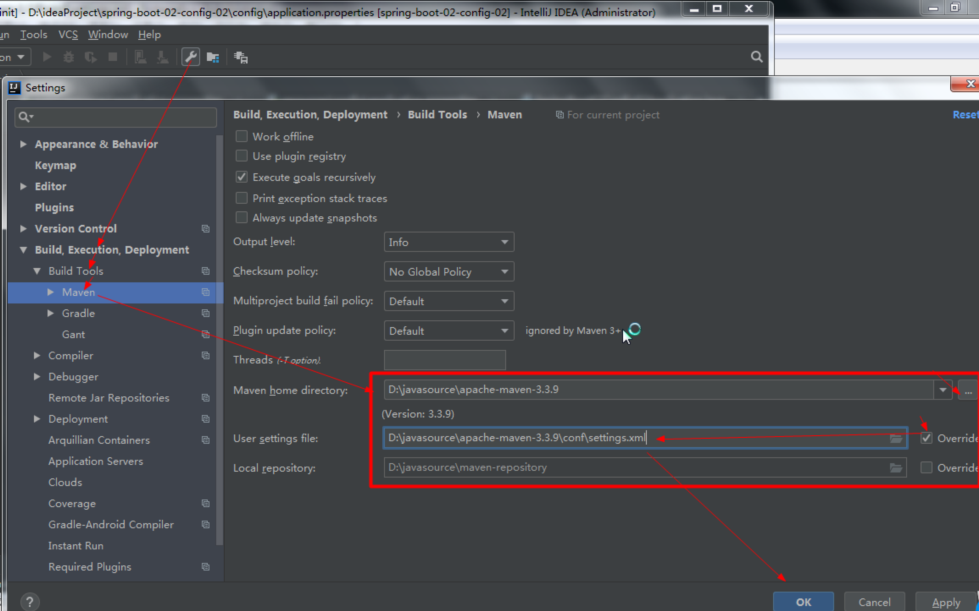
</profile>2.3 IntelliJ IDEA 设置
在idea上将 maven 环境添加进来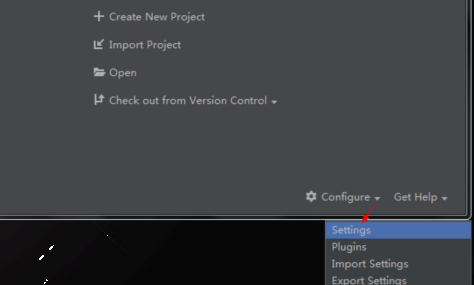
2.4 快速构建 Spring Boot 项目
需求:浏览器发送 /hello 请求,服务器接受请求并处理,响应 Hello World 字符串
分析 :构建 Spring Boot 项目,事实上建立的就是一个 Maven 项目
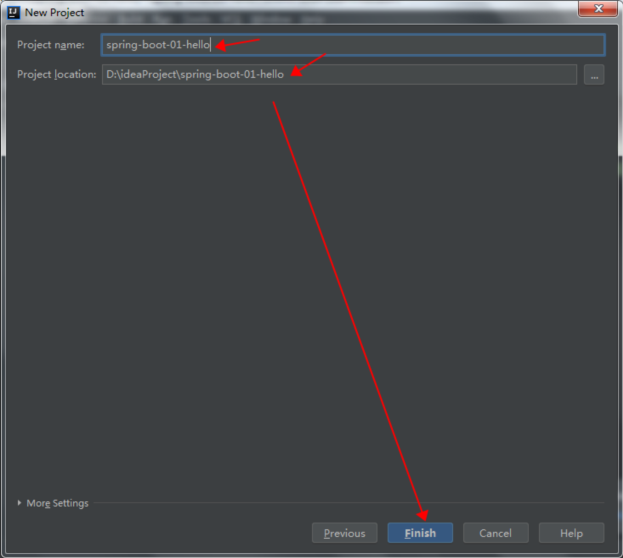
2.4.1 创建 Maven工程
在 IDEA上新建一个空的jar类型 的 maven 工程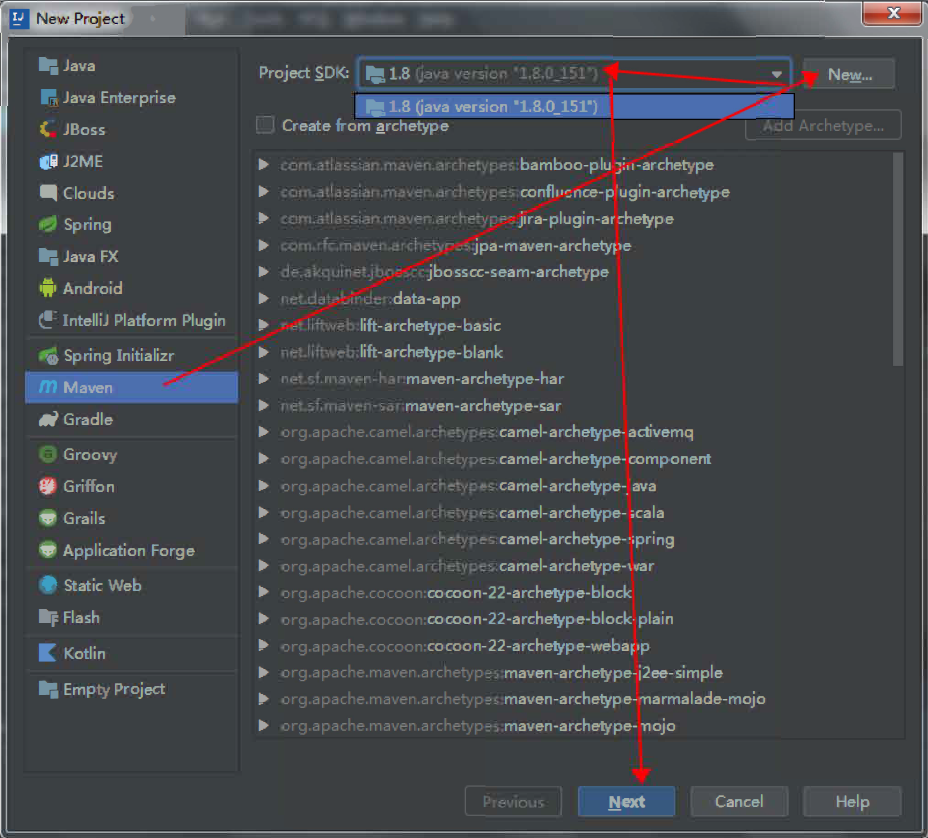
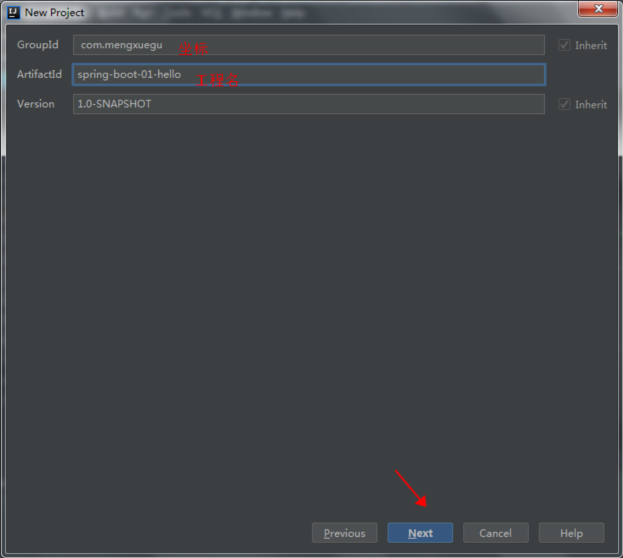
2.4.2 修改 pom.xml
在 pom.xml 中添加 Spring Boot 相关的父级依赖, spring-boot-starter-parent 是一个特殊的starter,
它提供了项目相关的默认依赖,使用它之后 ,常用的包依赖可以省去 version 标签。在 dependencies 添加构建 Web 项目相关的依赖
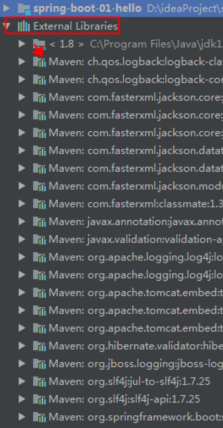
<parent>
	<groupId>org.springframework.boot</groupId>
	<artifactId>spring-boot-starter-parent</artifactId>
	<version>2.0.6.RELEASE</version>
</parent>
<dependencies>
		<dependency>
		<groupId>org.springframework.boot</groupId>
		<artifactId>spring-boot-starter-web</artifactId>
		</dependency>
</dependencies>
3 我们会惊奇地发现,我们的工程自动添加了好多好多jar包, 这些 jar包正是开发时需要导入的jar包
2.4.3 创建控制器 Controller
package com.mengxuegu.controller;
import org.springframework.stereotype.Controller;
import org.springframework.web.bind.annotation.RequestMapping;
import org.springframework.web.bind.annotation.ResponseBody;
@Controller
public class HelloController {
    @ResponseBody
    @RequestMapping("/hello")
    public String hello() {
        return "HelloWorld...";
    }
}
2.4.4 创建Spring Boot主程序启动类
在java文件夹下创建com.mengxuegu文件夹,在文件夹下创建一个类HelloWorldMainApplication.class
@SpringBootApplication
public class HelloWorldMainApplication {
    public static void main(String[] args) {
        SpringApplication.run(HelloWorldMainApplication.class,args);
    }
}
2.4.5 运行效果
运行springboot主启动类的main方法
在浏览器地址栏输入localhost:8080/hello 即可看到运行结果
2.4.6 简化部署
1.在 pom.xml中添加spring-boot-maven-plugin插件,将应用打包成可执行的jar包后,可直接通过 java -jar 的命令运行
<build>
    <plugins>
        <plugin>
            <groupId>org.springframework.boot</groupId>
            <artifactId>spring-boot-maven-plugin</artifactId>
        </plugin>
    </plugins>
</build>
2.对应用打包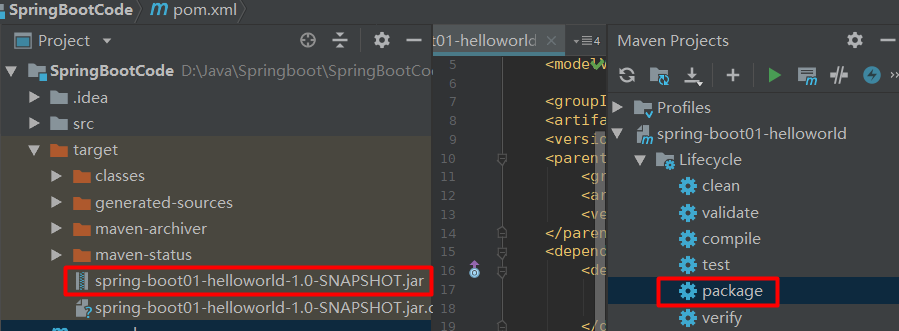
3.进入jar包所在路径执行java -jar命令运行该jar包
4.响应结果, 默认端口8080
2.5 Spring Boot的HelloWorld程序的运行原理
2.5.1 pom.xml文件
1.Spring Boot依赖的版本管理(Spring Boot版本仲裁)
首先在应用的pom文件中引入了spring-boot-starter-parent
接着spring-boot-starter-parent.pom文件中又引用了spring-boot-dependencies
spring-boot-dependencies.pom文件中即管理了各个依赖的版本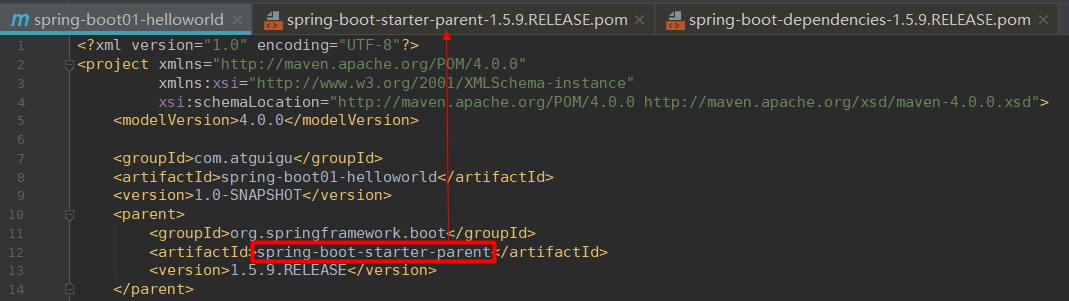


由上述可知,以后我们导入依赖默认是不用写版本号的, 也就是可以省去 version 标签,除非该依赖在dependencies下没有找到
2.Spring Boot依赖管理(Spring Boot场景启动器)
Spring Boot对于应用所需要的依赖是通过各种场景启动器starter来实现的, 要用什么功能就导入什么场景的启动器。(各种启动器可参见官方文档 starter)
<dependencies>
   <dependency>
         <groupId>org.springframework.boot</groupId>
         <artifactId>spring-boot-starter-web</artifactId>
   </dependency>
</dependencies>
spring-boot-starter-web帮我们导入了web模块正常运行需要依赖的组件
导入了上述一个依赖就默认导入了如下的依赖
<dependencies>
		<dependency>
			<groupId>org.springframework.boot</groupId>
			<artifactId>spring-boot-starter</artifactId>
		</dependency>
		<dependency>
			<groupId>org.springframework.boot</groupId>
			<artifactId>spring-boot-starter-tomcat</artifactId>
		</dependency>
		<dependency>
			<groupId>org.hibernate</groupId>
			<artifactId>hibernate-validator</artifactId>
		</dependency>
		<dependency>
			<groupId>com.fasterxml.jackson.core</groupId>
			<artifactId>jackson-databind</artifactId>
		</dependency>
		<dependency>
			<groupId>org.springframework</groupId>
			<artifactId>spring-web</artifactId>
		</dependency>
		<dependency>
			<groupId>org.springframework</groupId>
			<artifactId>spring-webmvc</artifactId>
		</dependency>
</dependencies>
2.5.2 引导类
@SpringBootApplication
@SpringBootApplication用于标识一个引导类,说明当前是Spring Boot项目
@SpringBootApplication
public class HelloWorldMainApplication {
    public static void main(String[] args) {
        SpringApplication.run(HelloWorldMainApplication.class,args);
    }
}
@SpringBootApplication 是一个组合注解主要组合了 @SpringBootConfiguration、@EnableAutoConfiguration、@ComponentScan
@Target(ElementType.TYPE)
@Retention(RetentionPolicy.RUNTIME)
@Documented
@Inherited
@SpringBootConfiguration
@EnableAutoConfiguration
@ComponentScan(excludeFilters = {
        @Filter(type = FilterType.CUSTOM, classes = TypeExcludeFilter.class),
        @Filter(type = FilterType.CUSTOM, classes =
                AutoConfigurationExcludeFilter.class) })
public @interface SpringBootApplication {
@SpringBootConfiguration
@SpringBootConfiguration:用于定义一个Spring Boot的配置类( 配置类 等同 配置文件)引用了 @Configuration 注解,是Spring底层的一个注解,用于定义 Spring 的配置类。配置类也是容器中的一个组件 @Component
@org.springframework.context.annotation.Configuration
public @interface SpringBootConfiguration {
}
@EnableAutoConfiguration
@EnableAutoConfiguration注解告诉Spring Boot开启自动配置功能, 使用该注解后以前需要我们手动配置的东西,现在就能交给Spring Boot帮我们自动配置了
Spring Boot会自动根据你导入的依赖jar包来自动配置项目。
该注解是一个组合注解它包含了@AutoConfigurationPackage @Import(EnableAutoConfigurationImportSelector.class)
@org.springframework.boot.autoconfigure.AutoConfigurationPackage
@org.springframework.context.annotation.Import({org.springframework.boot.autoconfigure.AutoConfigurationImportSelector.class})
public @interface EnableAutoConfiguration {
@AutoConfigurationPackage
该注解的作用是将主配置类(即被@SpringBootApplication标注的类)所在包及下面所有子包里面的所有组件扫描到Spring容器中
@Import
该注解的作用是给容器中导入组件
@Import(AutoConfigurationImportSelector.class) 给容器中导入AutoConfigurationImportSelector(自动配置导入选择器)组件
会给容器中导入非常多的自动配置类(xxxAutoConfiguration)就是给容器中导入这个场景所需要的所有组件,并配置好这些组件
Spring Boot中存现大量的这些类(xxxAutoConfiguration),这些类的作用就是帮我们进行自动配置
–他会将这个这个场景需要的所有组件都注册到容器中,并配置好
–他们在类路径下的META-INF/spring.factories文件中
–spring-boot-autoconfigure-1.5.9.RELEASE.jar中包含了所有场景的自动配置类代码
–这些自动配置类是Spring Boot进行自动配置的精髓

@ComponentScan
该注解标识的类, 会被 Spring 自动扫描并且装入bean容器
2.6 使用SpringBoot初始化器创建Spring Boot项目
注:初始化器需要联网才能创建Spring Boot项目
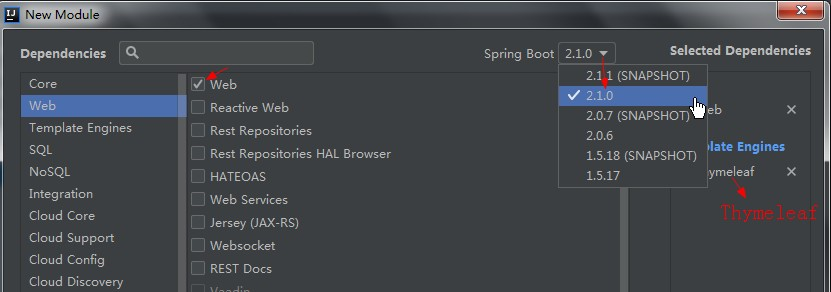
创建Spring Boot项目的第二种方式(使用快速向导Spring Initializer快速创建一个Spring Boot项目)
a)在idea中快速创建一个SpringBoot应用的过程如下图
b)默认生成的Spring Boot项目,主程序已经生成好了,我们只需要写自己的逻辑(controller和service即可)
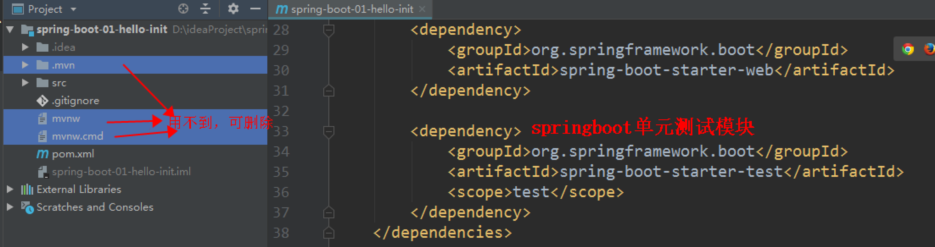
默认生成的项目resources文件夹下的目录结构如下
- static : 保存所有的静态资源(js,css,images等)
- template : 保存所有的模板页面(例如freemaker模板,和thymeleaf模板等)
- application.properties : 在该文件中修改Spring Boot的默认配置 如修改默认端口 server.port=8081
默认生成properties结尾的文件, 我习惯使用application.yml文件,所以修改文件后缀名为.yml - 删除不需要的文件与目录
- pom文件中默认导入了Spring Boot 单元测试模块spring-boot-starter-test
第3章 Spring Boot 核心配置
Spring Boot中可以使用两种配置文件一种是application.properties另一种是application.yml 配置文件的作用在于提供给我们修改Spring Boot的一些默认配置
3.1 yml的应用
application.yml可以作为springboot的全局配置文件
注意:springboot的配置文件名是固定的只能叫application
3.2 yml语法
3.2.1 以空格为缩进控制层级关系大小写敏感
server:          #server的下级属性port前面有两个空格
port: 8888  #key:空格value
3.2.2 基本数据类型的写法(数字 字符串 布尔等)
number: 123
isPerson: true
str1: 张三          #字符串默认不用加上单引号或者双引号
str2: "张三\n李四"   #双引号"" 不会转义字符串里面的特殊字符;特殊字符会作为本身想表示的意思输出
#上述输出结果为 张三 换行 李四
str3: '张三\n李四'   #单引号'' 会转义特殊字符,特殊字符最终只是一个普通的字符串数据
#上述输出结果为 张三\n李四
3.2.3 对象的写法
#方式一(推荐使用)
person:
  name: parkour
  age: 26
#方式二(行内写法)
student: {id: 110,name: parkour}
3.2.4 数组的写法
#方式一 用 -空格值 来表示数组中的元素,注意 - 前面有个空格
pets:
 - cat
 - dog
 - pig
#方式二(行内写法)(推荐使用)
colors: [red,blue,yellow]3.2.5 文档块—
yml中可以使用—将一个文档分割成不同的文档块
server:
  port: 8081
spring:
  profiles:
     active: dev
---
server:
  port: 8082
spring:
  profiles: dev
---
server:
  port: 8083
spring:
  profiles: test
---
server:
  port: 8084
spring:
  profiles: prod
3.3 将yml配置文件中的数据映射到代码中
application.yml配置文件如下
server:
port: ${random.int[1024,9999]} #生成随机端口号
# 在SpringCloud微服务中,不需要记录IP与端口可以使用随机生成
message:
hello: hello world
person:
name: parkour
age: ${random.int[18,30]} #使用函数生成随机值,该值只在加载配置文件的时候生成一次
isPerson: true
birth: 1993/12/09
likeColors: [red,blue,yellow]
str1: I like music
str2: "I like /n music"
str3: 'I like /n music'SpringBoot中的代码如下
/**
* @ConfigurationProperties注解 告诉SpringBoot将配置文件中对应属性的值,映射到这个组件类中,进行一一绑定
*   prefix = "emp":配置文件中的前缀名,哪个前缀与下面的所有属性进行一一映射
* @Component注解 必须将当前组件作为SpringBoot中的一个组件,才能使用容器提供的@ConfigurationProperties功能
*/
@ConfigurationProperties(prefix = "person")
@Component
@Data
public class Person {
    private String name;
    private Integer age; //这里使用包装类型(阿里规范bean的属性使用包装类型)
    private Boolean isPerson;//这里是使用包装类型
    private Date birth;
    private String[] likeColors;
    private String str1;
    private String str2;
    private String str3;
}
测试代码如下
@RunWith(SpringRunner.class)
@SpringBootTest
public class DemoApplicationTests {
@Autowired
Person person;
@Value("${message.hello}") //获取属性文件中的属性使用"${}"
String helloWorld;
@Test
public void contextLoads() {
System.out.println(person);
System.out.println(helloWorld);
}
}测试结果如下
Person(name=parkour, age=22, isPerson=true, birth=Thu Dec 09 00:00:00 CST 1993, likeColors=[red, blue, yellow], str1=I like music, str2=I like /n music, str3=I like /n music)
hello world 4.注意点
1.加上@ConfigurationProperties注解后
idea提示没有Spring Boot Configuration Annotation Processor not found in classpath
解决办法,在pom文件中添加下面依赖即可
加上此依赖就有代码提示了
<dependency>
   <groupId>org.springframework.boot</groupId>
   <artifactId>spring-boot-configuration-processor</artifactId>
   <optional>true</optional>
</dependency>
2.配置文件中的布尔值,对应对象属性中的布尔值必须要是包装类型的Boolean
1.@Value注解
该注解可以用于根据${key}获取配置文件中的value并将value的值注入给对应的变量,也可以将#{SpEL}表达式计算的结果注入给对应的变量
@RunWith(SpringRunner.class)
@SpringBootTest
public class DemoApplicationTests {
@Value("${service.port }") //获取配置文件中的port属性的值注入给变量port
Integer port;
@Value("#{1+2}") //将SpEL表达式的计算结果赋值给变量sum
Integer sum;
@Test
public void contextLoads() {
System.out.println(port);
System.out.println(sum);
}
}3.4 比较ConfigurationProperties注解和@Value注解的区别
| 比较项 | @ConfigurationProperties | @Value | 支持的示例 |
|---|---|---|---|
| 可以实现的功能 | 可以批量注入配置文件中的属性 | 只能一个一个的注入配置文件中的属性 | |
| 是否支持松散绑定 | 支持 | 不支持 | last_name == lastName last-name == lastName |
| 是否支持SpEL | 不支持 | 支持 | #{10*2} |
| 是否支持JSR303数据校验 | 支持 | 不支持 | ${emp.map} |
| 是否支持复杂数据类型封装 | 支持 | 不支持 | 参考如下3.5 |
两者如何选择: 如果我们只是需要获取配置文件中的某个值, 则使用@value
如果编写了一个JavaBean来和配置文件进行映射, 此时使用@ ConfigurationProperties
3.5 JSR303校验注解
Spring参数校验Validator的注解, 使用下述注解需要先在要使用注解的类上贴上一个@Validator注解, 之后在类中就可以使用下面的注解进行校验了
| 注解 | 取值 | 含义 |
|---|---|---|
| @Email(regexp=正则表达式,flag=标志的模式) | CharSequence子类型(如String) | 验证注解的元素值是Email,也可以通过regexp和flag指定自定义的email格式 |
| @AssertFalse | Boolean,boolean | 验证注解的元素值是false |
| @AssertTrue | Boolean,boolean | 验证注解的元素值是true |
| @NotNull | 任意类型 | 验证注解的元素值不是null |
| @Null | 任意类型 | 验证注解的元素值是null |
| @Min(value=值) | BigDecimal,BigInteger, byte,short, int, long,等任何Number或CharSequence(存储的是数字)子类型 | 验证注解的元素值大于等于@Min指定的value值 |
| @Max(value=值) | 和@Min要求一样 | 验证注解的元素值小于等于@Max指定的value值 |
| @DecimalMin(value=值) | 和@Min要求一样 | 验证注解的元素值大于等于@ DecimalMin指定的value值 |
| @DecimalMax(value=值) | 和@Min要求一样 | 验证注解的元素值小于等于@ DecimalMax指定的value值 |
| @Digits(integer=整数位数, fraction=小数位数) | 和@Min要求一样 | 验证注解的元素值的整数位数和小数位数上限 |
| @Size(min=下限, max=上限) | 字符串、Collection、Map、数组等 | 验证注解的元素值的在min和max(包含)指定区间之内,如字符长度、集合大小 |
| @Past | java.util.Date,java.util.Calendar;Joda Time类库的日期类型 | 验证注解的元素值(日期类型)比当前时间早 |
| @Future | 与@Past要求一样 | 验证注解的元素值(日期类型)比当前时间晚 |
| @NotBlank | CharSequence子类型 | 验证注解的元素值不为空(不为null、去除首位空格后长度为0),不同于@NotEmpty,@NotBlank只应用于字符串且在比较时会去除字符串的首位空格 |
| @Length(min=下限, max=上限) | CharSequence子类型 | 验证注解的元素值长度在min和max区间内 |
| @NotEmpty | CharSequence子类型、Collection、Map、数组 | 验证注解的元素值不为null且不为空(字符串长度不为0、集合大小不为0) |
| @Range(min=最小值, max=最大值) | BigDecimal,BigInteger,CharSequence, byte, short, int, long等原子类型和包装类型 | 验证注解的元素值在最小值和最大值之间 |
| @Pattern(regexp=正则表达式,flag=标志的模式) | String,任何CharSequence的子类型 | 验证注解的元素值与指定的正则表达式匹配 |
| @Valid | 任何非原子类型 | 指定递归验证关联的对象;如用户对象中有个地址对象属性,如果想在验证用户对象时一起验证地址对象的话,在地址对象上加@Valid注解即可级联验证 |
3.6 加载指定的配置文件
3.6.1 @PropertySource注解: 加载指定的配置文件(.yml或.properties结尾的文件)
person.properties配置文件内容如下
person.name=parkour
person.age=26
pojo内容如下
@PropertySource("classpath:person.properties")
@ConfigurationProperties(prefix = "person") //@ConfigurationProperties默认加载的是application配置文件,@PropertySource注解使他加载person配置文件
@Component
@Data
@NoArgsConstructor
public class Person {
    private String name;
    private int age;
}
单元测试内容如下
@RunWith(SpringRunner.class)
@SpringBootTest
public class PersonTest {
    @Autowired
    Person person;

    @Test
    public void testPerson(){
        System.out.println(person);
    }

}
3.6.2 @ImportResource注解: 加载spring的xml配置文件,让配置文件里面的内容生效
Spring Boot中没有Spring的配置文件, 在Spring Boot中我们自己编写的Spring配置文件也不能自动识别如果需要配置文件生效,需要借助@ImportResource注解
在Spring的默认配置文件applicationContext.xml文件中配置一个bean内容如下
<?xml version="1.0" encoding="UTF-8"?>
<beans xmlns="http://www.springframework.org/schema/beans"
       xmlns:xsi="http://www.w3.org/2001/XMLSchema-instance"
       xsi:schemaLocation="http://www.springframework.org/schema/beans http://www.springframework.org/schema/beans/spring-beans.xsd">
    <!--在spring的配置文件中配置了一个bean-->
    <bean id="helloService" class="com.atguigu.service.HelloService"/>
</beans>
在Spring Boot中默认情况下,上述bean是没有注入到Spring的IOC容器中的
@RunWith(SpringRunner.class)
@org.springframework.boot.test.context.SpringBootTest
public class SpringBootApplicationTest {

    @Autowired
    ApplicationContext ioc;

    //测试IOC容器中是否包含一个名叫helloService的bean
    @Test
    public void testBean(){
        System.out.println(ioc.containsBean("helloService"));  //输出结果为false
    }

}
可以使用@ImportResource注解将spring配置文件中的bean对象再springboot应用中注入到IOC容器中
将@ImportResource注解标注在主配置类上,并指定配置文件的位置location即可
@ImportResource("classpath:applicationContext.xml")  //导入Spring的配置文件让其生效
@SpringBootApplication
public class HelloWorldMainApplication {
    public static void main(String[] args) {
        SpringApplication.run(HelloWorldMainApplication.class,args);
    }
}
添加上述注解后, 再次进行测试发现上述bean就已经注入到Spring的IOC容器中了
@RunWith(SpringRunner.class)
@org.springframework.boot.test.context.SpringBootTest
public class SpringBootApplicationTest {

    @Autowired
    ApplicationContext ioc;

    //测试IOC容器中是否包含一个名叫helloService的bean
    @Test
    public void testBean(){
        System.out.println(ioc.containsBean("helloService"));  //输出结果为true
    }

}
3.6.3 自定义配置类向容器注入组件
在Spring Boot应用中向Spring的IOC容器中添加组件的方法有两种,一种即上面这种, 使用@ImportResource注解给容器中添加组件,该方法不推荐使用
要向容器中添加组件Spring Boot推荐我们使用配置类结合注解添加
不来编写spring的配置文件了
<?xml version="1.0" encoding="UTF-8"?>
<beans xmlns="http://www.springframework.org/schema/beans"
       xmlns:xsi="http://www.w3.org/2001/XMLSchema-instance"
       xsi:schemaLocation="http://www.springframework.org/schema/beans http://www.springframework.org/schema/beans/spring-beans.xsd">
    <!--在spring的配置文件中配置了一个bean-->
    <bean id="helloService" class="com.atguigu.service.HelloService"/>
</beans>
Spring Boot推荐给容器中添加组件的方式
创建一个配置类使用@Configuration注解+@Bean的模式,向容器中添加组件
/**
 * @Configuration 指定当前类是一个配置类
 * 之前在配置文件中用<bean><bean/>标签添加组件,现在改为使用@Configuration+@Bean注解
 */
@Configuration
public class MyAppConfig {

    //将方法的返回值添加到容器中: 容器中这个组件的id默认就是方法名
    @Bean
    public HelloService helloService(){
        return new HelloService();
    }

}
测试
@RunWith(SpringRunner.class)
@org.springframework.boot.test.context.SpringBootTest
public class SpringBootApplicationTest {

    @Autowired
    ApplicationContext ioc;

    //测试IOC容器中是否包含一个名叫helloService的bean
    @Test
    public void testBean(){
        System.out.println(ioc.containsBean("helloService"));  //返回true
    }

}
3.7 配置文件中的随机数和占位符
配置文件中可以使用random函数生成随机数
例如
server:
  port: ${random.int[1024,9999]}  #生成随机端口号
num1: ${random.int(10)}
num2: ${random.long(20)}
配置文件中的数据
myApp.name=app
myApp.description=${myApp.name} is a spring boot application  #占位符有值的情况

myName.description=${myName:parkour} is my name           #未指定myName的值,使用默认值parkour  占位符无值的时候,可以指定一个默认值
测试结果
@Component
@RunWith(SpringRunner.class)
@org.springframework.boot.test.context.SpringBootTest
public class SpringBootApplicationTest {

    @Value("${myApp.description}")
    private String myAppdesc;

    @Value("${myName.description}")
    private String myName;

    @Test
    public void testDesc(){
        System.out.println(myAppdesc);  // 输出app is a spring boot application
        System.out.println(myName);     // 输出parkour is my name
    }

}
3.8 Profile多环境支持
3.8.1 Profile介绍
Profile 是 Spring 用来针对不同的环境要求,提供不同的配置支持,可以随意的切换开发, 生产, 测试环境下使用不同配置文件
全局 Profile 配置使用的文件名可以是application-{profile}.properties / application-{profile}.yml ;
如: application-dev.properties / application-prod.properties
Spring Boot的配置文件有两种一种是以properties结尾的,一种是以yml结尾的
3.8.2 properties 文件演示案例
如果使用的是properties格式的配置文件, 使用profile的方法如下
application.properties
#主配置文件默认的端口为8080
server.port=8080

#在主配置文件中指定激活使用开发环境下的端口8081
spring.profiles.active=dev
application-dev.properties
#开发环境下的端口为8081
server.port=8081
application-test.properties
#测试环境下的端口为8082
server.port=8082
application-prod.properties
#生产环境下的端口为8083
server.port=8083
3.8.3 yml 文件演示案例
如果使用的是yml格式的配置文件, 使用profile的方法更加简单, 直接在主配置文件application.yml中配置不同环境的配置文件即可
不同环境文档块之间使用—分隔
server:
  port: 8081
spring:
  profiles:
     active: dev
---
server:
  port: 8082
spring:
  profiles: dev
---
server:
  port: 8083
spring:
  profiles: test
---
server:
  port: 8084
spring:
  profiles: prod
3.8.4 激活指定profile的四种方式
方式1: 在主配置文件中指定
将主配置文件application.yml写好后直接运行程序即可
方式2: 将项目打成jar包, 通过java命令运行
将项目打包成jar包后,进入jar包所在目录,使用cmd命令窗口执行下面的命令即可(适合于linux下部署使用)
D:\Java\Springboot\SpringBootCode\target>java -jar spring-boot01-helloworld-1.0-SNAPSHOT.jar –spring-profiles.active=dev
方式3: 通过命令行参数指定
可以直接在测试的时候,配置传入命令行参数 –spring.profiles.active=dev

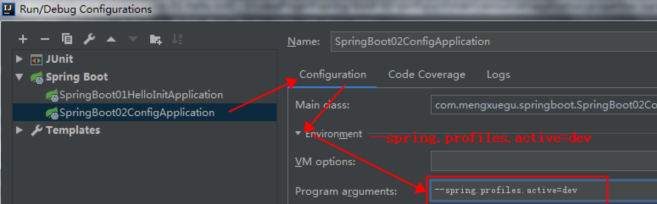
方式4: 通过虚拟机参数指定
也可以指定定虚拟机参数命令运行, 参数设置好点击OK后, 再点击运行程序即可
3.9 配置文件的加载位置顺序与优先级
Spring Boot启动的时候会扫描以下位置的application.properties或application.yml文件作为Spring Boot的默认配置文件
- 项目下/config/
- 项目下/
- classpath/config/
- classpath/
以上是按照优先级从高到低的顺序依次加载的
高优先级的配置内容会覆盖低优先级相同的配置内容, 如果高优先级的配置内容和低优先级的配置内容不同则会形成互补配置
我们也可以通过spring.config.location来改变默认的配置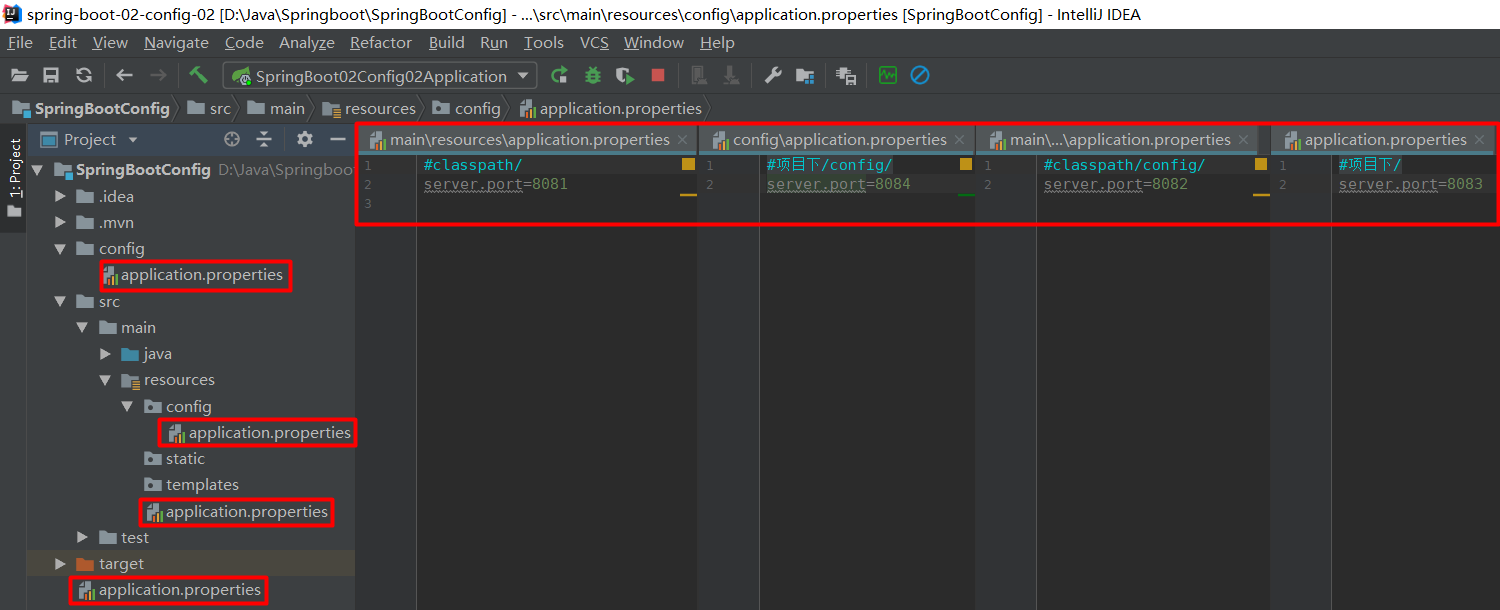
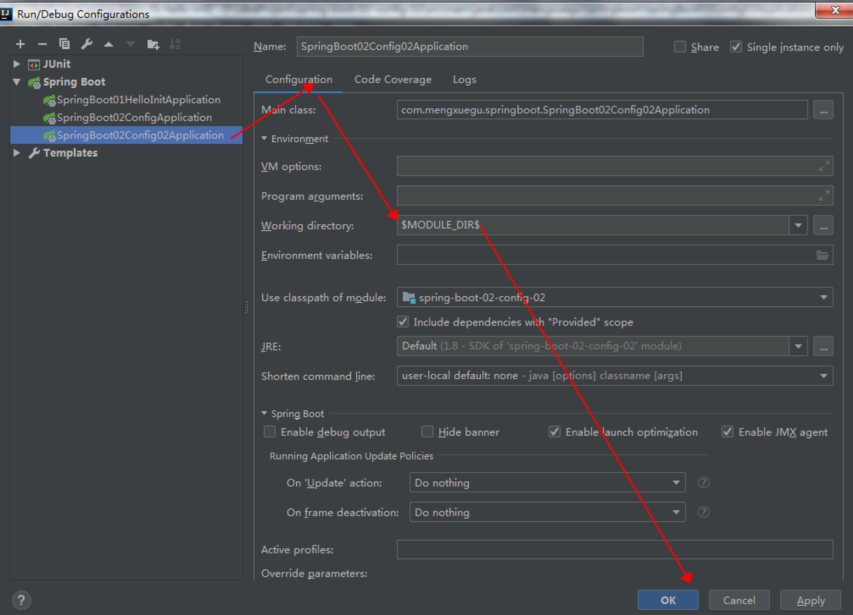
注意:如果使用IDEA创建的项目是 Module (如果是 Project 则忽略),当前项目的根目录不是你这个项目所
有目录(是Project所在目录) ,这样使用 file: 存放配置文件时会找不到配置
解决方式:更改工作路径直接为Module所有目录 $MODULE_DIR$
通过 1 System.getProperty(“user.dir”) 获取的是module的路径
4.0 外部配置加载顺序
Spring Boot也可以从以下位置加载配置,优先级由高到低, 高优先级的配置会覆盖低优先级相同的配置, 所有的配置会形成互补配置
1.命令行参数
所有的配置都可以在命令行上进行指定
java -jar spring-boot-02-config-02-0.0.1-SNAPSHOT.jar –server.port=8087 –server.context-path=/abc
多个配置用空格分开; –配置项=值
==由jar包外, 向jar包内进行寻找;==
==优先加载带profile的==
2.jar包外部的application-{profile}.properties或application.yml(带spring.profile)配置文件
3.jar包内部的application-{profile}.properties或application.yml(带spring.profile)配置文件
==再来加载不带profile的==
4.jar包外部的application.properties或application.yml(不带spring.profile)配置文件
5.jar包内部的application.properties或application.yml(不带spring.profile)配置文件
4.1 Spring Boot自动配置原理
明白配置文件到底能写什么?怎么写?(具体能写哪些东西,参见Spring Boot官方文档的附录A)
SpringBoot启动的时候加载主配置类
@SpringBootApplication
public class SpringBootConfigAutoconfigApplication {

    public static void main(String[] args) {
        SpringApplication.run(SpringBootConfigAutoconfigApplication.class, args);
    }

}
查看@SpringBootApplication注解, 开启了自动配置功能@EnableAutoConfiguration
//....这里还有其他注解
@EnableAutoConfiguration    //开启自动配置
public @interface SpringBootApplication {
}
查看@EnableAutoConfiguration注解
//....这里还有其他注解
@Import(EnableAutoConfigurationImportSelector.class)   //开启自动配置导入选择器
public @interface EnableAutoConfiguration {
}
@EnableAutoConfiguration 作用:利用EnableAutoConfigurationImportSelector给容器中导入了一些组件?
具体导入了哪些组件可以查看AutoConfigurationImportSelector类中selectImports()方法的内容
查看AutoConfigurationImportSelector类中
public class AutoConfigurationImportSelector implements XXX,YYY{
@Override
public String[] selectImports(AnnotationMetadata annotationMetadata) {
if (!isEnabled(annotationMetadata)) {
return NO_IMPORTS;
}
try {
// Step1: 得到注解信息
AutoConfigurationMetadata autoConfigurationMetadata = AutoConfigurationMetadataLoader
.loadMetadata(this.beanClassLoader);
// Step2: 得到注解中的所有属性信息
AnnotationAttributes attributes = getAttributes(annotationMetadata);
// Step3: 得到候选配置列表
List<String> configurations = getCandidateConfigurations(annotationMetadata,attributes);
// Step4: 去重
configurations = removeDuplicates(configurations);
// Step5: 排序
configurations = sort(configurations, autoConfigurationMetadata);
// Step6: 根据注解中的exclude信息去除不需要的
Set<String> exclusions = getExclusions(annotationMetadata, attributes);
checkExcludedClasses(configurations, exclusions);
configurations.removeAll(exclusions);
configurations = filter(configurations, autoConfigurationMetadata);
// Step7: 派发事件
fireAutoConfigurationImportEvents(configurations, exclusions);
return configurations.toArray(new String[configurations.size()]);
}
catch (IOException ex) {
throw new IllegalStateException(ex);
}
}
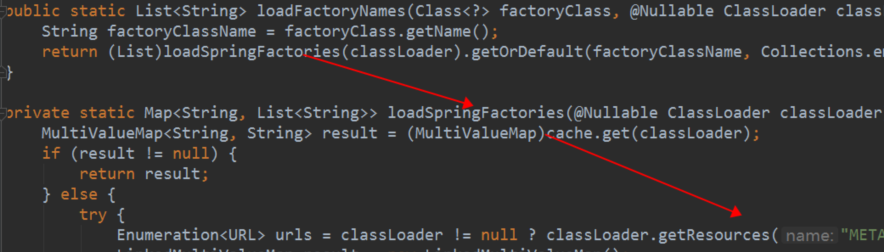
} 查看获取候选配置列表方法getCandidateConfigurations()
protected List<String> getCandidateConfigurations(AnnotationMetadata metadata,AnnotationAttributes attributes) {
    List<String> configurations = SpringFactoriesLoader.loadFactoryNames(getSpringFactoriesLoaderFactoryClass(), getBeanClassLoader());
    Assert.notEmpty(configurations,
            "No auto configuration classes found in META-INF/spring.factories. If you "
                    + "are using a custom packaging, make sure that file is correct.");
    return configurations;
}
查看loadFactoryNames()方法
// 传入的factoryClass:org.springframework.boot.autoconfigure.EnableAutoConfiguration
public static List<String> loadFactoryNames(Class<?> factoryClass, ClassLoader classLoader) {
    String factoryClassName = factoryClass.getName();
    try {
        Enumeration<URL> urls = (classLoader != null ? classLoader.getResources(FACTORIES_RESOURCE_LOCATION) :  //从类路径下获得资源
                                                            //扫描所有jar包类路径下"META-INF/spring.factories"的资源
                ClassLoader.getSystemResources(FACTORIES_RESOURCE_LOCATION));
        List<String> result = new ArrayList<String>();
        while (urls.hasMoreElements()) {
            URL url = urls.nextElement();
            Properties properties = PropertiesLoaderUtils.loadProperties(new UrlResource(url));
            String factoryClassNames = properties.getProperty(factoryClassName);
            result.addAll(Arrays.asList(StringUtils.commaDelimitedListToStringArray(factoryClassNames)));
        }
        return result;
    }
    catch (IOException ex) {
        throw new IllegalArgumentException("Unable to load [" + factoryClass.getName() +
                "] factories from location [" + FACTORIES_RESOURCE_LOCATION + "]", ex);
    }
}

// 相关常量
public static final String FACTORIES_RESOURCE_LOCATION = "META-INF/spring.factories";
将类路径下META-INF/spring.factories里面配置的所有EnableAutoConfiguration的值加入到容器中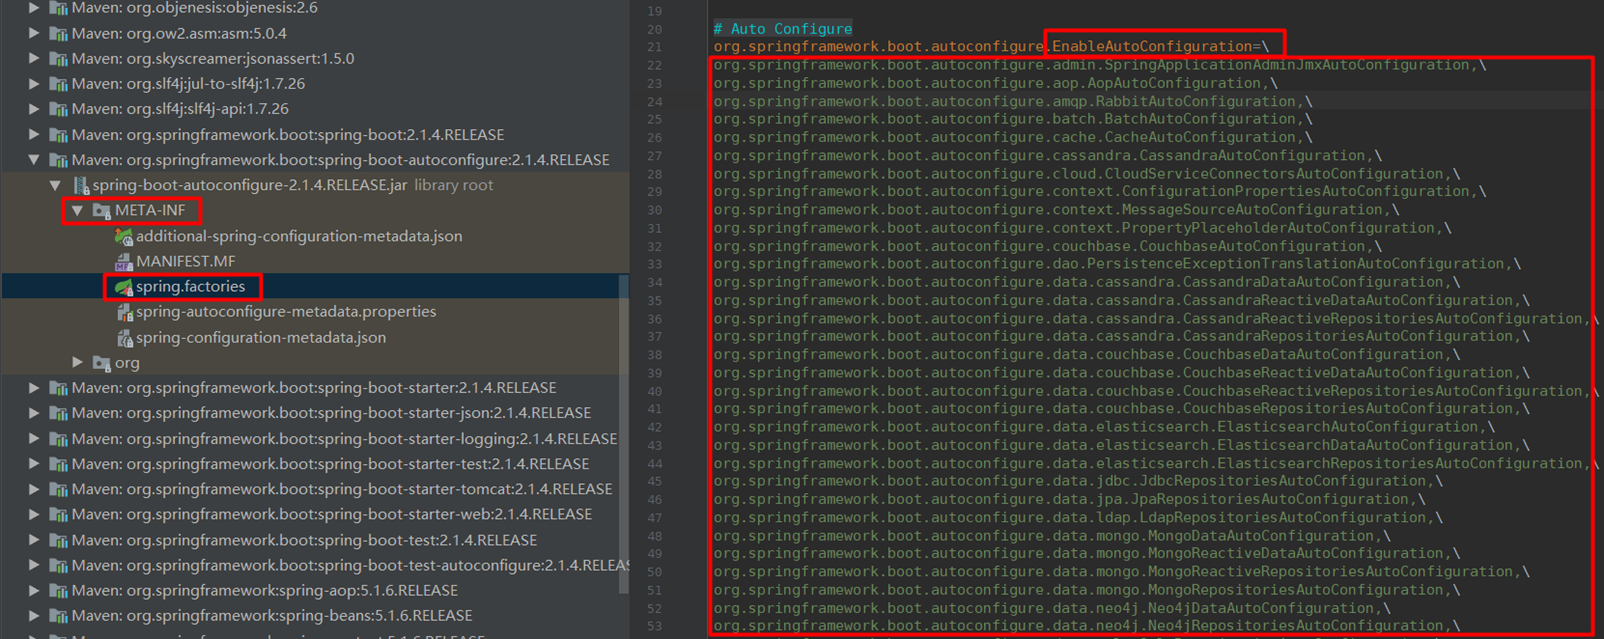
每一个这样的 xxxAutoConfiguration类都是容器中的一个组件,都加入到容器中;用他们来做自动配置;
3)、每一个自动配置类进行自动配置功能;
4)、以HttpEncodingAutoConfiguration(Http编码自动配置)为例解释自动配置原理;
@Configuration   //表示这是一个配置类,以前编写的配置文件一样,也可以给容器中添加组件
@EnableConfigurationProperties(HttpEncodingProperties.class)  //启动指定类的ConfigurationProperties功能;将配置文件中对应的值和HttpEncodingProperties绑定起来;并把HttpEncodingProperties加入到ioc容器中
@ConditionalOnWebApplication //Spring底层@Conditional注解(Spring注解版),根据不同的条件,如果满足指定的条件,整个配置类里面的配置就会生效;    判断当前应用是否是web应用,如果是,当前配置类生效
@ConditionalOnClass(CharacterEncodingFilter.class)  //判断当前项目有没有这个类CharacterEncodingFilter;SpringMVC中进行乱码解决的过滤器;
@ConditionalOnProperty(prefix = "spring.http.encoding", value = "enabled", matchIfMissing = true)  //判断配置文件中是否存在某个配置  spring.http.encoding.enabled;如果不存在,判断也是成立的
//即使我们配置文件中不配置pring.http.encoding.enabled=true,也是默认生效的;
public class HttpEncodingAutoConfiguration {
    //他已经和SpringBoot的配置文件映射了
    private final HttpEncodingProperties properties;
   //只有一个有参构造器的情况下,参数的值就会从容器中拿
    public HttpEncodingAutoConfiguration(HttpEncodingProperties properties) {
        this.properties = properties;
    }
    @Bean   //给容器中添加一个组件,这个组件的某些值需要从properties中获取
    @ConditionalOnMissingBean(CharacterEncodingFilter.class) //判断容器没有这个组件?
    public CharacterEncodingFilter characterEncodingFilter() {
        CharacterEncodingFilter filter = new OrderedCharacterEncodingFilter();
        filter.setEncoding(this.properties.getCharset().name());
        filter.setForceRequestEncoding(this.properties.shouldForce(Type.REQUEST));
        filter.setForceResponseEncoding(this.properties.shouldForce(Type.RESPONSE));
        return filter;
    }
根据当前不同的条件判断,决定这个配置类是否生效?
一但这个配置类生效;这个配置类就会给容器中添加各种组件;这些组件的属性是从对应的properties类中获取的,这些类里面的每一个属性又是和配置文件绑定的;
5)、所有在配置文件中能配置的属性都是在xxProperties类中封装着;配置文件能配置什么就可以参照某个功能对应的这个属性类
@ConfigurationProperties(prefix = "spring.http.encoding")  //从配置文件中获取指定的值和bean的属性进行绑定
   public class HttpEncodingProperties {
      public static final Charset DEFAULT_CHARSET = Charset.forName("UTF-8");
Spring Boot自动配置的精髓:
1)、SpringBoot启动会加载大量的自动配置类
2)、我们看我们需要的功能有没有SpringBoot默认写好的自动配置类;
3)、我们再来看这个自动配置类中到底配置了哪些组件;(只要我们要用的组件有,我们就不需要再来配置了)
4)、给容器中自动配置类添加组件的时候,会从properties类中获取某些属性。我们就可以在配置文件中指定这些属性的值;
xxxxAutoConfigurartion:自动配置类;
给容器中添加组件
xxxxProperties:封装配置文件中相关属性;
4.2 @Conditional派生注解
作用:必须是@Conditional指定的条件成立,才给容器中添加组件,配置配里面的所有内容才生效;
| @Conditional扩展注解 | 作用(判断是否满足当前指定条件) |
|---|---|
| @ConditionalOnJava | 系统的java版本是否符合要求 |
| @ConditionalOnBean | 容器中存在指定Bean |
| @ConditionalOnMissingBean | 容器中不存在指定Bean |
| @ConditionalOnExpression | 满足SpEL表达式指定 |
| @ConditionalOnClass | 系统中有指定的类 |
| @ConditionalOnMissingClass | 系统中没有指定的类 |
| @ConditionalOnSingleCandidate | 容器中只有一个指定的Bean,或者这个Bean是首选Bean |
| @ConditionalOnProperty | 系统中指定的属性是否有指定的值 |
| @ConditionalOnResource | 类路径下是否存在指定资源文件 |
| @ConditionalOnWebApplication | 当前是web环境 |
| @ConditionalOnNotWebApplication | 当前不是web环境 |
| @ConditionalOnJndi | JNDI存在指定项 |
自动配置类必须在一定的条件下才能生效;
4.3 自动配置匹配报告
我们怎么知道哪些自动配置类生效;
我们可以通过启用debug=true属性;来让控制台打印自动配置匹配报告,这样我们就可以很方便的知道哪些自动配置类生效了
首先需要在Spring Boot配置文件application.properties中加入一段代码
debug=true然后使用debug模式开启程序,打印自动配置匹配报告,如下
=========================
AUTO-CONFIGURATION REPORT
=========================


Positive matches:(启用的自动配置类)
-----------------

   DispatcherServletAutoConfiguration matched:
      - @ConditionalOnClass found required class 'org.springframework.web.servlet.DispatcherServlet'; @ConditionalOnMissingClass did not find unwanted class (OnClassCondition)
      - @ConditionalOnWebApplication (required) found StandardServletEnvironment (OnWebApplicationCondition)


Negative matches:(没有启用的自动配置类)
-----------------

   ActiveMQAutoConfiguration:
      Did not match:
         - @ConditionalOnClass did not find required classes 'javax.jms.ConnectionFactory', 'org.apache.activemq.ActiveMQConnectionFactory' (OnClassCondition)

   AopAutoConfiguration:
      Did not match:
         - @ConditionalOnClass did not find required classes 'org.aspectj.lang.annotation.Aspect', 'org.aspectj.lang.reflect.Advice' (OnClassCondition)
第4章 Spring Boot日志配置
常见日志框架和日志实现
| 日志接口 | 日志实现 |
|---|---|
| JCL(Jakarta Commons Logging即apache下的commons-logging, 2014年后便不再维护) jboss-logging(不适合企业项目开发使用) SLF4j(Simple Logging Facade for Java,与 log4j和Logback一样是出自同一个人开发) |
Log4j(存在性能问题) JUL(java.util.logging 担心被抢市场,推出的) Log4j2(apache开发,借用了log4j的名, 但当前很多框架未适配上) Logback(在Log4j基础上做了重大升级) |
4.1 默认日志配置
Spring Boot 默认采用了 SLF4j +Logback 的组合形式
如果不使用Maven, 需要使用SLF4j+ Logback组合的日志框架,只需要导入日志接口SLF4j的jar包和日志实现Logback的jar包即可
如果是在SpringBoot中要使用SLF4j+ Logback组合的日志框架,只需要在pom文件中添加上日志启动器spring-boot-starter-logging即可(不用做这一步,原因如下)
<dependency>
    <groupId>org.springframework.boot</groupId>
    <artifactId>spring-boot-starter</artifactId>
</dependency>
注意: 如果在pom文件中已经添加了spring-boot-starter-web坐标,则不必再添加spring-boot-starter了,因为spring-boot-starter-web文件中已经包含了
如果在pom文件中已经添加了spring-boot-starter坐标,则不必加下面的spring-boot-starter-logging了,因为spring-boot-starter的pom文件中已经包含了
我们一般都会使用spring boot的web模块, 所以, 由上述可知,其实使用spring-boot-starter-logging在pom文件中不用我们添加
<dependency>
    <groupId>org.springframework.boot</groupId>
    <artifactId> spring-boot-starter-logging </artifactId>
</dependency>
面向接口编程,SLF4j的使用方法见下面演示代码
import org.slf4j.Logger;
import org.slf4j.LoggerFactory;

public class HelloWorld {
  public static void main(String[] args) {
    Logger logger = LoggerFactory.getLogger(HelloWorld.class);
    //日志级别由低到高, trace<debug<info<warn<error日志级别越低输出的信息越多
    //spring boot默认的日志级别为info 所以只会输出info warn和error信息
    logger.trace("这是trace日志");
    logger.debug("这是debug日志");
    logger.info("这是info日志");
    logger.warn("这是warn日志");
    logger.error("这是error日志");
  }
}
SpringBoot底层也是使用slf4j+logback的方式进行日志记录, SpringBoot也把其他的日志都替换成了slf4j底层的依赖关系图如下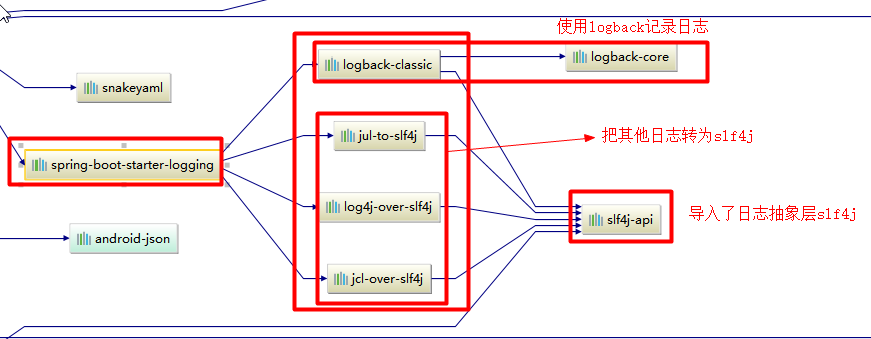
注意: 如果我们需要引入其他框架, 一定要把这个框架的默认日志依赖移除掉, 例如
<dependency>
    <groupId>org.springframework</groupId>
    <artifactId>spring-core</artifactId>
    <exclusions>
        <exclusion>
            <groupId>commons-logging</groupId>
            <artifactId>commons-logging</artifactId>
        </exclusion>
    </exclusions>
</dependency>
4.2 修改Spring Boot默认的日志配置
Spring Boot中日志的相关配置, 都可以在application.properties配置文件中进行更改 例如:
#更改日志的输出级别
logging.level.com.parkour=trace
        #将com.parkour包下日志的输出级别设置为trace

#将日志输出到指定的文件
#logging.file=springboot.log   #不指定路径就在当前项目下生成日志文件
logging.file=C:/Users/parko/Desktop/springboot.log  #指定日志文件存放的路径

#在当前项目的所在的磁盘路径(比如C盘,D盘)下创建一个spring文件夹,在spring文件下创建一个log文件夹,
#spring boot将生成的默认日志文件spring.log存放在该文件夹log下
logging.path=/spring/log

#注意: 如果logging.file和logging.path同时都配置, 默认logging.file生效,logging.path不会生效

#指定在文件中输出的日志格式
logging.pattern.file=%d{yyyy-MM-dd HH:mm:ss.SSS} [%thread] %-5level %logger{50} - %msg%n

#指定在控制台输出的日志格式
logging.pattern.console=%d{yyyy-MM-dd HH:mm:ss.SSS} [%thread] %-5level %logger{50} - %msg%n

#默认在控制台输出的日志格式
2019-04-19 23:23:03.532  INFO    5204 --- [           main] o.apache.catalina.core.StandardService   : Starting service [Tomcat]
时间        日志级别  线程ID            线程名               全类名                     日志消息
#指定日志格式后在控制台输出的日志格式
2019-04-19 23:43:35.300 [main] INFO  org.apache.catalina.core.StandardService - Starting service [Tomcat]
4.3 其他日志实现框架要使用SLF4j, 需要导入的jar包关系如下

每一个日志的实现框架都有自己的配置文件。使用slf4j作为日志接口后,日志的配置文件还是使用对应日志实现框架自己本身的配置文件
4.4 自定义logback日志配置
如果spring boot的日志功能无法满足我们的需求(比如异步日志记录等),我们可以自已定义日志配置文件
在 resources 目录下创建 logback.xml , 文件内容如下,SpringBoot就会采用以下日志配置:
<?xml version="1.0" encoding="UTF-8"?>
<!--
scan:当此属性设置为true时,配置文件如果发生改变,将会被重新加载,默认值为true。
scanPeriod:设置监测配置文件是否有修改的时间间隔,如果没有给出时间单位,默认单位是毫秒当scan为true时,此属性生效。默认的时间间隔为1分钟。
debug:当此属性设置为true时,将打印出logback内部日志信息,实时查看logback运行状态。默认值为false。
-->
<configuration scan="false" scanPeriod="60 seconds" debug="false">
    <!-- 定义日志的根目录 -->
    <property name="LOG_HOME" value="/app/log"/>
    <!-- 定义日志文件名称 -->
    <property name="appName" value="atguigu-springboot"></property>
    <!-- ch.qos.logback.core.ConsoleAppender 表示控制台输出 -->
    <appender name="stdout" class="ch.qos.logback.core.ConsoleAppender">
        <!--
        日志输出格式说明:
            %d           表示日期时间,yyyy-MM-dd HH:mm:ss.SSS 年-月-日 时:分:秒.毫秒
            %thread     表示线程名,
            %-5level:  输日志级别,左对齐5个字符宽度
            %logger{50} 输出全类名最长50个字符,超过按照句点分割。
            %msg:      日志信息,
            %n          是换行符
        -->
        <layout class="ch.qos.logback.classic.PatternLayout">
            <pattern>%d{yyyy-MM-dd HH:mm:ss.SSS} [%thread] %-5level %logger{50} - %msg%n</pattern>
        </layout>
    </appender>

    <!-- 滚动记录文件,先将日志记录到指定文件,当符合某个条件时,将日志记录到其他文件 -->
    <appender name="appLogAppender" class="ch.qos.logback.core.rolling.RollingFileAppender">
        <!-- 指定日志文件的名称 -->
        <file>${LOG_HOME}/${appName}.log</file>
        <!--
        当发生滚动时,决定 RollingFileAppender 的行为,涉及文件移动和重命名
        TimeBasedRollingPolicy: 最常用的滚动策略,它根据时间来制定滚动策略,既负责滚动也负责出发滚动。
        -->
        <rollingPolicy class="ch.qos.logback.core.rolling.TimeBasedRollingPolicy">
            <!--
            滚动时产生的文件的存放位置及文件名称 %d{yyyy-MM-dd}:按天进行日志滚动
            %i:当文件大小超过maxFileSize时,按照i进行文件滚动
            -->
            <fileNamePattern>${LOG_HOME}/${appName}-%d{yyyy-MM-dd}-%i.log</fileNamePattern>
            <!--
            可选节点,控制保留的归档文件的最大数量,超出数量就删除旧文件。假设设置每天滚动,
            且maxHistory是365,则只保存最近365天的文件,删除之前的旧文件。注意,删除旧文件是,
            那些为了归档而创建的目录也会被删除。
            -->
            <MaxHistory>365</MaxHistory>
            <!--
            当日志文件超过maxFileSize指定的大小是,根据上面提到的%i进行日志文件滚动 注意此处配置SizeBasedTriggeringPolicy是无法实现按文件大小进行滚动的,必须配置timeBasedFileNamingAndTriggeringPolicy
            -->
            <timeBasedFileNamingAndTriggeringPolicy class="ch.qos.logback.core.rolling.SizeAndTimeBasedFNATP">
                <maxFileSize>100MB</maxFileSize>
            </timeBasedFileNamingAndTriggeringPolicy>
        </rollingPolicy>
        <!-- 日志输出格式: -->
        <layout class="ch.qos.logback.classic.PatternLayout">
            <pattern>%d{yyyy-MM-dd HH:mm:ss.SSS} [ %thread ] - [ %-5level ] [ %logger{50} : %line ] - %msg%n</pattern>
        </layout>
    </appender>

    <!--
        logger主要用于存放日志对象,也可以定义日志类型、级别
        name:表示匹配的logger类型前缀,也就是包的前半部分
        level:要记录的日志级别,包括 TRACE < DEBUG < INFO < WARN < ERROR
        additivity:作用在于children-logger是否使用 rootLogger配置的appender进行输出,
        false:表示只用当前logger的appender-ref,true:
        表示当前logger的appender-ref和rootLogger的appender-ref都有效
    -->
    <!-- hibernate logger -->
    <logger name="com.atguigu" level="debug"/>
    <!-- Spring framework logger -->
    <logger name="org.springframework" level="debug" additivity="false"></logger>


    <!--
    root与logger是父子关系,没有特别定义则默认为root,任何一个类只会和一个logger对应,
    要么是定义的logger,要么是root,判断的关键在于找到这个logger,然后判断这个logger的appender和level。
    -->
    <root level="info">
        <appender-ref ref="stdout"/>
        <appender-ref ref="appLogAppender"/>
    </root>
</configuration>
4.4.1 logback-spring.xml可以使用 Profile 特殊配置
logback.xml :是直接就被日志框架加载了。
logback-spring.xml:配置项不会被日志框架直接加载,而是由 SpringBoot 解析日志配置文件
进而可以使用SpringBoot 的 Profile 特殊配置,可根据不同的环境激活不同的日志配置
将在类路径classpath(在IDEA中即resources)下的logback.xml 改为 logback-spring.xml
在logback-spring.xml中添加日志配置 , 可以使用SpringBoot的Profile功能指定某段配置只能在某个环境下(dev test prod)才生效
<?xml version="1.0" encoding="UTF-8"?>
<configuration scan="false" scanPeriod="60 seconds" debug="false">
    <property name="LOG_HOME" value="/app/log"/>
    <property name="appName" value="atguigu-springboot"></property>
    <appender name="stdout" class="ch.qos.logback.core.ConsoleAppender">
        <layout class="ch.qos.logback.classic.PatternLayout">
            <pattern>%d{yyyy-MM-dd HH:mm:ss.SSS} [%thread] %-5level %logger{50} - %msg%n</pattern>
        </layout>
    </appender>
    <appender name="appLogAppender" class="ch.qos.logback.core.rolling.RollingFileAppender">
        <file>${LOG_HOME}/${appName}.log</file>
        <rollingPolicy class="ch.qos.logback.core.rolling.TimeBasedRollingPolicy">
            <fileNamePattern>${LOG_HOME}/${appName}-%d{yyyy-MM-dd}-%i.log</fileNamePattern>
            <MaxHistory>365</MaxHistory>
            <timeBasedFileNamingAndTriggeringPolicy class="ch.qos.logback.core.rolling.SizeAndTimeBasedFNATP">
                <maxFileSize>100MB</maxFileSize>
            </timeBasedFileNamingAndTriggeringPolicy>
        </rollingPolicy>
        <layout class="ch.qos.logback.classic.PatternLayout">
              <springProfile name="dev">
                    <pattern>%d{yyyy-MM-dd HH:mm:ss.SSS} ----> [%thread] ---> %-5level %logger{50} - %msg%n</pattern>
               </springProfile>
               <springProfile name="test">
                    <pattern>%d{yyyy-MM-dd HH:mm:ss.SSS} ==== [%thread] ==== %-5level %logger{50} - %msg%n</pattern>
               </springProfile>
        </layout>
    </appender>
    <logger name="com.atguigu" level="debug"/>
    <logger name="org.springframework" level="debug" additivity="false"></logger>
    <root level="info">
        <appender-ref ref="stdout"/>
        <appender-ref ref="appLogAppender"/>
    </root>
</configuration>
4.5 将系统中所有的日志都统一到slf4j+logback
在Spring Boot中不同框架使用不同的日志框架如何使其全部转向使用SLF4j+logback组合的日志框架
日志遗留问题
开发一个应用的时候,如果我使用的是SLF4j+logback的方式记录日志 ,但我开发这个应用的时候还需要用到Spring框架,Hibernate框架等等框架,但是每个框架底层使用的日志框架可能不同, 比如Spring底层使用的日志接口框架就是commons-logging, Hibernate底层使用的日志接口框架就是jboss-logging 那么现在我想统一日志记录的框架, 将其他框架你都给我使用SLF4j+logback的方式来记录日志 .这样的好处就是不用针对不同的日志实现框架写不同的日志配置文件了,只需要写一个logback的日志配置文件即可
步骤:
1将系统中其他日志框架先排除出去
<dependency>
    <groupId>org.springframework</groupId>
    <artifactId>spring-core</artifactId>
    <exclusions>
        <exclusion>
            <groupId>commons-logging</groupId>
            <artifactId>commons-logging</artifactId>
        </exclusion>
    </exclusions>
</dependency>
2.用中间包来替换原有的日志框架
使用jcl-over-slf4j.jar替换commons-logging.jar
3.导入slf4j的实现logback
导入logback-classic.jar
logback-core.jar
具体实现思路见下图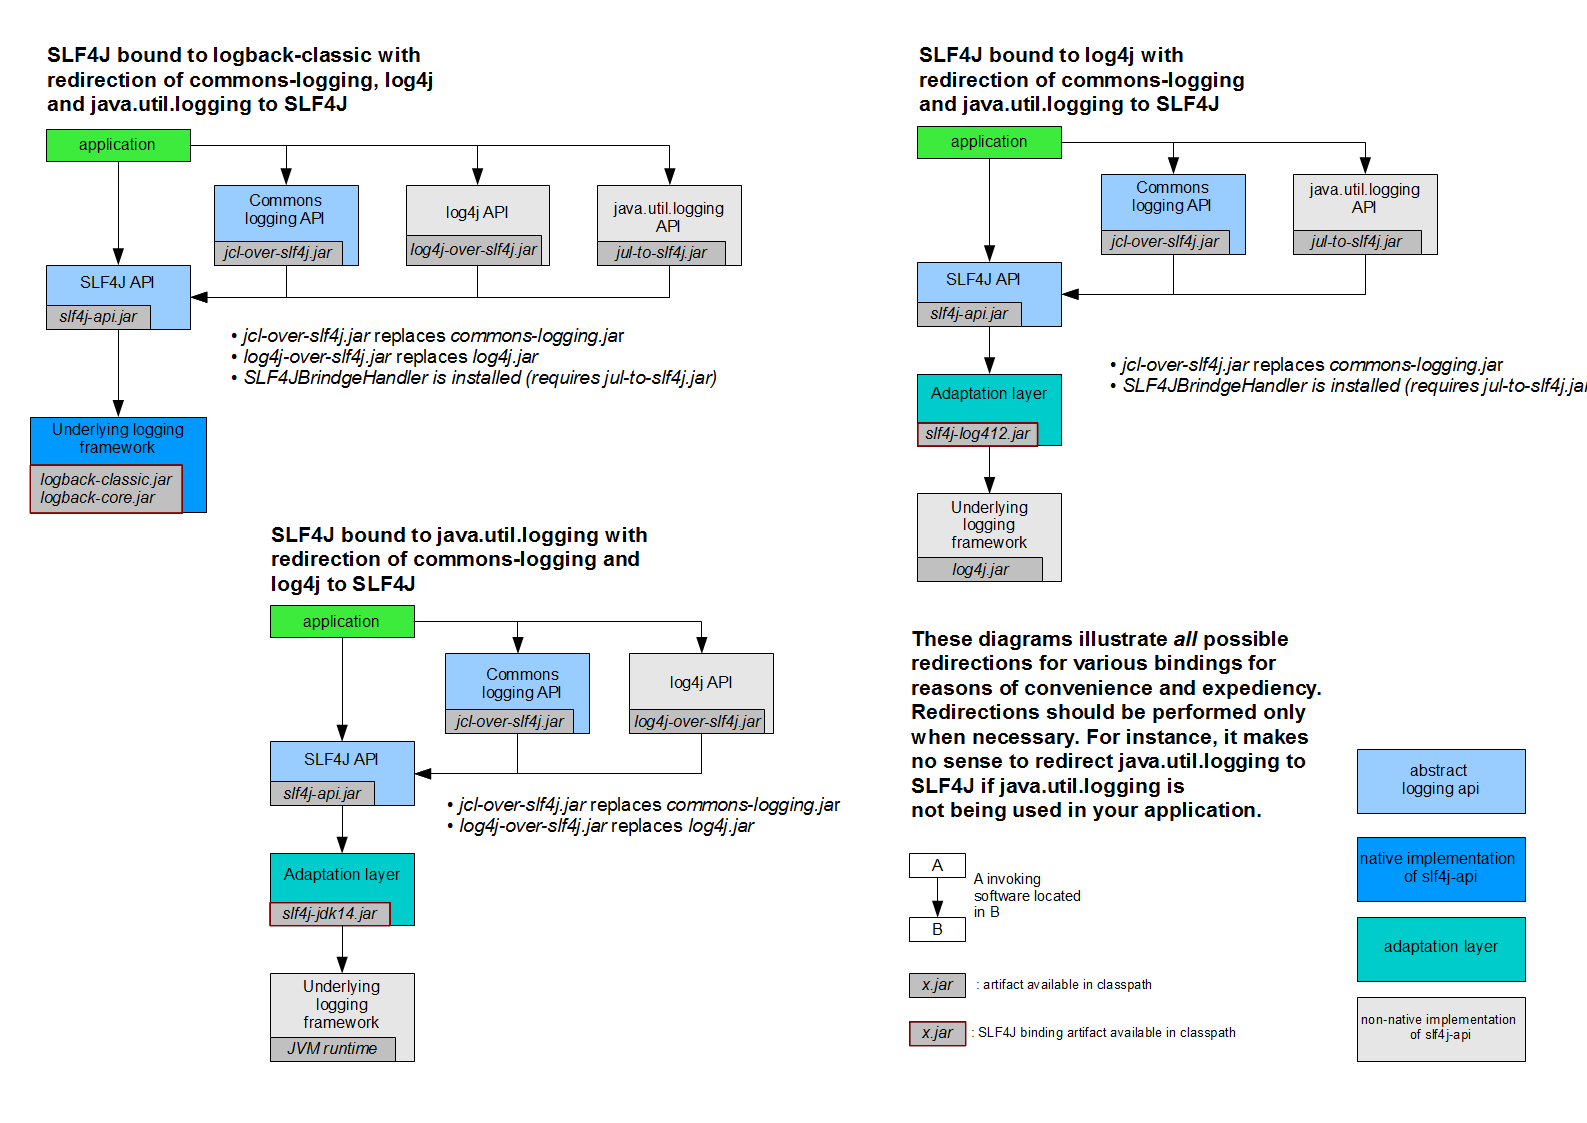
第5章 Spring Boot的web开发
5.1 Spring Boot对Web开发的支持
使用Spring Boot搭建web工程的步骤
在IDEA中通过Spring Initializr创建Spring Boot项目,勾选对应需要的web模块即可
根据自己的需求在application.properties或application.yml配置文件中添加自定义的配置即可
编写业务代码
Spring Boot 为 Web 开发提供了 spring-boot-starter-web 启动器作为基本支持,为我们提供了嵌入的
Tomcat 以及 Spring MVC 的依赖支持。(参考:pom.xml)
也提供了很多不同场景的自动配置类,让我们只需要在配置文件中指定少量的配置即可启动项目。自动配置
类存储在 spring-boot-autoconfigure.jar 的 org.springframework.boot.autoconfigure 包下。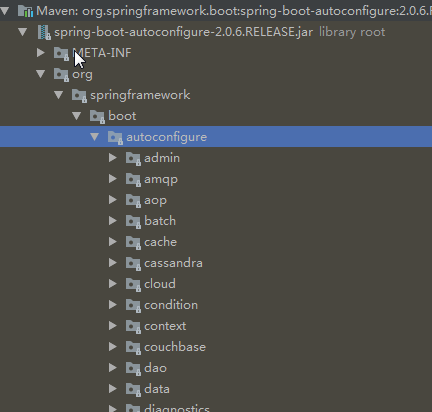
自动配置类举例
xxxxAutoConfiguration :向容器中添加自动配置组件
xxxxProperties :使用自动配置类 来封装 配置文件的内容
SpringMVC配置 : WebMvcAutoConfiguration 和 WebMvcProperties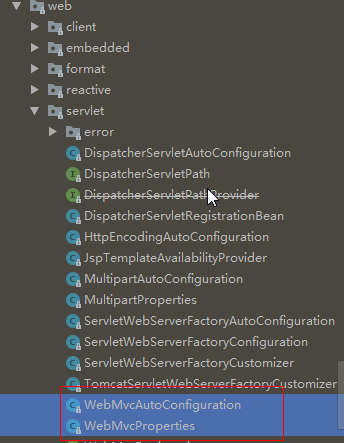
内嵌 Servlet 容器 : ServletWebServerFactoryAutoConfiguration 和 ServerProperties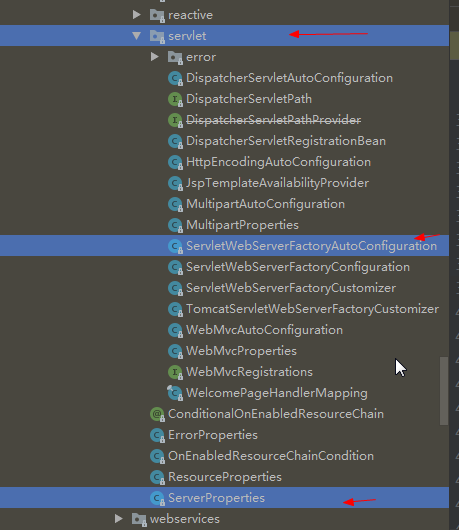
上传文件的属性 :MultipartAutoConfiguration 和 MultipartProperties
JDBC : DataSourceAutoConfiguration 和 DataSourceProperties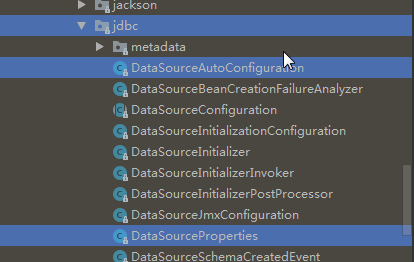
5.2 静态资源的映射规则
@ConfigurationProperties(prefix = "spring.resources", ignoreUnknownFields = false)
public class ResourceProperties implements ResourceLoaderAware {
  //可以设置和静态资源有关的参数,缓存时间等

WebMvcAuotConfiguration:
        @Override
        public void addResourceHandlers(ResourceHandlerRegistry registry) {
            if (!this.resourceProperties.isAddMappings()) {
                logger.debug("Default resource handling disabled");
                return;
            }
            Integer cachePeriod = this.resourceProperties.getCachePeriod();
            if (!registry.hasMappingForPattern("/webjars/**")) {
                customizeResourceHandlerRegistration(
                        registry.addResourceHandler("/webjars/**")
                                .addResourceLocations(
                                        "classpath:/META-INF/resources/webjars/")
                        .setCachePeriod(cachePeriod));
            }
            String staticPathPattern = this.mvcProperties.getStaticPathPattern();
            //静态资源文件夹映射
            if (!registry.hasMappingForPattern(staticPathPattern)) {
                customizeResourceHandlerRegistration(
                        registry.addResourceHandler(staticPathPattern)
                                .addResourceLocations(
                                        this.resourceProperties.getStaticLocations())
                        .setCachePeriod(cachePeriod));
            }
        }

        //配置欢迎页映射
        @Bean
        public WelcomePageHandlerMapping welcomePageHandlerMapping(
                ResourceProperties resourceProperties) {
            return new WelcomePageHandlerMapping(resourceProperties.getWelcomePage(),
                    this.mvcProperties.getStaticPathPattern());
        }

       //配置喜欢的图标
        @Configuration
        @ConditionalOnProperty(value = "spring.mvc.favicon.enabled", matchIfMissing = true)
        public static class FaviconConfiguration {

            private final ResourceProperties resourceProperties;

            public FaviconConfiguration(ResourceProperties resourceProperties) {
                this.resourceProperties = resourceProperties;
            }

            @Bean
            public SimpleUrlHandlerMapping faviconHandlerMapping() {
                SimpleUrlHandlerMapping mapping = new SimpleUrlHandlerMapping();
                mapping.setOrder(Ordered.HIGHEST_PRECEDENCE + 1);
                //所有  **/favicon.ico
                mapping.setUrlMap(Collections.singletonMap("**/favicon.ico",
                        faviconRequestHandler()));
                return mapping;
            }

            @Bean
            public ResourceHttpRequestHandler faviconRequestHandler() {
                ResourceHttpRequestHandler requestHandler = new ResourceHttpRequestHandler();
                requestHandler
                        .setLocations(this.resourceProperties.getFaviconLocations());
                return requestHandler;
            }

        }
webjars:以jar包的方式引入静态资源;
在访问的时候只需要写webjars下面资源的名称即可
<!--引入jquery-webjar-->
<dependency>
    <groupId>org.webjars</groupId>
    <artifactId>jquery</artifactId>
    <version>3.3.1</version>
</dependency>
所有请求以/webjars/**开头的url ,都去项目的 classpath:/META-INF/resources/webjars/下找静态资源
例如请求: localhost:8080/webjars/jquery/3.3.1/jquery.js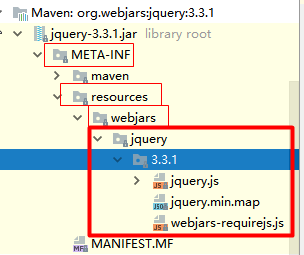
/** 访问当前项目的任何资源,都去(静态资源的文件夹)找映射
例如请求: localhost:8080/abc === 去静态资源文件夹里面找abc
以下五个路径都属于静态资源文件夹,都可以存放静态资源
"classpath:/META-INF/resources/",
"classpath:/resources/",
"classpath:/static/",
"classpath:/public/"
"/":当前项目的根路径
请求根路径显示index页面
请求: localhost:8080/ 显示index页面 只需要将index.html文件放在上述五个静态文件路径下的一个即可
显示网站图标
只需要将favicon.ico图标文件放在上述五个静态文件路径下的一个即可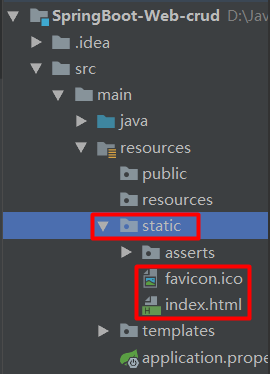
5.3 Thymeleaf模板引擎
Spring Boot 官方不推荐使用JSP,因为内嵌的 Tomcat 、Jetty 容器不支持以 jar 形式运行 JSP。Spring Boot
中提供了大量模板引擎,包含 Freemarker、Mastache、Thymeleaf 等。 而 Spring Boot 官方推荐使用
Thymeleaf 作为模板引擎, 因为 Thymeleaf 提供了完美的 SpringMVC 的支持。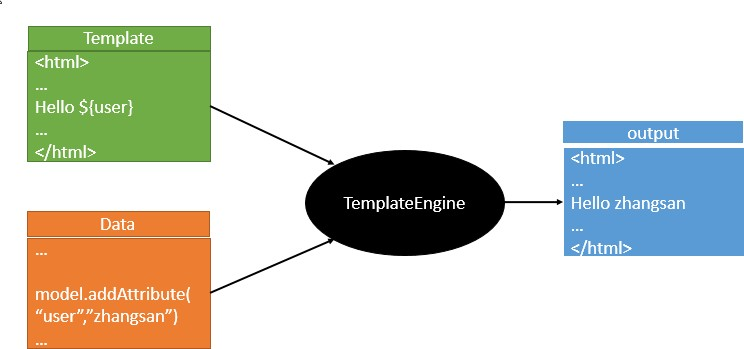
5.3.1 引入Thymeleaf
pom中加入 Thymeleaf 启动器
<dependency>
    <groupId>org.springframework.boot</groupId>
    <artifactId>spring-boot-starter-thymeleaf</artifactId>
</dependency>
5.3.2 使用Thymeleaf
模板文件放在哪里?
@ConfigurationProperties(prefix = "spring.thymeleaf")
public class ThymeleafProperties {
    private static final Charset DEFAULT_ENCODING;
    public static final String DEFAULT_PREFIX = "classpath:/templates/";
    public static final String DEFAULT_SUFFIX = ".html";
通过上面分析发现, 将 HTML 页面放到 classpath:/templates/ 目录下, Thymeleaf 就能自动渲染
@RequestMapping("/execute")
public String execute(Map<String, Object> map) {
    map.put("name", "梦学谷");
    // classpath:/templates/success.html
    return "success"; 6
}
发送 http://localhost:8080/execute 后, 通过上面代码转到 classpath:/templates/success.html
导入 Thymeleaf 的名称空间
在 html 页面加上以下名称空间, 使用 Thymeleaf 时就有语法提示
<html xmlns:th="http://www.thymeleaf.org">演示Thymeleaf 语法
<html lang="en" xmlns:th="http://www.thymeleaf.org">
<head>
    <meta charset="UTF-8">
    <title>hello</title>
</head>
<body>
    <h2>成功</h2>
    <!--th:text 设置p标签的标签体内容-->
    <p th:text="${name}">这里显示名字</p>
</body>
</html>
5.3.3 Thymeleaf 语法
5.3.3.1 常用属性
| 优先级 | 属性名 | 作用 |
|---|---|---|
| 1 | th:insert th:replace |
引入片段,与th:fragment声明组合使用; 类似于 jsp:include |
| 2 | th:each | 遍历,类似于 c:forEach |
| 3 | th:if th:unless th:switch th:case |
条件判断,类似于 c:if |
| 4 | th:object th:with |
声明变量,类似于 c:set |
| 5 | th:attr th:attrprepend th:attrappend |
修改任意属性, prepend前面追加, append后面追加 |
| 6 | th:value th:href th:src … |
修改任意html原生属性值 |
| 7 | th:text th:utext |
修改标签体中的内容, th:text 转义特殊字符, 即 h1标签以文本显示出来th:utext 是不转义特殊字符, 即 h1 标签展现出本来效果 |
| 8 | th:fragment | 声明片段 |
| 9 | th:remove | 移除片段 |
5.3.3.2 标准表达式语法
一、Simple expressions(表达式语法)
    1. Variable Expressions(变量表达式): ${...}	(参考: 4.2 Variables)
        1)、获取变量值;使用OGNL表达式;
        2)、获取对象的属性, 调用方法

        3)、使用内置的基本对象:
            #ctx : the context object.(当前上下文对象)
            #vars: the context variables.(当前上下文里的变量)
            #locale : the context locale. (当前上下文里的区域信息)
            下面是Web环境下的隐式对象
            #request : (only in Web Contexts) the HttpServletRequest object.
            #response : (only in Web Contexts) the HttpServletResponse object.
            #session : (only in Web Contexts) the HttpSession object.
            #servletContext : (only in Web Contexts) the ServletContext object.
            示例:	${session.foo}	(用法参考: 18 Appendix A: Expression Basic Objects)

        4)、使用内置的工具对象:(用法参考: 19 Appendix B: Expression Utility Objects)
            #execInfo : information about the template being processed.
            #messages : methods for obtaining externalized messages inside variables expressions, in the same way as they would be obtained using #{…} syntax.
            #uris : methods for escaping parts of URLs/URIs
            #conversions : methods for executing the configured	conversion service (if any).
            #dates : methods for	java.util.Date	objects: formatting, component extraction, etc.
            #calendars : analogous to	#dates , but for	java.util.Calendar objects.
            #numbers : methods for formatting numeric objects.
            #strings : methods for	String	objects: contains, startsWith, prepending/appending, etc.
            #objects : methods for objects in general.
            #bools : methods for boolean evaluation.
            #arrays : methods for arrays.
            #lists : methods for lists.
            #sets : methods for sets.
            #maps : methods for maps.
            #aggregates : methods for creating aggregates on arrays or collections.
            #ids : methods for dealing with id attributes that might be repeated (for example, as a result of an iteration).

    2. Selection Variable Expressions(选择表达式): *{...}  (参考:4.3 Expressions on selections)
        1)、和${}在功能上是一样, 额外新增:配合 th:object 使用
            <div th:object="${session.user}">
            省得每次写${session.user.firstName}, 直接取出对象,然后写对象名即可
            <p>Name: <span th:text="*{firstName}">Sebastian</span> </p>
            <p>Email: <span th:text="*{email}">Saturn</span> </p>
            </div>

    3. Message Expressions(获取国际化内容):	#{...}	(参考:4.1 Messages)
    4. Link URL Expressions(定义URL):	@{...}	(参考:4.4 Link URLs)
    5. Fragment Expressions(片段引用表达式):	~{...}	(参考:4.5 Fragments)
        <div th:insert="~{commons :: main}">...</div>

二、Literals(字面量) (参考: 4.6 Literals)
    1. Text literals:	'one text' ,	'Another one!' ,… 49
    2. Number literals:	0 ,34 ,3.0 ,12.3 ,…
    3. Boolean literals:	true ,false
    4. Null literal:	null
    5. Literal tokens: one ,	sometext ,main ,…

三、Text operations(文本操作) (参考: 4.7 Appending texts)
    1. String concatenation:	+
    2. Literal substitutions:	|The name is ${name}|

四、Arithmetic operations(数学运算) (参考: 4.9 Arithmetic operations)
    1. Binary operators:	+ ,	- ,	* ,	/ ,	%
    2. Minus sign (unary operator):	- 61

五、Boolean operations(布尔运算)
    1.	Binary operators:	and ,	or
    2.	Boolean negation (unary operator):	! ,	not

六、Comparisons and equality(比较运算)	(参考: 4.10 Comparators and Equality)
    1.	Comparators:	> ,	< ,	>= ,	<=	( gt ,	lt ,	ge ,	le )
    2.	Equality operators:	== ,	!=	( eq ,	ne )
七、Conditional operators(条件表达式;三元运算符) (参考: 4.11 Conditional expressions)
    1.	If-then:	(if) ? (then)
    2.	If-then-else:	(if) ? (then) : (else)
    3.	Default:	(value) ?: (defaultvalue)

八、Special tokens(特殊操作)(参考: 4.13 The No-Operation token)
    1. No-Operation:	_
5.3.4 实例代码演示
5.3.4.1 声明与引入公共片段th:fragment和th:insert
<!--header.html-->
<body>
    <!--声明公共片段-->
    <!-- 方式1:-->
    <div th:fragment="header_common">
        这是th:fragment声明公共片段
    </div>
    <!-- 方式2:选择器写法-->
    <div id="header_common_id">
        这是id选择器声明公共片段
    </div>
</body>
        <!-- success.html 引入头部公共片段
        <!--方式1:
        header : 公共片段所在模板的文件名
        header_common :声明代码片段名 -->
<div th:replace="header :: header_common"></div>
        <!--方式2:选择器写法
        header : 公共片段所在模板的文件名
        #header_common_id: 声明代码片的id值
        -->
<div th:replace="header :: #header_common_id"></div>
        <!--
        th:insert 和 th:replace的区别
        th:insert和th:replace都可以引入片段,两者的区别在于
        th:insert: 保留引入时使用的标签
        th:replace:不保留引入时使用的标签, 将声明片段直接覆盖当前引用标签
        -->
<h2 th:insert="header :: #header_common_id"></h2>
练习:将项目中的 公共模块抽取出来到 public.html 中
5.3.4.2 迭代th:each
常用迭代方式
HelloController
@RequestMapping("/study")
public String study(Map<String, Object> map, HttpServletRequest request){
        List<User> userList=new ArrayList<>();userList.add(new User("小梦",1));
        userList.add(new User("小李",2));
        userList.add(new User("小张",1));
        map.put("userList",userList);

        return "study";
}
study.html
<table border="1px">
    <tr>
        <th>姓名</th>
    </tr>
    <!--方式1: -->
    <tr th:each="user : ${userList}">
        <!--每次迭代都会生成一个当前标签-->
        <td th:text="${user}">mengxuegu</td>
    </tr>
</table>

<hr/>
<ul>
    <!--方式2:-->
    <!--作用在同一个标签上, 每次迭代生成一个当前标签-->
<li th:each="user : ${userList}" th:text="${user}"></li>
</ul>
获取迭代状态
<table border="1px">2
    <tr>
        <th>编号</th>
        <th>姓名</th>
        <th>总数</th>
        <th>偶数/奇数</th>
        <th>第一个元素</th>
        <th>最后一个元素</th>
    </tr>
    <!--
    user :第1个值,代表每次迭代出对象,名字任意取
    iterStat : 第2个值,代表每次迭代器内置对象, 名字任意取, 并有如下属性: index : 当前迭代下标 0 开始
    count : 当前迭代下标 1 开始size : 获取总记录数current : 当前迭代出的对象
    even/odd : 当前迭代是偶数还是奇数 (1开始算,返回布尔值) first : 当前是否为第一个元素
    last : 当前是否为最后一个元素
    -->
    <tr th:each="user, iterStat : ${userList}">
        <td th:text="${iterStat.count}">0</td>
        <td th:text="${user.username}">mengxuegu</td>
        <td th:text="${user.gender == 1 ? '女' : '男'}">未知</td>
        <td th:text="${iterStat.size}">0</td>
        <td th:text="${iterStat.even}? '偶数' : '奇数'"></td>
        <td th:text="${iterStat.first}"></td>
        <td th:text="${iterStat.last}"></td>
    </tr>
</table>
练习 : 供应商管理 查询页面
5.3.4.3 条件判断th:if
th:if 不仅判断返回为 true 的表达式,还判断一些特殊的表达式
- 如果值不是Null, 以下情况均返回 true
- 如果值是boolean类型并且值为true
- 如果值是数值类型并且值不为0
- 如果值是字符类型并且值不为空
- 如果值是字符串并且内容不为”false”,”off”或者”no”
- 如果值不是上述类型也返回true
- 如果值是NULL, 则返回false
th:unless 与 th:if 作用正好相反。<hr/> 下面加not <h3 th:if="not ${#lists.isEmpty(userList)}">th:if判断,如果此文字显示说明有值</h3> <h3 th:unless="${#lists.isEmpty(userList)}">th:unless判断,如果此文字显示说明有值</h3>
th:swith th:case
@RequestMapping("/study")
public String study(Map<String, Object> map,HttpServletRequest request){
        List<User> userList=new ArrayList<>();
        userList.add(new User("小梦",1));
        userList.add(new User("小李",2));
        userList.add(new User("小张",1));
        map.put("userList",userList);

        // 1女, 2男map.put("sex", 1);
        map.put("man",2);

        return"study";
}<div th:switch="${sex}">
<!--1女, 2男-->
<p th:case="1">女</p>
<!--判断sex的值和下面取出man的值是否相等,相等则显示-->
<p th:case="${man}">男</p>
<!--如果值都不在上述case里,则th:case="*"语句生效。-->
<p th:case="*">未知</p>
</div>5.3.4.4 显示标签体内容th:text和th:utext
th:text 转义特殊字符, 即 h1标签以文本显示出来
th:utext 不转义特殊字符, 即 h1 标签展现出本来效果
@RequestMapping("/study")
public String study(Map<String, Object> map,HttpServletRequest request){
        List<User> userList=new ArrayList<>();
        userList.add(new User("小梦",1));
        userList.add(new User("小李",2));
        userList.add(new User("小张",1));
        map.put("userList",userList);

        // 1女, 2男
        map.put("sex", 1);
        map.put("man", 2);

        // th:text th:utext
        map.put("desc", "欢迎来到<h1>梦学谷<h1>");

        return"study";
}<hr/>
<div th:text="${desc}"> </div>
<div th:utext="${desc}"> </div>补充:Thymeleaf 行内表达式双中括号: (就是不在标签上使用属性,参考12 Inlining)
<input type="checkbox" /> [[${desc}]]
<p>Hello, [[${desc}]] 。。。</p>
5.3.4.5 直接取出对象th:object
使用th:object直接取出对象,然后写对象里的属性名即可获取属性值
@RequestMapping("/study")
public String study(Map<String, Object> map,HttpServletRequest request){
        List<User> userList=new ArrayList<>();
        userList.add(new User("小梦",1));
        userList.add(new User("小李",2));
        userList.add(new User("小张",1));
        map.put("userList",userList);

        // 1女, 2男
        map.put("sex", 1);
        map.put("man", 2);

        // th:text th:utext
        map.put("desc", "欢迎来到<h1>梦学谷<h1>");

        request.getSession().setAttribute("user", new User("小不点", 2));

        return"study";
}
<!--使用th:object 直接取出对象,然后写对象里的属性名即可获取属性值-->
<div th:object="${session.user}">
<p>
姓 名 :<span th:text="*{username}">xxxx</span> 5
</p>
<p>
性别:<span th:text="*{gender == 1 ? '女' : '男'}">xxxx</span> 8
</p>
</div>5.4 SpringBoot 热部署
默认情况下, 在开发中我们修改一个项目文件后,想看到效果不得不重启应用,这会导致浪费大量时间 ,我们希望不重启应用的情况下,程序可以自动部署(热部署)。
如何能实现热部署?
1.在Spring Boot开发环境下禁用模板缓存
1.#开发环境下关闭thymeleaf模板缓存,thymeleaf默认是开启状态
2.spring.thymeleaf.cache=false
2.添加 Spring Boot Devtools 热部署依赖
<!--热部署-->
<dependency>
    <groupId>org.springframework.boot</groupId>
    <artifactId>spring-boot-devtools</artifactId>
</dependency>
3.Intellij IEDA和Eclipse不同,Intellij IDEA必须做一些小调整:
在 Eclipse 中,修改文件后要手动进行保存,它就会自动编译,就触发热部署现象。在Intellij IEDA 中,修改文件后都是自动保存,默认不会自动编译文件,
需要手动编译按Ctrl+F9(推荐使用)或 Build->Build Project;
或者进行以下设置才会自动编译(效果不明显)
(File -> Settings -> Build, Execution, Deployment -> Compiler -> 勾选 Build project automatically)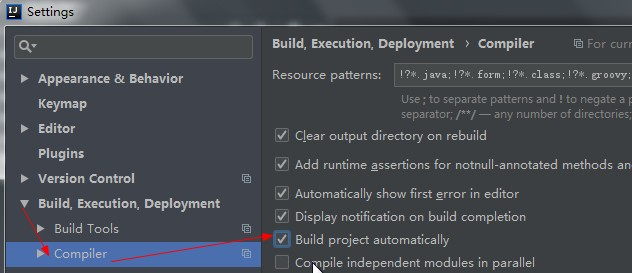
5.5 分析SpringMVC自动配置
Spring Boot 为 Spring MVC 提供了适用于多数应用的自动配置功能(WebMvcAutoconfiguration)。在Spring默认基础上,自动配置添加了以下特性:
引入 ContentNegotiatingViewResolver和BeanNameViewResolver beans.
自动配置了视图解析器ViewResolver(根据方法返回值获取视图对象View,视图对象决定如何渲染?重定向Or 转发)
ContentNegotiatingViewResolver: 组合所有的视图解析器的(通过源码可分析出)
public class ContentNegotiatingViewResolver

        //146
        public View resolveViewName(String viewName, Locale locale) throws Exception {
            RequestAttributes attrs = RequestContextHolder.getRequestAttributes();
            Assert.state(attrs instanceof ServletRequestAttributes,"No current ServletRequestAttributes");
            List<MediaType> requestedMediaTypes = this.getMediaTypes(((ServletRequestAttributes) attrs).getRequest());

            if (requestedMediaTypes != null) {
                //选择所有候选的视图对象
                List<View> candidateViews = this.getCandidateViews(viewName, locale,requestedMediaTypes);
                //从候选中选择最合适的视图对象
                View bestView = this.getBestView(candidateViews, requestedMediaTypes,attrs);
                //存入所有视图解析器
                private List<ViewResolver> viewResolvers;
                //107
                protected void initServletContext (ServletContext servletContext){
                    Collection<ViewResolver> matchingBeans = BeanFactoryUtils.beansOfTypeIncludingAncestors(
                    //从容器中获取所有的视图解析器
                            this.obtainApplicationContext(), ViewResolver.class).values();
}
自定义视图解析器:可以@Bean向容器中添加一个我们自定义的视图解析器,即可被容器管理使用
@Bean
public ViewResolver myViewResolver(){
    return new MyViewResolver();
}

private class MyViewResolver implements ViewResolver {
    @Override
    public View resolveViewName(String s, Locale locale) throws Exception {
        return null;
    }
}

// DispatcherServlet.doDispatch 断点后,发送任意请求,可查看已被容器自动管理了
自动注册 Converter, GenericConverter,Formatter
Converter:转换器; 如: 文本类型转换目标类型, true 转 boolean类型
GenericConverter:转换器,Spring内部在注册时,会将Converter先转换为GenericConverter之后,再统一对GenericConverter注册。
Formatter: 格式化器; 如: 2017/12/17 格式化 Date类型
@Bean
public FormattingConversionService mvcConversionService(){
    //传入日期格式, spring.mvc.date-format配置日期格式
    WebConversionService conversionService=new WebConversionService(this.mvcProperties.getDateFormat());
    this.addFormatters(conversionService);
    return conversionService;
}

//将格式化器添加容器中
protected void addFormatters(FormatterRegistry registry){
    this.configurers.addFormatters(registry);
}
对HttpMessageConverters的支持。
SpringMVC 用它来转换Http请求和响应的;User _json User _xml
可以通过@Bean向容器中添加一个我们自定义的HttpMessageConverters即可被容器管理使用
自动注册MessageCodeResolver。
定义错误代码生成规则
自动注册ConfigurableWebBindingInitializer。
初始化所有 Web数据绑定器 对象, 比如 请求数据 ——》JavaBean
对静态资源的支持,包括对 Webjars 的支持。
对静态首页 index.html 的支持。
对自定义Favicon图标的支持。
如果想保留 Spring Boot MVC的特性,而且还想扩展新的功能(拦截器, 格式化器, 视图控制器等),你可以在你自
定义的WebMvcConfigurer类上增加@Configuration注解。
如果你想全面控制SpringMVC(也就是不使用默认配置功能), 你在自定义的Web配置类上添加
@Configuration和@EnableWebMvc注解。
5.6 扩展SpringMVC功能
扩展一个视图解析器功能
<mvc:view-controller path="/mengxuegu" view-name="success"/>
<mvc:interceptors>
<mvc:interceptor>
    <mvc:mapping path="/hello"/>
    <bean></bean>
</mvc:interceptor>
</mvc:interceptors>
如果想保留 Spring Boot MVC的特性,而且还想扩展新的功能(拦截器, 格式化器, 视图控制器等),你可以
在你自定义的WebMvcConfigurer类上增加@Configuration注解。
自定义配置类保留了所有的自动配置, 也能用我们扩展的功能
package com.mengxuegu.springboot.config;

@Configuration
public class MySpringMvcConfigurer implements WebMvcConfigurer {
    @Override
    public void addViewControllers(ViewControllerRegistry registry) {
        // super.addViewControllers(registry);
        //发送 /mengxuegu 请求来到 success.html
        registry.addViewController("/mengxuegu").setViewName("success");
    }
}
原理:
1.自定义WebMvcConfigurer自动配置时会导入@Import({WebMvcAutoConfiguration.EnableWebMvcConfiguration.class});
//导入EnableWebMvcConfiguration.class
@Import({WebMvcAutoConfiguration.EnableWebMvcConfiguration.class})
@EnableConfigurationProperties({WebMvcProperties.class, ResourceProperties.class})
@Order(0)
public static class WebMvcAutoConfigurationAdapter implements WebMvcConfigurer, ResourceLoaderAware {
2.EnableWebMvcConfiguration 继承了DelegatingWebMvcConfiguration
@Configuration
public static class EnableWebMvcConfiguration extends DelegatingWebMvcConfiguration {
3.分析DelegatingWebMvcConfiguration ,会将所有web配置组件加到WebMvcConfigurerComposite中
@Configuration
public class DelegatingWebMvcConfiguration extends WebMvcConfigurationSupport {
    //存储所有的mvc配置类组件
    private final WebMvcConfigurerComposite configurers = new WebMvcConfigurerComposite();

    @Autowired(required = false)
    public void setConfigurers(List<WebMvcConfigurer> configurers) {
        if (!CollectionUtils.isEmpty(configurers)) {
            this.configurers.addWebMvcConfigurers(configurers);
            /*
            一个参考实现;将所有的WebMvcConfigurer相关配置都来一起调用;
            public void addViewControllers(ViewControllerRegistry registry) { Iterator var2 = this.delegates.iterator();
                while(var2.hasNext()) {
                  WebMvcConfigurer delegate = (WebMvcConfigurer)var2.next();
                 delegate.addViewControllers(registry);
                }
            }
            */
        }
    }
}
保留原来的配置类,也添加了新的配置类,所有的WebMvcConfigurer都会一起起作用
效果:SpringMVC的自动配置和我们的扩展配置都会起作用;
5.7 全面控制 SpringMVC
如果你想全面控制SpringMVC(SpringBoot对SpringMVC的自动配置都废弃), 在自定义的Web配置类上添加@ Configuration 和@EnableWebMvc注解。
原理:为什么添加@EnableWebMvc注解,自动配置就失效了?
1.@EnableWebMvc的核心
@Import(DelegatingWebMvcConfiguration.class)
public @interface EnableWebMvc {
2.先记住继承了WebMvcConfigurationSupport类
@Configuration
public class DelegatingWebMvcConfiguration extends WebMvcConfigurationSupport {
3.而在 WebMvcAutoConfiguration 上使用了@ConditionalOnMissingBean(WebMvcConfigurationSupport.class)
//容器中没有这个组件的时候,这个自动配置类才生效
@ConditionalOnMissingBean({WebMvcConfigurationSupport.class})
@AutoConfigureOrder(-2147483638)
@AutoConfigureAfter({DispatcherServletAutoConfiguration.class, ValidationAutoConfiguration.class})
public class WebMvcAutoConfiguration {
相反@EnableWebMvc将WebMvcConfigurationSupport组件导入进来, 使得WebMvcAutoConfiguration就失效了
WebMvcConfigurationSupport只是SpringMVC最基本的功能;
5.8 总结 SpringMVC 配置
在Spring Boot中自已配置组件的时候,先看容器中有没有公司自已配置的(@Bean、@Component),如果有就用公司自已配置的; 如果没有,才自动配置.
在Spring Boot中会有非常多的xxxConfigurer帮助我们进行扩展配置.
在Spring Boot中会有很多的xxxCustomizer帮助我们进行定制配置.
第6章 项目实战-帐单管理系统
6.1 初始化项目
6.1.1 创建并引入项目资源
6.1.2 Thymeleaf修改资源路径
使用th:href修改资源路径;好处是:会自动获取应用名
<head lang="en" th:fragment="public_head">
    <meta charset="UTF-8">
    <title>梦学谷账单管理系统1</title>
    <link rel="stylesheet" th:href="@{/css/public.css}" href="../css/public.css"/>
    <link rel="stylesheet" th:href="@{/css/style.css}" href="../css/style.css"/>
</head>
<td>
    <a href="view.html">
        <img th:src="@{/img/read.png}" src="../img/read.png" alt="查看" title="查看"/>
    </a>
    <a href="update.html">
        <img th:src="@{/img/xiugai.png}" src="../img/xiugai.png" alt="修改" title="修改"/>
    </a>
    <a href="#" class="removeUser">
        <img th:src="@{/img/schu.png}" src="../img/schu.png" alt="删除" title="删除"/>
    </a>
</td>

<!--webjars方式引入-->
<script th:src="@{/webjars/jquery/3.3.1/jquery.js}" src="../js/jquery.js"></script>
<script th:src="@{/js/js.js}" src="../js/js.js"></script>

<!--
# 上面会自动获取到应用名 /bill
server.servlet.context-path=/bill
-->
6.1.3 Thymeleaf引入片段时传入参数
<div class="left" id="public_left">
    <h2 class="leftH2"><span class="span1"></span>功能列表 <span></span></h2>
    <nav>
        <ul class="list">
            <li ><a href="../bill/list.html">账单管理</a></li>
            <li><a href="../provider/list.html">供应商管理</a></li>
            <!--接收引入时传入的activeUri参数值-->
            <li th:id="${activeUri == 'user' ? 'active' : ''}" id="active">
                <a th:href="@{/user/list}" href="/user/list">用户管理</a>
            </li>
            <li><a href="../main/password.html">密码修改</a></li>
            <li><a href="../main/login.html">退出系统</a></li>
        </ul>
    </nav>
</div>
<!--引入公共片段处, 传入参数-->
<div class="left" th:replace="main/public :: #public_left(activeUri='user')"></div>
6.2 默认访问欢迎页
默认访问的欢迎页是 login.html
@Configuration
public class MySpringMvcConfigurer {
    @Bean
    public WebMvcConfigurer webMvcConfigurer() {
        return new WebMvcConfigurer() {
            //添加视图控制
            @Override
            public void addViewControllers(ViewControllerRegistry registry) {
                registry.addViewController("/").setViewName("main/login");
                registry.addViewController("/index.html").setViewName("main/login");
            }
        };
    }
}
更改图标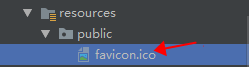
6.3 国际化信息
6.3.1 SpringMVC国际化步骤
编写国际化配置文件, 需要显示的国际化内容写到配置中
使用@ResourceBundleMessageSource管理国际化资源文件
在 JSP 页面中使用 fmt:message 标签取出国际化内容
6.3.2 SpringBoot国际化步骤
编写国际化配置文件,需要要显示的国际化内容写到配置中
类路径下创建i18n目录存放配置文件(i18n是“国际化”的简称)
login.properties(默认国际化文件)
login_语言代码_国家代码.propertis
login_zh_CN.properties (中文_中国 国际化文件)
login_en_US.properties (英文_美国 国际化文件)
先修改 properties 文件的字符编码,不然出现乱码,进行如下设置: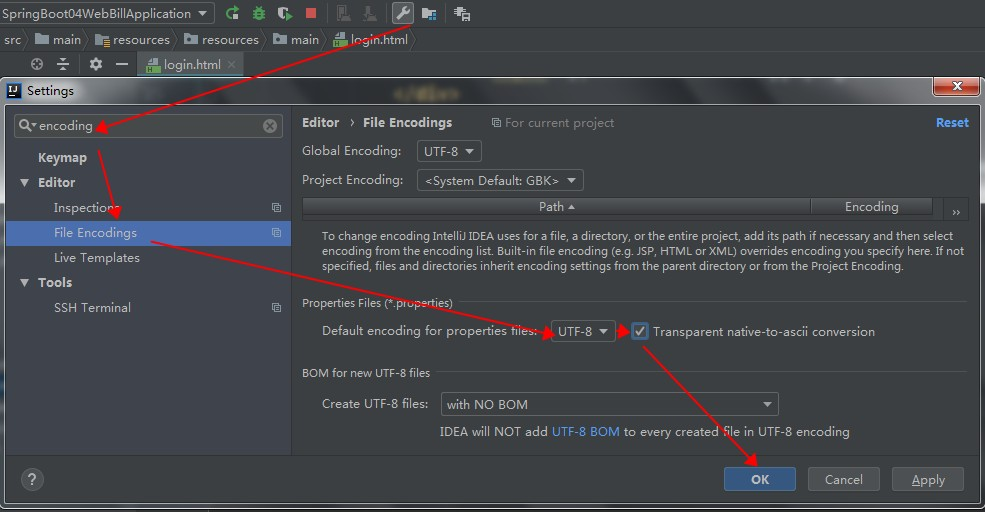
类路径下创建 i18n 目录存放配置文件
Spring Boot 已经自动配置了管理国际化资源文件的组件MessageSourceAutoConfiguration
public class MessageSourceAutoConfiguration {
    @Bean
    @ConfigurationProperties(prefix = "spring.messages")
    public MessageSourceProperties messageSourceProperties() {
        return new MessageSourceProperties();
    }

    @Bean
    public MessageSource messageSource() {
        // 国际化资源相关属性
        MessageSourceProperties properties = this.messageSourceProperties();
        //管理国际化资源的组件
        ResourceBundleMessageSource messageSource = new ResourceBundleMessageSource();
    }
}

public class MessageSourceProperties {
    private String basename = "message";
    /*
    默认国际化资源文件的基础名(就是去掉语言_国家代码之后的名称,上面自定义的是login)
    即如果我们定义为messages.properties就可以放在类路径下,就可不做任何配置,就会被直接被加载
    */
}

if(StringUtils.hasText(properties.getBasename())){
    //设置国际化资源文件的基础名(就是去掉 语言_国家代码 之后的名称,自定义的就是login)
    messageSource.setBasenames(StringUtils.commaDelimitedListToStringArray(StringUtils.trimAllWhitespace(properties.getBasename())));
}
通过底层源码分析 , 得到结论:
如果国际化资源文件的基础名为messages则可以直接将messages.properties文件放到类路径下, 就可不做任何配置,容器就会直接被加载它。
如果非messages基础名, 则在全局配置文件中 指定位置(类似包名的方式指定):
spring.messages.basename = i18n.login
登录页面中通过#{}获取国际化的值
login.html 模板页面通过#{}属性获取国际化值
<section class="loginCont">
    <form class="loginForm" action="../main/index.html">
        <div class="inputbox">
            <label for="user" th:text="#{login.username}">Username</label>
            <input id="user" type="text" name="username" required/>
        </div>
        <div class="inputbox">
            <label for="mima" th:text="#{login.password}">Password</label>
            <input id="mima" type="password" name="password" required="true"/>
        </div>
        <div class="subBtn">
            Thymeleaf 行内表达式双中括号[[表达式]](参考12 Inlining)
            <input type="checkbox"/>[[#{login.remember}]]
        </div>
        <br/>
        <div class="subBtn">
            <input type="submit" th:value="#{login.submit}" value="登录"/>
            <input type="reset" th:value="#{login.reset}" value="重置"/>
        </div>
        <br/>
        <div style="margin-left: 100px;">
            <a href="#">中文</a>

            <a href="">English</a>
        </div>
    </form>
</section>
显示效果: 通过谷歌浏览器中设置-高级里切换语言查看效果
6.3.3 分析切换国际化原理
原理 : LocalResolver获取区域信息对象, 来切换国际化信息 (区域信息就是像zh_CN/en_US )
public class WebMvcAutoConfiguration {
    @Bean
    @ConditionalOnMissingBean
    @ConditionalOnProperty(prefix = "spring.mvc", name = {"locale"})
    public LocaleResolver localeResolver() {
        if (this.mvcProperties.getLocaleResolver() == LocaleResolver.FIXED) {
            return new FixedLocaleResolver(this.mvcProperties.getLocale());
        } else {
            //1. 根据请求头来获取区域信息
            AcceptHeaderLocaleResolver localeResolver = new AcceptHeaderLocaleResolver();
            localeResolver.setDefaultLocale(this.mvcProperties.getLocale());
            return localeResolver;
        }
    }

    //2. 请求头区域信息解析器
    public class AcceptHeaderLocaleResolver implements LocaleResolver {
        public Locale resolveLocale(HttpServletRequest request) {
            public Locale resolveLocale (HttpServletRequest request){
                Locale defaultLocale = this.getDefaultLocale();
                if (defaultLocale != null && request.getHeader("Accept-Language") == null) {
                    return defaultLocale;
                } else {
                    //3. 获取当前收到的请求区域信息, 从而来选择国际化语言
                    Locale requestLocale = request.getLocale();
                }
            }
        }
    }
} 
通过上面分析, 是根据请求头带来的区域信息来选择对应的国际化信息, 即我们可以自定义区域信息解析器
6.3.4 点击链接切换国际化
请求参数中设置区域信息
<div style="margin-left: 100px;">
    <a th:href="@{/index.html(l='zh_CH')}" href="#">中文</a>
    <a th:href="@{/index.html(l='en_US')}" href="">English</a>
</div>
自定义区域信息解析器来进行设置区域信息
package com.mengxuegu.springboot.component;

import org.springframework.context.annotation.Bean;
import org.springframework.stereotype.Component;
import org.springframework.util.StringUtils;
import org.springframework.web.servlet.LocaleResolver;

import javax.servlet.http.HttpServletRequest;
import javax.servlet.http.HttpServletResponse;
import java.util.Locale;

/**
 * 自定义解析器来切换国际化信息,
 * 需要再注入到容器器
 */
public class MyLocaleResolver implements LocaleResolver {
    //解析区域信息
    @Override
    public Locale resolveLocale(HttpServletRequest httpServletRequest) {
        System.out.println("区域信息。。。");
        //获取请求头中的l参数值
        String l = httpServletRequest.getParameter("l");
        //获取浏览器上的区域信息
        Locale locale = httpServletRequest.getLocale();
        //获取当前操作系统 默认的区域信息
        //  Locale locale = Locale.getDefault();

        //参数有区域信息,则用参数里的区域信息
        if (!StringUtils.isEmpty(l)) {
            String[] split = l.split("_");
            //参数:语言代码,国家代码
            locale = new Locale(split[0], split[1]);
        }
        return locale;
    }

    @Override
    public void setLocale(HttpServletRequest httpServletRequest, HttpServletResponse httpServletResponse, Locale locale) {
    }
}
需要替换mvc自动配置类中区域信息解析器,(返回值与方法名要和下面保持必须一致)
package com.mengxuegu.springboot.config;

import org.springframework.context.annotation.Bean;
import org.springframework.context.annotation.Configuration;2

@Configuration
public class MySpringMvcConfigurer {
    //需要替换mvc自动配置类中区域解析器,
    @Bean
    public LocaleResolver localeResolver() {
        return new MyLocaleResolver();
    }
}
6.4 登录模块开发
登录控制层
@Controller
public class LoginController {
    @PostMapping("/login")
    @RequestMapping(value = "/user/login", method = RequestMethod.POST)
    public String login(@RequestParam("username") String username,
                        @RequestParam("password") String password, Map<String, Object> map) {
        if (!StringUtils.isEmpty(username) && "123".equals(password)) {
            //登录成功,
            //防止表单重复提交,通过重定向到主页, 需要添加一个视图
            return "redirect:/main.html";
        }
        //登录失败
        map.put("msg", "用户名或密码错误!");
        return "/main/login";
    }
}
页面
<!DOCTYPE html>
<html xmlns:th="http://www.thymeleaf.org">
    <head lang="en">
        <meta charset="UTF-8">
        <title>系统登录 - 梦学谷账单管理系统</title>
        <link rel="stylesheet" th:href="@{/css/style.css}" href="../css/style.css"/>
    </head>
    <body class="login_bg">
        <section class="loginBox">
            <header class="loginHeader">
                <h1>梦学谷账单管理系统</h1>
            </header>
            <section class="loginCont">
                <div th:text="${msg}" th:if="${not #strings.isEmpty(msg)}" style="color:red; margin-left: 130px">
                    用户名错误!
                </div>
                <form class="loginForm" th:action="@{/login}" method="post">
                    <div class="inputbox">
                        <label for="user" name="username" th:text="#{login.username}">Username
                        </label>
                        <input id="user" type="text" name="username" required/>
                    </div>
                    <div class="inputbox">
                        <label for="mima" name="password" th:text="#{login.password}">Password
                        </label>
                        <input id="mima" type="password" name="password" required/>
                    </div>
                    <div class="subBtn">
                        <input type="checkbox"/>[[#{login.remember}]]
                    </div>
                    <br/>
                    <div class="subBtn">
                        <input type="submit" th:value="#{login.submit}" value="登录"/>
                        <input type="reset" th:value="#{login.reset}" value="重置"/>
                    </div>
                    <br/>
                    <div style="margin-left: 100px;">
                        <a th:href="@{/index.html(l='zh_CH')}" href="#">中文</a>

                        <a th:href="@{/index.html(l='en_US')}" href="">English</a>
                    </div>
                </form>
            </section>
        </section>
    </body>
</html>
6.5 自定义拦截器-登录校验
非登录用户,只能访问登录页面,其他页面都不可以访问
// 登录成功,存入session中
session.setAttribute("loginUser", username);
public class LoginHandlerInterceptor implements HandlerInterceptor {
//调用目标方法前请求
@Override
public boolean preHandle(HttpServletRequest request, HttpServletResponse response, Object handler) throws Exception {
Object loginUser = request.getSession().getAttribute("loginUser");
if (loginUser != null) {
//已经登录,放行请求return true;
}
//未登录, 转发到登录页面
request.setAttribute("msg", "无权限,请登录后访问!");
request.getRequestDispatcher("/index.html").forward(request, response);
return false;
}
}添加拦截器到容器中
package com.mengxuegu.springboot.config;

@Configuration
public class MySpringMvcConfigurer {
    //所有的WebMvcConfigurer组件都会一起起作用
    @Bean //将当前组件添加到容器当前才可生效
    public WebMvcConfigurer webMvcConfigurer() {
        WebMvcConfigurer webMvcConfigurer = new WebMvcConfigurer() {
            //添加视图控制器
            @Override
            public void addViewControllers(ViewControllerRegistry registry) {
                registry.addViewController("/").setViewName("main/login");
                registry.addViewController("/index.html").setViewName("main/login");
                registry.addViewController("/main.html").setViewName("main/index");
            }

            //添加拦截器
            @Override
            public void addInterceptors(InterceptorRegistry registry) {
                registry.addInterceptor(new LoginHandlerInterceptor())
                        // 拦截所有请求 /**
                        .addPathPatterns("/**")
                        // 排除不需要拦截的请求  //SpringBoot2+中要排除静态资源路径, 因访问时不会加/static,所以配置如下
                        .excludePathPatterns("/", "/index.html", "/login","/css/**","/img/**","/js/**");
            }
        };

        return webMvcConfigurer;
    }

    @Bean
    public LocaleResolver localeResolver() {
        return new MyLocaleResolver();
    }

}
6.6 主页模块开发-退出系统
右上角和主页显示登录用户名
<span style="color: #fff21b">[[${session.loginUser}]]</span> , 欢迎你!
<div class="wFont">
    <h2 th:text="${session.loginUser}">Admin</h2>
    <p>欢迎来到梦学谷账单管理系统!</p>
    <span id="hours"></span>
</div>
点击退出,退出系统
//退出系统
@GetMapping("/logout")
public String logout(HttpSession session){
    System.out.println("logout被调用。。。");
    session.removeAttribute("loginUser");
    session.invalidate();
    //回到登录页面
    return"redirect:/index.html";
}
6.7 分析 Restful 架构
1.Restful 架构: 通过HTTP请求方式来区分对资源CRUD操作, 请求 URI 是/资源名称/资源标识,
普通CRUD与RestfulCRUD对比如下:
| 普通CRUD | RestfulCRUD | |
|---|---|---|
| 查询 | getProvider | provider—GET |
| 添加 | addProvider?xxx | provider—POST |
| 修改 | updateProvider?id=xxx | provider/{id}—PUT |
| 删除 | deleteProvider?id=1 | provider/{id}—DELETE |
2.项目使用Rest处理架构
| 项目功能 | 请求URI | 请求方式 |
|---|---|---|
| 查询所有供应商 | providers | GET |
| 查询某个供应商详情 | provider/1 | GET |
| 来到修改页面(查出供应商进行信息回显) | provider/1 | GET |
| 修改供应商 | provider | PUT |
| 前往添加页面 | provider | GET |
| 添加供应商 | provider | POST |
| 删除供应商 | provider/1 | DELETE |
6.8 供应商列表查询
/**
 * 供应商控制层
 */
@Controller
public class ProviderController {
    Logger logger = LoggerFactory.getLogger(getClass());
    @Autowired
    ProviderDao providerDao;
    //查询所有供应商并响应列表页面
    @GetMapping("/providers")
    public String list(@RequestParam(value = "providerName", required = false) String providerName, Map<String, Object> map) {
        logger.info("providerName = " + providerName);
        Collection<Provider> providers = providerDao.getAll(providerName);
        map.put("providers", providers);
        return "provider/list";
    }
}<div class="right">
<div class="location">
<strong>你现在所在的位置是:</strong>
<span>供应商管理页面</span>
</div>
<form id="searchForm" th:method="get" th:action="@{/providers}">
<div class="search">
<span>供应商名称:</span>
<input type="text" name="providerName" placeholder="请输入供应商的名称"/>
<input type="button" onclick="$('#searchForm').submit();" value="查询"/>
<a href="add.html">添加供应商</a>
</div>
</form>
<!--供应商操作表格-->
<table class="providerTable" cellpadding="0" cellspacing="0">
<tr class="firstTr">
<th width="10%">供应商编码</th>
<th width="20%">供应商名称</th>
<th width="10%">联系人</th>
<th width="10%">联系电话</th>
<th width="10%">传真</th>
<th width="10%">创建时间</th>
<th width="30%">操作</th>
</tr>
<tr th:each="p : ${providers}">
<td th:text="${p.getPid()}">PRO-CODE—001</td>
<td th:text="${p.providerName}">测试供应商001</td>
<td th:text="${p.people}">韩露</td>
<td th:text="${p.phone}">15918230478</td>
<td th:text="${p.fax}">15918230478</td>
<td th:text="${#dates.format( p.createDate, 'yyyy-MM-dd')}">2015-11-12</td>
<td>
<a href="view.html">
<img src="../img/read.png" alt="查看" title="查看"/>
</a>
<a href="update.html">
<img src="../img/xiugai.png" alt="修改" title="修改"/>
</a>
<a href="#" class="removeProvider">
<img src="../img/schu.png" alt="删除" title="删除"/>
</a>
</td>
</tr>
</table>
</div>
6.9 供应商详情查询
//查看某个供应商详情
@GetMapping("/view/{pid}")
public String view(@PathVariable("pid") Integer pid, Map<String, Object> map) {
    Provider provider = providerDao.getProvider(pid);
    map.put("provider", provider);
    //详情页面
    return "provider/view";
}
<!--provider/list.html-->
<a href="view.html" th:href="@{/view/} + ${p.pid}">
<img th:src="@{/img/read.png}" src="../img/read.png" alt="查看" title="查看"/>
</a><!--provider/view.html-->
<div class="providerView">
<p>
<strong>供应商编码:</strong>
<span th:text="${provider.pid}">PRO-CODE</span>
</p>
<p>
<strong>供应商名称:</strong>
<span th:text="${provider.providerName}">测试供应商
</span>
</p>
<p>
<strong>联系人:</strong>
<span th:text="${provider.people}">韩露</span>
</p>
<p>
<strong>联系电话:</strong>
<span th:text="${provider.phone}">1591**478</span>
</p>
<p>
<strong>传真:</strong>
<span th:text="${provider.fax}">15918230478</span>
</p>
<p>
<strong>描述:</strong>
<span th:text="${provider.describe}">描述</span>
</p>
<a th:href="@{/providers}" href="list.html">返回</a>
</div>6.10 供应商修改
发送put请求修改供应商信息
- 在SpringMVC中配置HiddenHttpMethodFilter(SpringBoot自动配置好了)
- 页面创建一个method=”post”表单
- 创建一个input标签 name=”_method”,value=”指定请求方式”
前往修改页面, 方法重用详情查询的方法
方法改造
/**
 * 查看某个供应商详情
 * type=null 默认view详情页面,type=update 修改页面
 */
@GetMapping("/provider/{pid}")
public String view(@RequestParam(value = "type", defaultValue = "view")String type,
                                @PathVariable("pid") Integer pid,Map<String, Object> map){
    Provider provider=providerDao.getProvider(pid);
    map.put("provider",provider);

    //type=null 默认view详情页面,type=update 修改页面
    return"provider/"+type;
}

//修改供应商信息
@PutMapping("/provider")
public String update(Provider provider){
    logger.info("修改供应商信息: "+provider);
    provider.setCreateDate(new Date());
    providerDao.save(provider);
    //重定向到列表页
    return"redirect:/providers";
}
<!--list.html-->
<a href="view.html" th:href="@{/provider/} + ${p.pid}">
<img th:src="@{/img/read.png}" src="../img/read.png" alt="查看" title="查看"/>
</a>
<a href="update.html" th:href="@{/provider/} + ${p.pid} + '?type=update'">
<img th:src="@{/img/xiugai.png}" src="../img/xiugai.png" alt="修改" title="修改"/>
</a> <!--update.html-->
<form action="#" id="updateForm" th:method="post" th:action="@{/provider}">
<!--
发送put请求修改供应商信息
1. 在SpringMVC中配置HiddenHttpMethodFilter(SpringBoot自动配置好了)
2. 页面创建一个method="post"表单
3. 创建一个input标签 name="_method",value="指定请求方式"
-->
<input type="hidden" name="_method" value="put"/>
<input type="hidden" name="pid" th:value="${provider.pid}"/>
<!--div的class 为error是验证错误,ok是验证成功-->
<div class="">
<label for="providerName">供应商名称:</label>
<input type="text" name="providerName" th:value="${provider.providerName}" id="providerName"/>
<span>*请输入供应商名称</span>
</div>
<div>
<label for="people">联系人:</label>
<input type="text" name="people" id="people" th:value="${provider.people}"/>
<span>*请输入联系人</span>
</div>
<div>
<label for="phone">联系电话:</label>
<input type="text" name="phone" id="phone" th:value="${provider.phone}"/>
<span>*请输入联系电话</span>
</div>
<div>
<label for="address">联系地址:</label>
<input type="text" name="address" id="address" th:value="${provider.address}"/>
<span>*请输入联系地址</span>
</div>
<div>
<label for="fax">传真:</label>
<input type="text" name="fax" id="fax" th:value="${provider.fax}"/>
<span>*请输入传真</span>
</div>
<div>
<label for="describe">描述:</label>
<input type="text" name="describe" id="describe" th:value="${provider.describe}"/>
</div>
<div class="providerAddBtn">
<input type="button" value="保存" onclick="$('#updateForm').submit();"/>
<input type="button" value="返回" onclick="history.back(-1)"/>
</div>
</form>
6.11 供应商添加
前往添加供应商页面
//前往添加供应商页面
@GetMapping("/provider")
public String toAddPage() {
    //前往添加供应商页面
    return "provider/add";
}
提交供应商数据
//处理添加供应商请求
@PostMapping("/provider")
public String addProvider(Provider provider) {
    //SpringMVC会自动将请求参数与形参对象的属性一一绑定
    //要求:请求参数名要与形参对象的属性名相同
    logger.info("添加供应商信息:" + provider);

    provider.setCreateDate(new Date());
    providerDao.save(provider);

    //添加完成,回到供应商列表页面
    //通过redirect重定向 或forward转发到一个请求地址, / 代表当前项目路径
    return "redirect:/providers";
}
6.12 供应商删除
//删除操作
@DeleteMapping("provider/{pid}")
public String delete(@PathVariable("pid") Integer pid) {
    logger.info("删除供应商:" + pid);
    providerDao.delete(pid);
    return "redirect:/providers";
} <a href="#" th:attr="del_uri=@{/provider/}+${p.pid}" class="delete">
<img th:src="@{/img/schu.png}" src="../img/schu.png" alt="删除" title="删除"/>
</a> 第7章 SpringBoot 错误处理机制
我们所开发的项目大多是直接面向用户的,而程序出现异常往往又是不可避免的,那该如何减少程序异常对用户体 验的影响呢?
那么下面来介绍下 SpringBoot 为我们提供的处理方式。
7.1 默认的错误处理机制
7.1.1 出现错误时页面效果
浏览器发送一个不存在的请求时,会报404
服务器内部发生错误的时候,页面会返回什么呢?
@Controller
public class BillController {
    @GetMapping("/bills")
    public String list() {
        //模拟500错误
        int i=1/0;
        return "bill/list";
    }
} 
通过上面,我们会发现无论是发生什么错误,SpringBoot 都会返回一个状态码以及一个错误页面,这个错误页面是怎么来的呢?
7.1.2 底层原理分析
底层原理关注ErrorMvcAutoConfiguration错误自动配置类
第1步:ErrorPageCustomizer错误页面定制器
private static class ErrorPageCustomizer implements ErrorPageRegistrar, Ordered {
    public void registerErrorPages(ErrorPageRegistry errorPageRegistry) {
        ErrorPage errorPage = new ErrorPage(this.dispatcherServletPath.getRelativePath(
                // 出现错误后来到 /error 请求进行处理(类似web.xml注册的错误页面规则)
                this.properties.getError().getPath())); //private String path ="/error";
                errorPageRegistry.addErrorPages(new ErrorPage[]{errorPage});
    }

    public int getOrder() {
        return 0;
    }
}
当应用出现了4xx或5xx之类的错误 ,ErrorPageCustomizer就会被激活,它主要用于定制错误处理的响应规则,
就会发送一个/error请求,它会交给BasicErrorController进行处理
第2步:BasicErrorController就会接收 /error 请求处理。
@Controller
@RequestMapping({"${server.error.path:${error.path:/error}}"})
public class BasicErrorController extends AbstractErrorController {
    //通过请求头判断调用下面哪个访求: text/html
    //响应 html 类型的数据;接收浏览器发送的请求
    @RequestMapping(produces = {"text/html"})
    public ModelAndView errorHtml(HttpServletRequest request, HttpServletResponse response) {
        HttpStatus status = this.getStatus(request);
        Map<String, Object> model = Collections.unmodifiableMap(this.getErrorAttributes(request, this.isIncludeStackTrace(request, MediaType.TEXT_HTML)));
        response.setStatus(status.value());
        //去哪个页面作为错误页面,包括 页面地址与页面内容,里面有一个ErrorViewResolver
        ModelAndView modelAndView = this.resolveErrorView(request, response, status, model);
        //没有找到,则找 error 视图 ,在ErrorMvcAutoConfiguration的defaultErrorView中
        return modelAndView != null ? modelAndView : new ModelAndView("error", model);
    }

    //通过请求头判断: */*
    @RequestMapping
    @ResponseBody //响应 Json 类型的数据;接收其他客户端发送的请求
    public ResponseEntity<Map<String, Object>> error(HttpServletRequest request) {
        Map<String, Object> body = this.getErrorAttributes(request, this.isIncludeStackTrace(request, MediaType.ALL));
        HttpStatus status = this.getStatus(request);
        return new ResponseEntity(body, status);
    }
}
BasicErrorController会接收一个/error请求, 两个方法处理,第1个erroHtml响应html数据, 还有一个error用来响应json数据的,
使用了 ErrorViewResolver (DefaultErrorViewResolver)组件进行封装视图
第3步:DefaultErrorViewResolver去解析具体响应的错误页面。
public class DefaultErrorViewResolver implements ErrorViewResolver, Ordered {
    public ModelAndView resolveErrorView(HttpServletRequest request,HttpStatus status, Map<String, Object> model) {
        ModelAndView modelAndView = this.resolve(String.valueOf(status), model);
        if (modelAndView == null && SERIES_VIEWS.containsKey(status.series())) {
            //找4xx 5xx页面
            modelAndView = this.resolve((String) SERIES_VIEWS.get(status.series()), model);
        }
        return modelAndView;
    }

    private ModelAndView resolve(String viewName, Map<String, Object> model) {
        //SpringBoot默认根据状态码响应状态码页面,如 error/404(templates / error / 404. html)
        String errorViewName = "error/" + viewName;
        //如果模板引擎解析这个页面地址,则使用模板引擎解析
        TemplateAvailabilityProvider provider = this.templateAvailabilityProviders
                                                    .getProvider(errorViewName,this.applicationContext);
        //如果模板引擎可用,返回errorViewName指定的视图 //如果模板引擎不可用,则调resolveResource方法, 在静态资源目录下找errorViewName对应的页面
        return provider != null ? new ModelAndView(errorViewName, model) : this.resolveResource(errorViewName, model);
    }

    private ModelAndView resolveResource(String viewName, Map<String, Object> model) {
        //从静态资源目录下找状态码的错误页面,如 404.html
        String[] var3 = this.resourceProperties.getStaticLocations();
        int var4 = var3.length;
        for (int var5 = 0; var5 < var4; ++var5) {
            String location = var3[var5];
            try {
                Resource resource = this.applicationContext.getResource(location);
                resource = resource.createRelative(viewName + ".html");
                if (resource.exists()) {
                    return new ModelAndView(new DefaultErrorViewResolver.HtmlResourceView(resource), model);
                }
            } catch (Exception var8) {
            }
        }
        return null;
    }

    //还可以定义 4xx , 5xx的页面
    static {
        Map<Series, String> views = new EnumMap(Series.class);
        views.put(Series.CLIENT_ERROR, "4xx");
        views.put(Series.SERVER_ERROR, "5xx");
        SERIES_VIEWS = Collections.unmodifiableMap(views);
    }
}
通过以上分析则可以自定义错误页面
第4步 :DefaultErrorAttributes错误页面可获取到的数据信息
通过 BasicErrorController 的方法中响应的 module 可定位到响应哪些数据,从而引出ErrorAttributes的实现类DefaultErrorAttributes ,
DefaultErrorAttributes中绑定的所有值都可在页面获取到。
public abstract class AbstractErrorController implements ErrorController {
  //以下接口实现类 DefaultErrorAttributes 封装了响应的错误数据。
  private final ErrorAttributes errorAttributes;
public class DefaultErrorAttributes implements ErrorAttributes, HandlerExceptionResolver, Ordered {
public Map<String, Object> getErrorAttributes(WebRequest webRequest, boolean includeStackTrace) {
Map<String, Object> errorAttributes = new LinkedHashMap();
errorAttributes.put("timestamp", new Date());
this.addStatus(errorAttributes, webRequest);
this.addErrorDetails(errorAttributes, webRequest, includeStackTrace);
this.addPath(errorAttributes, webRequest);
return errorAttributes;
}
/*
下面省略一大波可获取的数据
timestamp:时间戳
status:状态码
error:错误提示
exception:异常对象
message:异常消息
errors:JSR303数据校验出现的错误
*/ 7.2 自定义错误响应页面
第1种 :有模板引擎
error/状态码:精确匹配,将错误页面命名为 错误代码.html 放在模板引擎目录templates下的 error 目录下,发生对应状态码错误时,就会响应对应的模板页面error/4xx 、error/5xx:模糊匹配, 可以将错误页面命名为 4xx 和 5xx,用来匹配对应类型的所有错误采用精确优先.
错误页面可获取的的数据信息
timestamp:时间戳
status:状态码
error:错误提示
exception:异常对象
message:异常消息
errors:JSR303数据校验出现的错误第2种:没有模板引擎 (模板引擎找不到对应错误页面)
静态资源目录下的 error 目录中找
第3种: 模板目录与静态目录下都找不到对应错误页面,就响应 SpringBoot 默认的错误页面
通过 BasicErrorController 的 errorhtml 方法最后 一行可知,没有找到则找 error 视图对象 ,error定义在 ErrorMvcAutoConfiguration 的 defaultErrorView中
protected static class WhitelabelErrorViewConfiguration {
    private final ErrorMvcAutoConfiguration.SpelView defaultErrorView = new
            ErrorMvcAutoConfiguration.SpelView("<html><body><h1>Whitelabel Error Page</h1>
            <p>This application has no explicit mapping for /error, so you are seeing this as a
            fallback.</p><div id='created'>${timestamp}</div><div>There was an unexpected error
            (type=${error}, status=${status}).</div><div>${message}</div></body></html>");
    protected WhitelabelErrorViewConfiguration() {
    }
    @Bean( name = {"error"} )
    @ConditionalOnMissingBean( name = {"error"} )
    public View defaultErrorView() {
        return this.defaultErrorView;
    }
7.3 自定义数据进行响应
分析:
出现错误以后,会发送/error请求,会被BasicErrorController处理,而响应的数据是由getErrorAttributes 封装的(就是 ErrorController 的实现类 AbstractErrorController.getErrorAttributes 的方法),所以我们只需要自定义ErrorAttributes实现类即可
自定义ErrorAttributes
//给容器中加入我们自己定义的ErrorAttributes
@Component
public class MyErrorAttributes extends DefaultErrorAttributes {
    @Override
    public Map<String, Object> getErrorAttributes(RequestAttributes requestAttributes, boolean includeStackTrace) {
        Map<String, Object> map = super.getErrorAttributes(requestAttributes, includeStackTrace);
        map.put("company","atguigu");
        return map;
    }
}
错误页面获取
<body>
    4xx错误。。
    <h2>[[${company}]]</h2>
</body>
第8章 嵌入式Servlet容器自定义配置
8.1 注册Servlet三大组件Servlet/Filter/Listener
以前 Web 应用使用外置Tomcat 容器部署,可在 web.xml 文件中注册 Servlet 三大组件;
而由于 Spring Boot 默认是以 jar 包的方式运行嵌入式Servlet容器来启动应用,没有web.xml文件,Spring提供以下Bean来注册三大组件:
- ServletRegistrationBean : 注 册 自 定 义 Servlet
- FilterRegistrationBean : 注 册 自 定 义 Filter
- ServletListenerRegistrationBean :注册自定义ListenerS
Servlet 组件
//自定义Servlet组件
public class HelloServlet extends HttpServlet {
    @Override
    protected void doGet(HttpServletRequest req, HttpServletResponse resp) throws ServletException, IOException {
        resp.getWriter().write("HelloServlet success。。。。");
    }
    @Override
    protected void doPost(HttpServletRequest req, HttpServletResponse resp) throws ServletException, IOException {
        super.doGet(req, resp);
    }
}
//注册Servlet相关组件
@Configuration
public class MyServletConfig {
//注册Sevlet组件
@Bean
public ServletRegistrationBean helloSevlet() {
//参数1:自定义Servlet, 参数2:url映射
ServletRegistrationBean<HelloServlet> bean = new ServletRegistrationBean<>(new HelloServlet(),"/hello");
//设置servlet组件参数配置,如下面加载顺序
bean.setLoadOnStartup(1);
return bean;
}
}Filter 组件
//自定义过滤器
public class MyFilter implements Filter {
    @Override
    public void init(FilterConfig filterConfig) throws ServletException {
        System.out.println("filter初始化");
    }

    @Override
    public void doFilter(ServletRequest servletRequest, ServletResponse
            servletResponse, FilterChain filterChain) throws IOException, ServletException {
        System.out.println("MyFilter过滤完成");
        //放行
        filterChain.doFilter(servletRequest, servletResponse);
    }

    @Override
    public void destroy() {
        System.out.println("filter销毁");
    }
}
//注册Servlet相关组件
@Configuration
public class MyServletConfig {
//注册Filter组件
@Bean
public FilterRegistrationBean myFilter() {
FilterRegistrationBean bean = new FilterRegistrationBean();
//指定过滤器
bean.setFilter(new MyFilter());
//过滤哪些请求
bean.setUrlPatterns(Arrays.asList("/hello"));
return bean;
}
} Listener 组件
//监听应用启动与销毁
public class MyListener implements ServletContextListener {
    @Override
    public void contextInitialized(ServletContextEvent sce) {
        System.out.println("SpringBoot.Servlet应用启动");
    }
    @Override
    public void contextDestroyed(ServletContextEvent sce) {
        System.out.println("SpringBoot.Servlet应用销毁");
    }
}
@Configuration
public class MyServletConfig {
//注册Listener
@Bean
public ServletListenerRegistrationBean myListener() {
return new ServletListenerRegistrationBean(new MyListener());
}
} 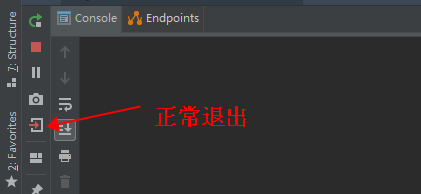
8.2 分析自动注册的SpringMVC前端控制器
SpringBoot 在DispatcherServletAutoConfiguration自动配置中 , 帮我们注册 SpringMVC 的前端控制器DispatcherServlet:
@Bean(name = {"dispatcherServletRegistration"})
@ConditionalOnBean(value = {DispatcherServlet.class}, name = {"dispatcherServlet"})
//注册了前端控制器
public DispatcherServletRegistrationBean dispatcherServletRegistration(DispatcherServlet dispatcherServlet){

    DispatcherServletRegistrationBean registration =new DispatcherServletRegistrationBean(dispatcherServlet,
                                                        //拦截所有请求(包括静态资源);但不会拦截jsp请求; 而 /* 会拦截jsp
                                                        this.webMvcProperties.getServlet().getPath());

    registration.setName("dispatcherServlet");
    registration.setLoadOnStartup(this.webMvcProperties.getServlet().getLoadOnStartup());

    if(this.multipartConfig!=null){
        registration.setMultipartConfig(this.multipartConfig);
    }

    return registration;
}
8.3 修改Servlet容器配置
参考 pom.xml 可知,SpringBoot 默认使用 Tomcat 作为嵌入式的 Servlet 容器,SpringBoot2.1版本默认使用的是Tomcat9.0.12版本的容器
8.3.1 修改Servlet容器配置
方式1:在 application 全局配置文件中, 修改server开头有关的配置【ServerProperties】
#项目服务相关
server.port=8080

#修改Servlet相关配置 server.servlet.xxx
server.servlet.context-path=/servlet

#修改Tomcat相关配置
server.tomcat.xxx server.tomcat.uri-encoding=utf-8
8.3.2 使用定制器修改Servlet容器配置(spring1.x与spring2.x不同)
Spring Boot 1.x:通过实现 嵌入式的Servlet容器定制器EmbeddedServletContainerCustomizer的 customize 方法, 来修改Servlet容器的配置
public class MyServletConfig {
    //Spring Boot 1.x:
    @Bean//一定要将这个定制器加入到容器中
    public EmbeddedServletContainerCustomizer embeddedServletContainerCustomizer() {
        return new EmbeddedServletContainerCustomizer() {
            //定制嵌入式的Servlet容器相关的规则
            @Override
            public void customize(ConfigurableEmbeddedServletContainer container) {
                container.setPort(8083);
            }
        };
    }
}
Spring Boot 2.x:在2.x版本改为实现WebServerFactoryCustomizer接口的 customize 方法
//springboot2.x
@Bean
public WebServerFactoryCustomizer webServerFactoryCustomizer(){
        return new WebServerFactoryCustomizer(){
            @Override
            public void customize(WebServerFactory factory){
                ConfigurableWebServerFactory serverFactory=(ConfigurableWebServerFactory)factory;
                serverFactory.setPort(8081);
            }
        };
}
8.4 切换为其他嵌入式Servlet容器
SpringBoot 默认针对Servlet容器提供以下支持:
Tomcat(默认使用)
Jetty :支持长连接项目(如:聊天页面)
Undertow : 不支持 JSP , 但是并发性能高,是高性能非阻塞的容器
默认Tomcat容器
<!--在spring-boot-starter-web启动器中默认引入了tomcat容器-->
<dependency>
    <groupId>org.springframework.boot</groupId>
    <artifactId>spring-boot-starter-tomcat</artifactId>
    <version>2.1.0.RELEASE</version>
    <scope>compile</scope>
</dependency>
切换 Jetty 容器
<dependency>
    <groupId>org.springframework.boot</groupId>
    <artifactId>spring-boot-starter-web</artifactId>
    <!-- 排除tomcat容器 -->
    <exclusions>
        <exclusion>
            <artifactId>spring-boot-starter-tomcat</artifactId>
            <groupId>org.springframework.boot</groupId>
        </exclusion>
    </exclusions>
</dependency>
<!--引入Jetty容器-->
<dependency>
    <artifactId>spring-boot-starter-jetty</artifactId>
    <groupId>org.springframework.boot</groupId>
</dependency>
切换 Undertow 容器
<dependency>
    <groupId>org.springframework.boot</groupId>
    <artifactId>spring-boot-starter-web</artifactId>
    <!-- 排除tomcat容器 -->
    <exclusions>
        <exclusion>
            <artifactId>spring-boot-starter-tomcat</artifactId>
            <groupId>org.springframework.boot</groupId>
        </exclusion>
    </exclusions>
</dependency>
<!--引入Jetty容器-->
<dependency>
    <artifactId>spring-boot-starter-undertow</artifactId>
    <groupId>org.springframework.boot</groupId>
</dependency>
第9章 使用外置Servlet容器_Tomcat9.x
9.1 比较嵌入式与外置Servlet容器
嵌入式Servlet容器:运行启动类就可启动,或将项目打成可执行的 jar 包
优点:简单、快捷;
缺点:默认不支持JSP、优化定制比较复杂使用定制器, 还需要知道 每个功能 的底层原理
外置Servlet容器:配置 Tomcat, 将项目部署到Tomcat中运行
9.2 使用Tomcat9.x作为外置Servlet容器
操作步骤:
1.必须创建一个 war 类型项目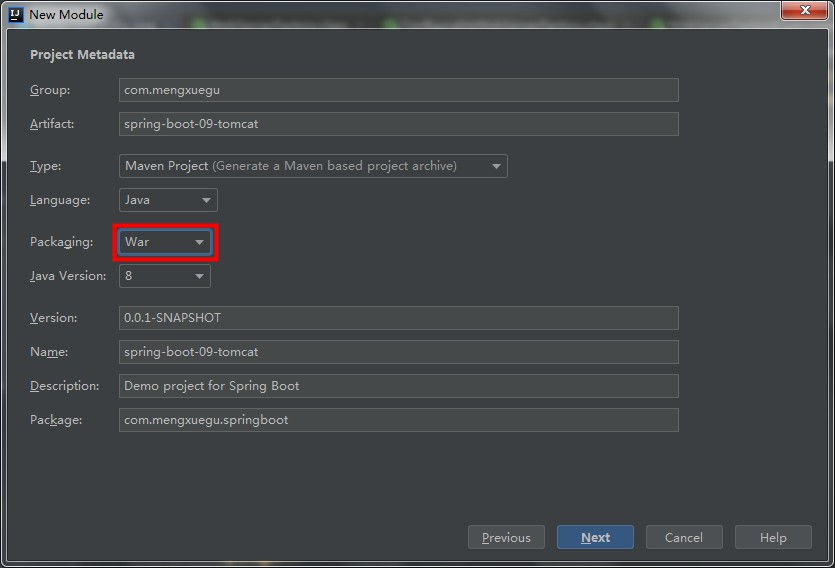
2.idea 上指定web.xml 与 修改好目录结构
指定webapp目录
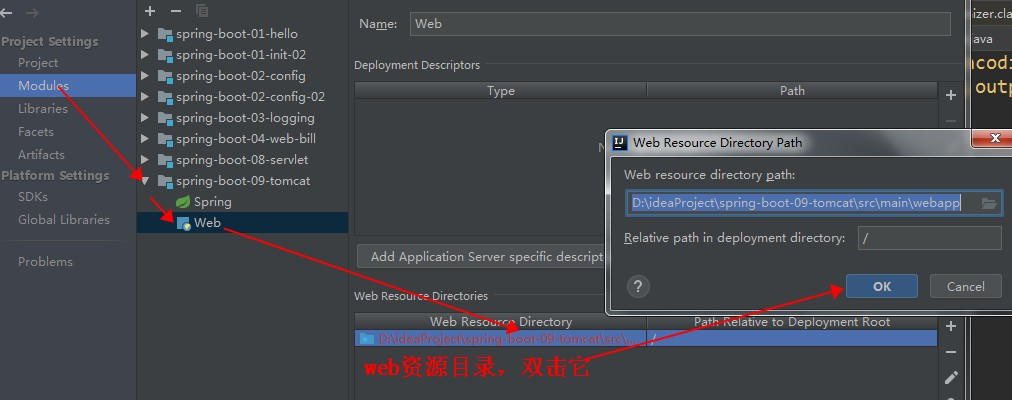
指定web.xml位置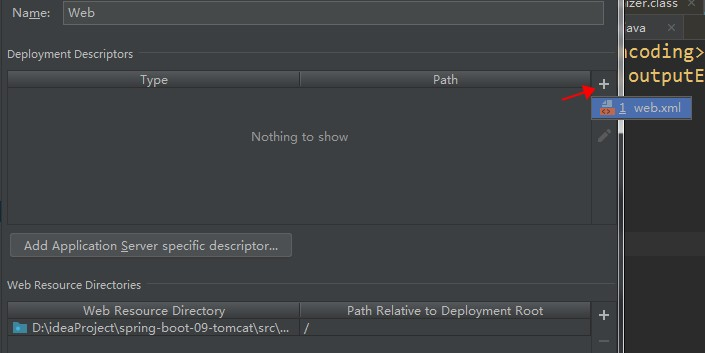
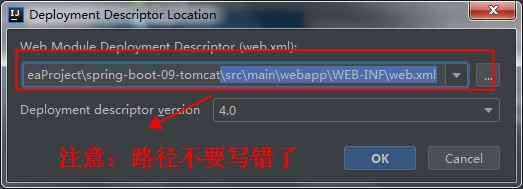
src\main\webapp\WEB-INF\web.xml
添加外置tomcat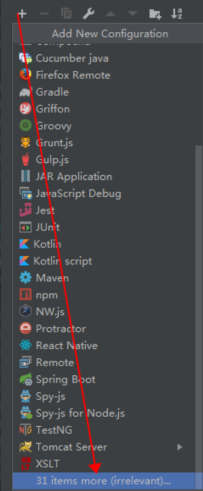

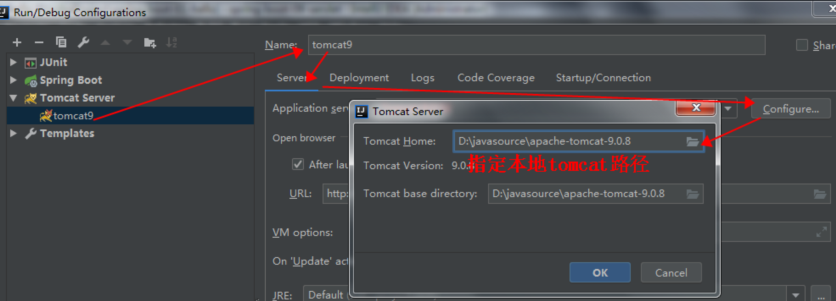
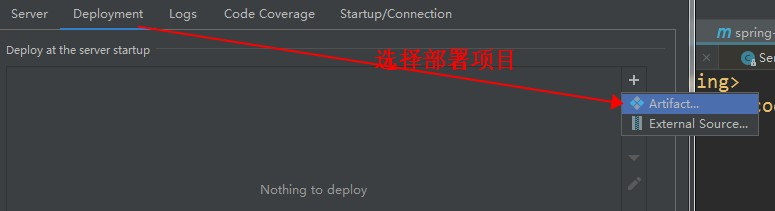
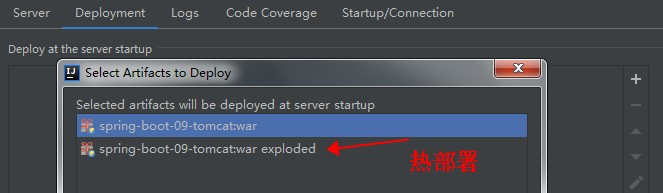
启动
在 pom.xml 将嵌入式的Tomcat指定为provided (Spring初始化器已经默认指定了)
<dependency>
    <groupId>org.springframework.boot</groupId>
    <artifactId>spring-boot-starter-tomcat</artifactId>
    <scope>provided</scope>
</dependency>
Spring初始化器 自动创建了SpringBootServletInitializer的子类,调用 configure 方法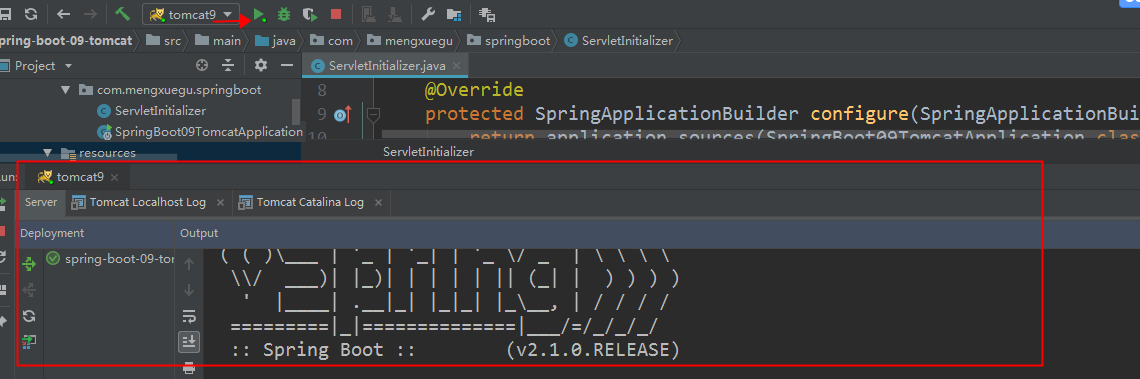
直接开发项目功能即可, 然后启动tomcat即可访问
第10章 SpringBoot数据访问操作
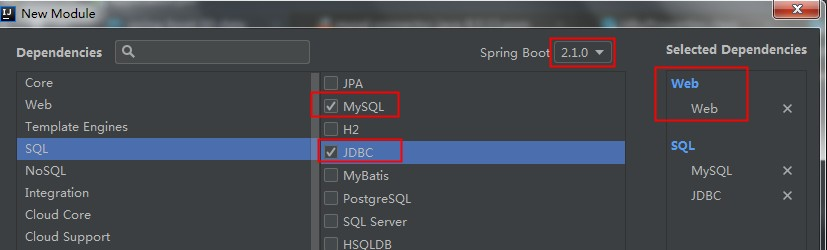
10.1 整合 JDBC 实战
10.1.1 JDBC相关配置
pom.xml
<!--mysql驱动包-->
<dependency>
    <groupId>mysql</groupId>
    <artifactId>mysql-connector-java</artifactId>
    <scope>runtime</scope>
</dependency>
<!--jdbc启动器-->
<dependency>
    <groupId>org.springframework.boot</groupId>
    <artifactId>spring-boot-starter-jdbc</artifactId>
</dependency>
application.yml
注意:mysql 8.x版本驱动包,要使用 com.mysql.cj.jdbc.Driver 作为驱动类
spring:
  datasource:
   username: root
   password: root
   #使用 MySQL连接驱动是8.0以上,需要在Url后面加上时区, GMT%2B8代表中国时区,不然报时区错误
   url: jdbc:mysql://127.0.0.1:3306/jdbc?serverTimezone=GMT%2B8
   # 注意: 新版本驱动包,要使用以下类作为驱动类
   driver-class-name: com.mysql.cj.jdbc.Driver
测试类
@RunWith(SpringRunner.class)
@SpringBootTest
public class SpringBootDataApplicationTests {
    @Autowired
    DataSource datasource;
    @Test
    public void contextLoads() throws SQLException {
        // 默认采用的数据源连接池:com.zaxxer.hikari.HikariDataSource
        System.out.println("datasource: " + datasource.getClass());
        Connection connection = datasource.getConnection();
        System.out.println(connection);
        connection.close();
    }
}
运行结果
SpringBoot 默认采用的数据源连接池是: com.zaxxer.hikari.HikariDataSource
数据源相关配置都在DataSourceProperties中;
10.1.2 常见错误
以下说明mysql服务器没有启动,需要启动mysql服务, 你用navicat连接试试看是否可以连接,不可以说明没有启动
The last packet sent successfully to the server was 0 milliseconds ago. The driver has not received any packets from the server.
- 时区异常:
需要配置文件中指定时区:jdbc: mysql://127.0.0.1:3306/jdbc?serverTimezone=GMT%2B8
The server time zone value ‘Öйú±ê׼ʱ¼ä’ is unrecognized or represents more than one
10.1.3 JDBC自动配置原理:
- 支持的数据源, 提供了 Hikari.class, Tomcat.class, Dbcp2.class, Generic.class
各种连接池数据源相关配置: DataSourceConfiguration 可以通过spring.datasource.type 修改数据源
@Configuration
@Conditional({DataSourceAutoConfiguration.PooledDataSourceCondition.class})
@ConditionalOnMissingBean({DataSource.class, XADataSource.class})
//提供了 Hikari.class, Tomcat.class, Dbcp2.class, Generic.class
@Import({Hikari.class, Tomcat.class, Dbcp2.class, Generic.class, DataSourceJmxConfiguration.class})
protected static class PooledDataSourceConfiguration {
    protected PooledDataSourceConfiguration() {
    }
} - JdbcTemplateAutoConfiguration自动配置类提供了JdbcTemplate操作数据库
@Controller
public class ProviderController {

    @Autowired
    JdbcTemplate jdbcTemplate;

    @ResponseBody
    @GetMapping("/providers")
    public Map<String, Object>list() {
        List<Map<String, Object>> maps = jdbcTemplate.queryForList("select * from provider");
        System.out.println(maps);
        return maps.get(0);
    }

}
10.2 高级配置 Druid 连接池与监控管理
Hikari 性能上比 Druid 更好,但是 Druid 有配套的监控安全管理功能
10.2.1 整合 Druid 操作步骤
1.引入 Driud 依赖
<dependency>
    <groupId>com.alibaba</groupId>
    <artifactId>druid</artifactId>
    <version>1.1.12</version>
</dependency>
2.Druid 全局配置
spring:
  datasource:
  # 数据源基本配置
    username: root
    password: root
    url: jdbc:mysql://127.0.0.1:3306/jdbc?serverTimezone=GMT%2B8
    # 8.x版本驱动包,要使用以下类作为驱动类
    driver-class-name: com.mysql.cj.jdbc.Driver
    # 指定 Druid 数据源
    type: com.alibaba.druid.pool.DruidDataSource

    # 数据源其他配置, DataSourceProperties中没有相关属性,默认无法绑定
    initialSize: 8
    minIdle: 5
    maxActive: 20
    maxWait: 60000
    timeBetweenEvictionRunsMillis: 60000
    minEvictableIdleTimeMillis: 300000
    validationQuery: SELECT 1 FROM DUAL
    testWhileIdle: true
    testOnBorrow: false
    testOnReturn: false
    poolPreparedStatements: true

    # 配置监控统计拦截的filters,去掉后监控界面sql无法统计,'wall'用于防火墙
    filters: stat,wall,logback
    maxPoolPreparedStatementPerConnectionSize: 25
    useGlobalDataSourceStat: true
    connectionProperties: druid.stat.mergeSql=true;druid.stat.slowSqlMillis=500
3.通过测试类测试,发现数据源已经切换为 DruidDataSource , 但是配置中的属性没有与它绑定上
4.自定义配置类, 将配置中属性与 DruidDataSource属性绑定
/**
 * Druid 配置类
 */
@Configuration
public class DruidConfig {
    //绑定数据源配置
    @ConfigurationProperties(prefix = "spring.datasource")
    @Bean
    public DataSource druid() {
        return new DruidDataSource();
    }
}
10.2.2 配置Druid监控
/**
 * Druid 配置类
 */
@Configuration
public class DruidConfig {
    //绑定数据源配置
    @ConfigurationProperties(prefix = "spring.datasource")
    @Bean
    public DataSource druid() {
        return new DruidDataSource();
    }

    /**
     * 配置Druid监控
     * 1. 配置一个管理后台的Servlet
     * 2. 配置一个监控的filter
     */
    // 1. 配置一个管理后台的Servlet
    @Bean
    public ServletRegistrationBean statViewServlet() {
        //StatViewServlet是 配置管理后台的servlet
        ServletRegistrationBean<StatViewServlet> bean = new ServletRegistrationBean<>(new StatViewServlet(),"/druid/*");
        //配置初始化参数
        Map<String, String> initParam = new HashMap<>();
        //访问的用户名密码
        initParam.put(StatViewServlet.PARAM_NAME_USERNAME, "root");
        initParam.put(StatViewServlet.PARAM_NAME_PASSWORD, "root");
        //允许访问的ip,默认所有ip访问
        initParam.put(StatViewServlet.PARAM_NAME_ALLOW, "");
        //禁止访问的ip
        initParam.put(StatViewServlet.PARAM_NAME_DENY, "192.168.10.1");
        bean.setInitParameters(initParam);
        return bean;
    }

    //2. 配置一个监控的filter
    @Bean
    public FilterRegistrationBean filter() {
        FilterRegistrationBean<Filter> bean = new FilterRegistrationBean<>();
        bean.setFilter(new WebStatFilter());
        //配置初始化参数
        Map<String, String> initParam = new HashMap<>();
        //排除请求
        initParam.put(WebStatFilter.PARAM_NAME_EXCLUSIONS, "*.js,*.css,/druid/*");
        //拦截所有请求
        bean.setUrlPatterns(Arrays.asList("/*"));
        return bean;
    }
}
10.3 整合 MyBatis3.x 注解版本实战
10.3.1 搭建 MyBatis 环境
创建Module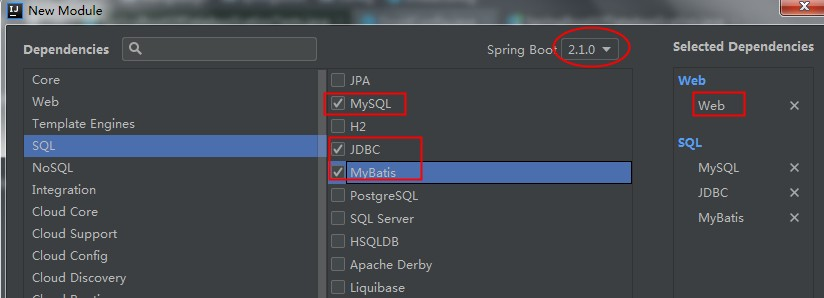
导入 Druid 数据源依赖, 创建后自动会引入 MyBatis 启动器,是由 MyBatis 官方提供的
<!--导入 mybatis 启动器-->
<dependency>
    <groupId>org.mybatis.spring.boot</groupId>
    <artifactId>mybatis-spring-boot-starter</artifactId>
    <version>1.3.2</version>
</dependency>
<!--druid数据源-->
<dependency>
    <groupId>com.alibaba</groupId>
    <artifactId>druid</artifactId>
    <version>1.1.12</version>
</dependency>
配置 Druid 数据源(application.yml修改为mybatis库)与监控 [参考10.2章节 ]
创建 mybatis 库与导入表和数据、实体类
10.3.2 注解版 MyBatis 操作
/**
 * 使用Mybatis注解版本
 */
//@Mapper //指定这是操作数据的Mapper
public interface ProviderMapper {
    @Select("select * from provider where pid=#{pid}")
    Provider getProvierByPid(Integer pid);
    //useGeneratedKeys是否使用自增主键,keyProperty指定实体类中的哪一个属性封装主键值
    @Options(useGeneratedKeys = true, keyProperty = "pid")
    @Insert("insert into provider(providerName) values(#{providerName})")
    int addProvider(Provider provider);
    @Delete("delete from provider where pid=#{pid}")
    int deleteProviderByPid(Integer pid);
    @Update("update provider set providerName=#{providerName} where pid=#{pid}" )
    int updateProvider(Provider provider);
}
注:上面@Insert插入数据时, 使用 @Options 接收插入的主键值: @Options(useGeneratedKeys = true, keyProperty = “pid”)
useGeneratedKeys是否自增主键, keyProperty指定实体中哪个属性封装主键
@Controller
public class ProviderController {
    @Autowired
    ProviderMapper providerMapper;

    @ResponseBody
    @GetMapping("/provider/{pid}")
    public Provider getProvider(@PathVariable("pid") Integer pid) {
        Provider providerByPid = providerMapper.getProviderByPid(pid);
        return providerByPid;
    }

    @ResponseBody
    @GetMapping("/provider")
    public Provider addProvider(Provider provider) {
        providerMapper.addProvider(provider);
        return provider;
    }
}
自定义MyBatis配置类, 替代mybatis配置文件
开启驼峰命名方式, 使用,不然 provider_code 不会自动转成 providerCode
/**
 * MyBatis注解版-配置类替换配置文件
 */
@org.springframework.context.annotation.Configuration
public class MyBatisConfig {
    @Bean
    public ConfigurationCustomizer configurationCustomizer() {
        return new ConfigurationCustomizer(){
            @Override
            public void customize(Configuration configuration) {
                //开启驼峰命名方式
                configuration.setMapUnderscoreToCamelCase(true);
            }
        };
    }
}
使用@MapperScan(“包名”)自动装配指定包下所有Mapper, 省得在每个Mapper接口上写@Mapper
@MapperScan("com.mengxuegu.springboot.mapper")
@SpringBootApplication
public class SpringBoot08DataMybatisApplication {
    public static void main(String[] args) {
        SpringApplication.run(SpringBoot08DataMybatisApplication.class, args);
    }
}
10.4 整合 MyBatis3.x 配置文件版实战
Mapper接口
/**
 * MyBatis 配置文件版
 */
//@Mapper 或 @MapperScan 扫描Mapper接口装配到容器中
public interface BillMapper {
    Bill getBillByBid(Integer bid);
    int insertBill(Bill bill);
}
在 resources 创建以下目录和核心配置文件与Mapper映射文件
mybatis 核心配置文件
<?xml version="1.0" encoding="UTF-8" ?>
<!DOCTYPE configuration
        PUBLIC "-//mybatis.org//DTD Config 3.0//EN"
        "http://mybatis.org/dtd/mybatis-3-config.dtd">
<configuration>
    <!--mybatis核心配置文件-->
</configuration>
BillMapper 映射文件
<?xml version="1.0" encoding="UTF-8" ?>
<!DOCTYPE mapper
        PUBLIC "-//mybatis.org//DTD Mapper 3.0//EN"
        "http://mybatis.org/dtd/mybatis-3-mapper.dtd">
<mapper namespace="com.mengxuegu.springboot10datamybatis.entities">
    <select id="getBillByBid" resultType="com.mengxuegu.springboot10datamybatis.entities.Bill">
        select * from bill where bid = #{bid}
    </select>
    <insert id="addBill">
        insert into bill (bill_code, bill_name)
        values (#{billCode}, #{billName})
    </insert>
</mapper>
application.yml 中指定配置文件路径
# Mybatis相关配置
mybatis:
#核心配置文件路径
  config-location: classpath:mybatis/mybatis-config.xml
#映射配置文件路径
  mapper-locations: classpath:mybatis/mapper/*.xml
创建 BillController 来测试
@Controller
public class BillController {

    @Autowired
    BillMapper billMapper;

    @ResponseBody
    @GetMapping("/bill/{bid}")
    public Bill getBill(@PathVariable Integer bid) {
        return billMapper.getBillByBid(bid);
    }

    @ResponseBody
    @GetMapping("/bill")
    public Bill addBill(Bill bill) {
        billMapper.addBill(bill);
        return bill;
    }

}
访问 http://localhost:8080/bill/1后发现 billCode、billName等没有获取到,需要配置文件中开启驼峰命名
{"bid":1,"billCode":null,"billName":null,"billCom":null,"billNum":null,"money":400000
.0,"provider":null,"pay":null,"createDate":null}
mybatis-config.xml开启驼峰命名
<?xml version="1.0" encoding="UTF-8" ?>
<!DOCTYPE configuration
        PUBLIC "-//mybatis.org//DTD Config 3.0//EN"
        "http://mybatis.org/dtd/mybatis-3-config.dtd">
<configuration>
    <!--mybatis核心配置文件-->
    <settings>
        <!--开启驼峰命名-->
        <setting name="mapUnderscoreToCamelCase" value="true"/>
    </settings>
</configuration>
控制台打印sql语句
# 打印sql
logging:
  level:
    com.mengxuegu.springboot10datamybatis.mapper : debug
10.5 整合 Spring Data JPA 实战
10.5.1 什么是 Spring Data
Spring Data 是 Spring Boot 底层默认进行数据访问的技术 , 为了简化构建基于 Spring 框架应用的数据访问技术, 包括非关系数据库、Map-Reduce 框架、云数据服务等;另外也包含对关系数据库的访问支持。

Spring Data 包含多个模块:
    Spring Data Commons 提供共享的基础框架,适合各个子项目使用,支持跨数据库持久化
    Spring Data JPA
    Spring Data KeyValue
    Spring Data LDAP
    Spring Data MongoDB
    Spring Data Redis
    Spring Data REST
    Spring Data for Apache Cassandra
    Spring Data for Apache Geode
    Spring Data for Apache Solr
    Spring Data for Pivotal GemFire
    Spring Data Couchbase (community module)
    Spring Data Elasticsearch (community module)
    Spring Data Neo4j (community module)

Spring Data 特点
    1.Spring Data 项目为大家提供统一的API来对不同数据访问层进行操作;

Spring Data 统一的核心接口
    1.Repository :统一的根接口,其他接口继承该接口
    2.CrudRepository :基本的增删改查接口,提供了最基本的对实体类CRUD操作
    3.PagingAndSortingRepository :增加了分页和排序操作
    4.JpaRepository :增加了批量操作,并重写了父接口一些方法的返回类型
    5.JpaSpecificationExecutor:用来做动态查询,可以实现带查询条件的分页(不属于Repository体系,支持 JPA Criteria 查询相关的方法 )
Spring Data JPA、JPA与Hibernate 关系
JPA是一种规范,而Hibernate是实现这种规范的底层实现,Spring Data JPA对持久化接口 JPA 再抽象一层, 针对持久层业务再进一步统一简化。
10.5.2 整合 Spring Data JPA 实战
JPA的底层遵守是ORM(对象关系映射)规范,因此JPA其实也就是java实体对象和关系型数据库建立起映射关系,通 过面向对象编程的思想操作关系型数据库的规范。
1.创建Module
2.添加数据源, 新建 jpa 数据库
spring:
  datasource:
    # 数据源基本配置
    username: root
    password: root
    url: jdbc:mysql://127.0.0.1:3306/jpa?serverTimezone=GMT%2B8
    # 8.x版本驱动包,要使用以下类作为驱动类
    driver-class-name: com.mysql.cj.jdbc.Driver
3.创建实体类, 并使用JPA注解进行配置映射关系
类上使用 JPA注解@Entity标注,说明它是和数据表映射的类;@Table(name=”表名”)指定对应映射的表名,省略默认表名就是类名。
@Id 标识主键,@GeneratedValue(strategy = GenerationType.IDENTITY) 标识自增长主键 @Column标识字段
//使用JPA注解进行配置映射关系
@Entity //说明它是和数据表映射的类
@Table(name = "tbl_user") //指定对应映射的表名,省略默认表名就是类名
@Getter
@Setter
public class User {
    @Id //标识主键
    @GeneratedValue(strategy = GenerationType.IDENTITY) //标识自增长主键
    private Integer id;
    @Column(name = "user_name",length = 5) //这是和数据表对应的一个列
    private String userName;
    @Column //省略默认列名就是属性名
    private String password;
}
4.创建UserRepository接口继承JpaRepository,就会crud及分页等基本功能
/**
 * 自定义接口继承JpaRepository,就会crud及分页等基本功能
 */
//指定的泛型<操作的实体类,主键的类型>
public interface UserRepository extends JpaRepository<User, Integer> {
}
5.JPA 配置在全局配置文件中添加 ( spring.jpa.* 开头)
spring:
  datasource:
    # 数据源基本配置
    username: root
    password: root
    url: jdbc:mysql://127.0.0.1:3306/jpa
    # 8.x版本驱动包,要使用以下类作为驱动类
    driver-class-name: com.mysql.cj.jdbc.Driver
  # jpa相关配置 spring.jpa.*
  jpa:
    # 控制台显示SQL
    showSql: true
    hibernate:
      # 会根据就映射实体类自动创建或更新数据表
      ddl-auto: update
    # 默认创建表类型是MyISAM,是非事务安全的,所以无法实现事物回滚
    # 指定如下方言: 创建的表类型是Innodb,才可以进行对事物的回滚。
    database-platform: org.hibernate.dialect.MySQL5InnoDBDialect
6.测试方法
@RestController
public class UserController {

    @Autowired
    UserRepository userRepository;

    @GetMapping("/user/{id}")
    public User getUserById(@PathVariable("id") Integer id) {
        return userRepository.findById(id).get();
    }

    @GetMapping("/user")
    public User addUser(User user) {
        return userRepository.save(user);
    }
}
10.6 Spring Boot中的事务管理
10.6.1 什么是事务
我们在开发企业应用时,对于业务人员的一个操作实际是对数据读写的多步操作的结合。由于数据操作在顺序执行 的过程中,任何一步操作都有可能发生异常,异常会导致后续操作无法完成,此时由于业务逻辑并未正确的完成, 之前成功操作数据的并不可靠,需要在这种情况下进行回退。
事务的作用就是为了保证用户的每一个操作都是可靠的,事务中的每一步操作都必须成功执行,只要有发生异常就 回退到事务开始未进行操作的状态。
事务管理是Spring框架中最为常用的功能之一,我们在使用Spring Boot开发应用时,大部分情况下也都需要使用事务。
10.6.2 事务管理操作
在Spring Boot中,当我们使用了spring-boot-starter-jdbc或spring-boot-starter-data-jpa依赖的时候,框架会自动默认分别注入DataSourceTransactionManager或JpaTransactionManager。所以我们不需要任何额外配置就可 以用@Transactional注解进行事务的使用。
1.强调 Hibernate 在创建表时,
默认创建表类型是MyISAM,是非事务安全的,所以无法实现事物回滚; Innodb才可以进行对事物的回滚。
需要指定 spring.jpa.database-platform=org.hibernate.dialect.MySQL57Dialect
jpa:
  # 控制台显示SQL
  showSql: true
  hibernate:
    # 会根据就映射实体类自动创建或更新数据表
    ddl-auto: update
  # 默认创建表类型是MyISAM,是非事务安全的,所以无法实现事物回滚
  # 指定如下方言: 创建的表类型是Innodb,才可以进行对事物的回滚。
  database-platform: org.hibernate.dialect.MySQL57Dialect
2.创建 Service 层
public interface IUserService {
    Boolean addUser(User user);
}

import org.springframework.transaction.annotation.Transactional;

@Service
public class UserServiceImpl implements IUserService {
    @Autowired
    UserRepository userRepository;
    /*
    事务管理:
    1. 在启动类上 ,使用 @EnableTransactionManagement 开启注解方式事务支持
    2. 在 Service层方法上添加 @Transactional 进行事务管理
    */
    @Transactional
    @Override
    public Boolean addUser(User user) {
        userRepository.save(new User("1","1"));
        userRepository.save(new User("12","2"));
        userRepository.save(new User("123","3"));
        userRepository.save(new User("1234","4"));
        userRepository.save(new User("12345","5"));
        //用户名长度大于5会报错,应该回滚事务的
        //userRepository.save(new User("123456","6"));
        //userRepository.save(user);
        return true;
    }
}
以上添加 用户名长度大于5会报错时,应该回滚
事务管理步骤:
1.在启动类上 ,使用 @EnableTransactionManagement 开启注解方式事务支持
2.在 Service层方法上添加 @Transactional 进行事务管理
@EnableTransactionManagement //开启注解的事务管理
@SpringBootApplication
public class SpringBoot09DataJpaApplication {
    public static void main(String[] args) {
        SpringApplication.run(SpringBoot09DataJpaApplication.class, args);
    }
}
3.如果使用 JPA 创建表则需要指定数据库引擎为 Innodb
10.6.3 事务的隔离级别和传播行为
除了指定事务管理器之后,还能对事务进行隔离级别和传播行为的控制,下面分别详细解释:
10.6.3.1 隔离级别
隔离级别是指在发生并发的事务之间的隔离程度,与我们开发时候主要相关的场景包括:脏读、不可重复读、幻读。
脏读:A事务执行过程中修改了id=1的数据,未提交前,B事务读取了A修改的id=1的数据,而A事务却回滚了,这样B事务就形成了脏读。
不可重复读:A事务先读取了一条数据,然后执行逻辑的时候,B事务将这条数据改变了,然后A事务再次读取的时 候,发现数据不匹配了,就是所谓的不可重复读了。
幻读:A事务先根据条件查询到了N条数据,然后B事务新增了M条符合A事务查询条件的数据,导致A事务再次查询 发现有N+M条数据了,就产生了幻读。
我们可以看org.springframework.transaction.annotation.Isolation枚举类中定义了五个表示隔离级别的值:
public enum Isolation {
    DEFAULT(-1),
    READ_UNCOMMITTED(1),
    READ_COMMITTED(2),
    REPEATABLE_READ(4),
    SERIALIZABLE(8);
}- DEFAULT :这是默认值,表示使用底层数据库的默认隔离级别。对大部分数据库而言,通常这值就是:READ_COMMITTED
- READ_UNCOMMITTED :该隔离级别表示一个事务可以读取另一个事务修改但还没有提交的数据。该级别不能防止脏读和不可重复读,因此很少使用该隔离级别。
- READ_COMMITTED:该隔离级别表示一个事务只能读取另一个事务已经提交的数据。该级别可以防止脏读,这也是大多数情况下的推荐值,性能最好。
- REPEATABLE_READ :该隔离级别表示一个事务在整个过程中可以多次重复执行某个查询,并且每次返回的记录都相同。即使在多次查询之间有新增的数据满足该查询,这些新增的记录也会被忽略。该级别 可以防止脏读和不可重复读。
- SERIALIZABLE:所有的事务依次逐个执行,这样事务之间就完全不可能产生干扰,也就是说,该级别可以防止脏读、不可重复读以及幻读。但是这将严重影响程序的性能。通常情况下也不会用到该级别。
指定方式:通过使用 属性设置,例如:
@Transactional(isolation = Isolation.DEFAULT)10.6.3.2传播行为
传播行为是指,如果在开始当前事务之前,已经存在一个事务,此时可以指定这个要开始的这个事务的执行行为。
我们可以看org.springframework.transaction.annotation.Propagation枚举类中定义了6个表示传播行为的枚举值:
public enum Propagation {
    REQUIRED(0),
    SUPPORTS(1),
    MANDATORY(2),
    REQUIRES_NEW(3),
    NOT_SUPPORTED(4),
    NEVER(5),
    NESTED(6);
}- REQUIRED :(默认)如果当前存在事务,则加入该事务;如果当前没有事务,则创建一个新的事务。
- SUPPORTS :如果当前存在事务,则加入该事务;如果当前没有事务,则以非事务的方式继续运行。
- MANDATORY :如果当前存在事务,则加入该事务;如果当前没有事务,则抛出异常。
- REQUIRES_NEW :创建一个新的事务,如果当前存在事务,则把当前事务挂起。
- NOT_SUPPORTED:以非事务方式运行,如果当前存在事务,则把当前事务挂起。
- NEVER :以非事务方式运行,如果当前存在事务,则抛出异常。
- NESTED:如果当前存在事务,则创建一个事务作为当前事务的嵌套事务来运行;如果当前没有事务,则该取值等价于REQUIRED
指定方式:通过使用属性设置,例如:
@Transactional(propagation = Propagation.REQUIRED)第11章 项目实战-帐单管理系统完整版
数据访问层采用 MyBatis配置文件版
11.1 项目环境搭建
1.构建新项目, 复制 spring-boot-05-bill ,粘贴为 spring-boot-10-bill ,然后导入spring-boot-10-bill
2.在 Project Struture 中重命名Module名字
3.修改pom.xml 的 artifactId 和 name 值
4.Shift+F6重命名启动类SpringBootBillApplication 与测试类 SpringBootBillApplicationTests
5.重命名后,看下当前 Module 目录下是否存在原来的 class 文件,有则按delete删除它,不然运行测试类会报如下错误 :
java.lang.IllegalStateException: Found multiple @SpringBootConfiguration annotated classes [Generic bean: class
[com.mengxuegu.springboot.SpringBoot05BillApplication];
6.启动 SpringBootBillApplication , 测试是否正常访问
7.删除 resources\static\error 错误页面,因为保留 templates\error 即可
11.2 数据源相关配置
1.添加依赖,使用 Mybatis 作为数据数据访问层
<!--数据源相关-->
<dependency>
    <groupId>org.mybatis.spring.boot</groupId>
    <artifactId>mybatis-spring-boot-starter</artifactId>
    <version>1.3.2</version>
</dependency>
<dependency>
    <groupId>mysql</groupId>
    <artifactId>mysql-connector-java</artifactId>
    <scope>runtime</scope>
</dependency>
<dependency>
    <groupId>com.alibaba</groupId>
    <artifactId>druid</artifactId>
    <version>1.1.12</version>
</dependency>
2.创建 bill 数据库, 导入创建表与数据脚本 bill.sql
3.指定 Druid 数据源,application.yml(要修改库名) 与 DruidConfig.java,参考 10.2.2 配置Druid连接池
4.resources类路径下添加 Mybatis 配置,并在配置中指定路径
核心配置文件:mybatis/mybatis-config.xml
映射配置文件:mybatis/mapper/ProviderMapper.xml
#配置mybatis相关文件路径
mybatis:
  #映射配置文件路径
  mapper-locations: classpath:mybatis/mapper/*.xml
  #核心配置文件路径
  config-location: classpath:mybatis/mybatis-config.xml
# 控制台打印sql
logging:
  level:
    com.mengxuegu.springboot.mapper: debug
#数据源相关配置
spring:
  datasource:
    username: root
    password: root
    #mysql8版本以上的驱动包,需要指定以下时区
    url: jdbc:mysql://127.0.0.1:3306/bill?serverTimezone=GMT%2B8
    #mysql8版本以上指定新的驱动类
    driver-class-name: com.mysql.cj.jdbc.Driver
    #引入Druid数据源
    type: com.alibaba.druid.pool.DruidDataSource

    # 数据源其他配置, DataSourceProperties中没有相关属性,默认无法绑定
    initialSize: 8
    minIdle: 5
    maxActive: 20
    maxWait: 60000
    timeBetweenEvictionRunsMillis: 60000
    minEvictableIdleTimeMillis: 300000
    validationQuery: SELECT 1 FROM DUAL
    testWhileIdle: true
    testOnBorrow: false
    testOnReturn: false
    poolPreparedStatements: true

    # 配置监控统计拦截的filters,去掉后监控界面sql无法统计,'wall'用于防火墙
    filters: stat,wall,logback
    maxPoolPreparedStatementPerConnectionSize: 25
    useGlobalDataSourceStat: true
    connectionProperties: druid.stat.mergeSql=true;druid.stat.slowSqlMillis=500
5.访问Druid监控后台
11.3 完成供应商管理模块
1.创建数据访问层 mapper.ProviderMapper
package com.mengxuegu.springboot.mapper;
import com.mengxuegu.springboot.entities.Provider;
import java.util.List;

//@Mapper 或 @MapperScan("com.mengxuegu.springboot.mapper")
public interface ProviderMapper {
    List<Provider> getProviders(Provider provider);
    Provider getProviderByPid(Integer pid);
    int addProvider(Provider provider);
    int deleteProviderByPid(Integer pid);
    int updateProvider(Provider provider);
}
2.扫描 Mapper , 在启动类上添加@MapperScan(“com.mengxuegu.springboot.mapper”)
3.在 mybatis/mapper/ProviderMapper.xml 添加 SQL 语句
<?xml version="1.0" encoding="UTF-8" ?>
<!DOCTYPE mapper
        PUBLIC "-//mybatis.org//DTD Mapper 3.0//EN"
        "http://mybatis.org/dtd/mybatis-3-mapper.dtd">
<mapper namespace="com.mengxuegu.springboot.mapper.ProviderMapper">
    <select id="getProviders" resultType="com.mengxuegu.springboot.entities.Provider">
        select * from provider where 11=1
        <if test="providerName != null and providerName != ''">
            <!--${} 用于字符串拼接-->
            and providerName like '%${providerName}%'
        </if>
    </select>
    <select id="getProviderByPid" resultType="com.mengxuegu.springboot.entities.Provider">
        select * from provider where pid = #{pid}
    </select>
    <insert id="addProvider">
        INSERT INTO `provider` (`provider_code`,`providerName`,`people`,`phone`,`address`,`fax`,`describe`,`create_date`)
        VALUES (#{providerCode}, #{providerName}, #{people}, #{phone}, #{address}, #{fax}, #{describe}, now())
    </insert>
    <update id="updateProvider">
        UPDATE `bill` . `provider`
        SET `provider_code` = #{providerCode},
            `providerName`  = #{providerName},
            `people`        = #{people},
            `phone`         = #{phone},
            `address`       = #{address},
            `fax`           = #{fax},
            `describe`      = #{describe},
            `create_date`   = now()
        WHERE `pid` = #{pid}
    </update>
    <delete id="deleteProviderByPid">
        delete from provider where pid = #{pid}
    </delete>
</mapper>
4.测试 mapper
@RunWith(SpringRunner.class)
@SpringBootTest
public class SpringBootBillApplicationTests {
    @Autowired
    ProviderMapper providerMapper;

    @Test
    public void contextLoads() {
        List<Provider> providers = providerMapper.getProviders(null);
        System.out.println(providers.get(0));
        Provider provider = providerMapper.getProviderByPid(1);
        System.out.println(provider);
        provider.setProviderCode("P_11111");
        int size = providerMapper.updateProvider(provider);
        System.out.println(size);
        providerMapper.addProvider(new Provider(null, "PR-AA", "梦学谷供应商111",
                "小张", "18888666981", "深圳软件园", "0911-0123456", "品质A"));
        providerMapper.deleteProviderByPid(5);
    }
}
5.修改 ProviderController
/**
 * 供应商的控制层
 */
@Controller
public class ProviderController {
    Logger logger = LoggerFactory.getLogger(getClass());
    @Autowired
    ProviderDao providerDao;
    @Autowired
    ProviderMapper providerMapper;

    @GetMapping("/providers")
    public String list(Map<String, Object> map, Provider provider) {
        logger.info("供应商列表查询。。。" + provider);
        List<Provider> providers = providerMapper.getProviders(provider);
        map.put("providers", providers);
        map.put("providerName", provider.getProviderName());
        return "provider/list";
    }

    /**
     * type = null 进入查看详情页面view.html,
     * type=update 则是进入update.html
     */
    @GetMapping("/provider/{pid}")
    public String view(@PathVariable("pid") Integer pid,
                       @RequestParam(value = "type", defaultValue = "view") String type,
                       Map<String, Object> map) {
        logger.info("查询" + pid + "的供应商详细信息");
        Provider provider = providerMapper.getProviderByPid(pid);
        map.put("provider", provider);
        // type = null 则进入view.html, type=update 则是进入update.html
        return "provider/" + type;
    }

    //修改供应商信息
    @PutMapping("/provider")
    public String update(Provider provider) {
        logger.info("更改供应商信息。。。");
        //更新操作
        providerMapper.updateProvider(provider);
        return "redirect:providers";
    }

    //前往添加 页面
    @GetMapping("/provider")
    public String toAddPage() {
        return "provider/add";
    }

    //添加数据
    @PostMapping("/provider")
    public String add(Provider provider) {
        logger.info("添加供应商数据" + provider);
        //保存数据操作
        providerMapper.addProvider(provider);
        return "redirect:/providers";
    }

    //删除供应商
    @DeleteMapping("/provider/{pid}")
    public String delete(@PathVariable("pid") Integer pid) {
        logger.info("删除操作, pid=" + pid);
        providerMapper.deleteProviderByPid(pid);
        return "redirect:/providers";
    }
}
11.4 帐单管理模块
1.改造实体类,因为列表需要供应商名称
Bill 类中添加private Integer pid;
private Integer pid;

public Integer getPid() {
    return pid;
}

public void setPid(Integer pid) {
    this.pid = pid;
}
BillProvider 继承 Bill 后,BillProvider包含了Bill的所有属性,只需要新增 供应商 的信息属性即可
public class BillProvider extends Bill{
    private String providerName;
    public String getProviderName() {
        return providerName;
    }
    public void setProviderName(String providerName) {
        this.providerName = providerName;
    }
}
2.BillMapper
package com.mengxuegu.springboot.mapper;
import com.mengxuegu.springboot.entities.Bill;
import com.mengxuegu.springboot.entities.BillProvider;
import com.mengxuegu.springboot.entities.Provider;
import java.util.List;

//@Mapper 或 @MapperScan("com.mengxuegu.springboot.mapper")
public interface BillMapper {
    List<BillProvider> getBills(Bill bill);
    BillProvider getBillByBid(Integer bid);
    int addBill(Bill bill);
    int updateBill(Bill bill);
    int deteleBillByBid(Integer bid);
}
3.BillMapper.xml
<?xml version="1.0" encoding="UTF-8" ?>
<!DOCTYPE mapper
        PUBLIC "-//mybatis.org//DTD Mapper 3.0//EN"
        "http://mybatis.org/dtd/mybatis-3-mapper.dtd">
<mapper namespace="com.mengxuegu.springboot.mapper.BillMapper">
    <select id="getBills" resultType="com.mengxuegu.springboot.entities.BillProvider">
        select b.*, p.providerName from bill b left join provider p on b.pid = p.pid where 11=1
        <if test="billName != null and billName != ''">
            and b.bill_name like '%${billName}%'
        </if>
        <if test="pid != null ">
            and b.pid = #{pid}
        </if>
        <if test="pay != null ">
            and b.pay = #{pay}
        </if>
    </select>
    <select id="getBillByBid" resultType="com.mengxuegu.springboot.entities.BillProvider">
        select b.*, p.providerName from bill b left join provider p on b.pid = p.pid where b.bid = #{bid}
    </select>
    <insert id="addBill">
        INSERT INTO `bill` (`bill_code`, `bill_name`, `bill_com`, `bill_num`, `money`, `pay`, `pid`, `create_date`)
        VALUES (#{billCode}, #{billName}, #{billCom}, #{billNum}, #{money}, #{pay}, #{pid}, now());
    </insert>
    <update id="updateBill">
        UPDATE `bill`
        SET `bill_code`   = #{billCode},
            `bill_name`   = #{billName},
            `bill_com`    = #{billCom},
            `bill_num`    = #{billNum},
            `money`       = #{money},
            `pay`         = #{pay},
            `pid`         = #{pid},
            `create_date` = '2018-11-17 15:22:03'
        WHERE `bid` = #{bid}
    </update>
    <delete id="deteleBillByBid">
        delete from bill where bid = #{bid}
    </delete>
</mapper>
4.测试
@Autowired
BillMapper billMapper;
@Test
public void testBill() {
    Bill b = new Bill();
    b.setBillName("com");
    List<BillProvider> bills = billMapper.getBills(b);
    System.out.println(bills.get(0));
    BillProvider billProvider = billMapper.getBillByBid(4);
    System.out.println(billProvider);
    Bill bill = (Bill) billProvider;
    bill.setBillName("cn域名...");
    billMapper.updateBill(bill);
    //billMapper.addBill(new Bill(3001, "Bi-AA11", "粮油aaa", "斤", 80,480.8,
    new Provider(null, "PR-BB", "梦学谷供应商222", "小李", "18888666982", "深圳软件园",
    "0911-0123453", "品质B"), 1));
    billMapper.deteleBillByBid(7);
}
5.修改 public.html 中帐单管理请求路径
<a th:href="@{/1 bills}" href="../bill/list.html">账单管理</a>6.BillController
@Controller
public class BillController {
    Logger logger = LoggerFactory.getLogger(getClass());
    @Autowired
    BillMapper billMapper;
    @Autowired
    ProviderMapper providerMapper;

    @GetMapping("/bills")
    public String list(Map<String, Object> map, BillProvider bp) {
        logger.info("帐单列表查询。。。" + bp);
        //获取所有供应商,
        List<Provider> providers = providerMapper.getProviders(null);
        //查询帐单
        Collection<BillProvider> billProviders = billMapper.getBills(bp);
        map.put("providers", providers);
        map.put("billProviders", billProviders);
        //回显
        map.put("billName", bp.getBillName());
        map.put("pid", bp.getPid());
        map.put("pay", bp.getPay());
        return "bill/list";
    }

    /**
     * type = null 进入查看详情页面view.html,
     * type=update 则是进入update.html
     */
    @GetMapping("/bill/{bid}")
    public String view(@PathVariable("bid") Integer bid,
                       @RequestParam(value = "type", defaultValue = "view") String type,
                       Map<String, Object> map) {
        logger.info("查询" + bid + "的帐单详细信息");
        BillProvider billProvider = billMapper.getBillByBid(bid);
        map.put("billProvider", billProvider);
        //查询所有供应商
        if ("update".equals(type)) {
            map.put("providers", providerMapper.getProviders(null));
        }
        // type = null 则进入view.html, type=update 则是进入update.html
        return "bill/" + type;
    }

    //修改
    @PutMapping("/bill")
    public String update(Bill bill) {
        logger.info("更改帐单信息。。。");
        //更新操作
        billMapper.updateBill(bill);
        return "redirect:bills";
    }

    //前往添加 页面
    @GetMapping("/bill")
    public String toAddPage(Map<String, Object> map) {
        //查询所有供应商
        map.put("providers", providerMapper.getProviders(null));
        return "bill/add";
    }

    //添加数据
    @PostMapping("/bill")
    public String add(Bill bill) {
        logger.info("添加帐单数据" + bill);
        //保存数据操作
        billMapper.addBill(bill);
        return "redirect:/bills";
    }

    //删除
    @DeleteMapping("/bill/{bid}")
    public String delete(@PathVariable("bid") Integer bid) {
        logger.info("删除操作, bid=" + bid);
        billMapper.deleteBillByBid(bid);
        return "redirect:/bills";
    }
}
7.模块页面直接复制项目相关资源下的templates对应bill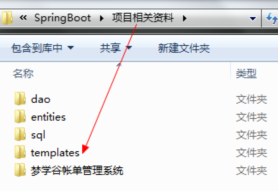
11.5 用户管理模块
1.UserMapper.java
public interface UserMapper {
    List<User> getUsers(User user);
    User getUserById(Integer id);
    int addUser(User user);
    int updateUser(User user);
    int deleteUserById(Integer id);
}
2.UserMapper.xml
<?xml version="1.0" encoding="UTF-8" ?>
<!DOCTYPE mapper
        PUBLIC "-//mybatis.org//DTD Mapper 3.0//EN"
        "http://mybatis.org/dtd/mybatis-3-mapper.dtd">
<mapper namespace="com.mengxuegu.springboot.mapper.UserMapper">
    <select id="getUsers" resultType="com.mengxuegu.springboot.entities.User">
        select * from `user` where 11=1
        <if test="username != null and username != ''">
            <!--${}用于字符串拼接使用-->
            and username like '%${username}%'
        </if>
    </select>
    <select id="getUserById" resultType="com.mengxuegu.springboot.entities.User">
        select * from `user` where id = #{id}
    </select>
    <insert id="addUser">
        INSERT INTO `user` (`username`, `real_name`, `password`, `gender`, `birthday`, `user_type`)
        VALUES (#{username}, #{realName}, #{password}, #{gender}, #{birthday}, #{userType})
    </insert>
    <update id="updateUser">
        UPDATE `user`
        SET `username`  = #{username},
            `real_name` = #{realName},
            `password`  = #{password},
            `gender`    = #{gender},
            `birthday`  = #{birthday},
            `user_type` = #{userType}
        WHERE `id` = #{id}
    </update>
    <delete id="deleteUserById">
        delete from `user` where id = #{id}
    </delete>
</mapper>
3.测试
@Autowired
UserMapper userMapper;
@Test
public void testUser() {
    User u = new User();
    // u.setUsername("zhang");
    List<User> users = userMapper.getUsers(u);
    System.out.println(users.get(0));
    User user = userMapper.getUserById(1);
    System.out.println(user);
    user.setUsername("admin");
    int size = userMapper.updateUser(user);
    System.out.println(size);
    billMapper.deleteBillByBid(4);
}
4.控制层
@Controller
public class UserController {
    Logger logger = LoggerFactory.getLogger(getClass());
    @Autowired
    UserMapper userMapper;

    @GetMapping("/users")
    public String list(Map<String, Object> map, User user) {
        logger.info("用户列表查询。。。" + user);
        List<User> users = userMapper.getUsers(user);
        map.put("users", users);
        map.put("username", user.getUsername());
        return "user/list";
    }

    /**
     * type = null 进入查看详情页面view.html,
     * type=update 则是进入update.html
     */
    @GetMapping("/user/{id}")
    public String view(@PathVariable("id") Integer id,
                       @RequestParam(value = "type", defaultValue = "view") String type,
                       Map<String, Object> map) {
        logger.info("查询" + id + "的用户详细信息");
        User user = userMapper.getUserById(id);
        map.put("user", user);
        // type = null 则进入view.html, type=update 则是进入update.html
        return "user/" + type;
    }

    //修改
    @PutMapping("/user")
    public String update(User user) {
        logger.info("更改用户信息。。。");
        //更新操作
        userMapper.updateUser(user);
        return "redirect:users";
    }

    //前往添加 页面
    @GetMapping("/user")
    public String toAddPage() {
        return "user/add";
    }

    //添加数据
    @PostMapping("/user")
    public String add(User user) {
        logger.info("添加用户数据" + user);
        //保存数据操作
        userMapper.addUser(user);
        return "redirect:/users";
    }

    //删除
    @DeleteMapping("/user/{id}")
    public String delete(@PathVariable("id") Integer id) {
        logger.info("删除操作, pid=" + id);
        userMapper.deleteUserById(id);
        return "redirect:/users";
    }
}
5.puclic.html 修改路径
<a th:href="@{/1 users}" href="../user/list.html">用户管理</a> 6.模板页面直接复制项目相关资源下的templates对应user
注意:新增修改页面有生日是Date类型 ,springboot默认识别dd/MM/yyyy格式
但是我们传入的是其他格式,如 yyyy-MM-dd ,则需要在配置中修改日期格式
#指定日期格式
spring:
  mvc:
    date-format: yyyy-MM-dd
11.6 重构登录功能
1.UserMapper.java 增加一个方法
User getUserByUsername(String username);2.UserMapper.xml
<select id="getUserByUsername" resultType="com.mengxuegu.springboot.entities.User">
    select * from `user` where upper(username) = upper(#{username})
</select>
3.LoginController.login(…)
@Controller
public class LoginController {
    @Autowired
    UserMapper userMapper;
    @PostMapping("/login")
    public String login (HttpSession session, String username, String password, Map<String, Object> map) {
        if( !StringUtils.isEmpty(username) && !StringUtils.isEmpty(password) ) {
            //查询数据库用户是否存在
            User user = userMapper.getUserByUsername(username);
            if(user != null && password.equals(user.getPassword())) {
                //登录成功
                session.setAttribute("loginUser", user.getUsername());
                //重定向 redirect:可以重定向到任意一个请求中(包括其他项目),地址栏改变
                return "redirect:/main.html";
            }
        }
        map.put("msg", "用户名或密码错误");
        return "";
    }
}
11.7 密码修改模块
需求:先使用Ajax异步校验输入的原密码是否正确,正确则JS校验新密码输入是否一致,一致则提交修改, 然后注销重新回到登录页面。
1.Session存入User对象并重构 主页 用户名 显示
2.main/password.html 抽取公共代码片段
<div class="left" th:r 1 eplace="main/public :: #public_left(activeUri='pwd')">3.JS , 注意js中引入thymeleaf行内表达式
<script type="text/javascript" th:inline="javascript">
    <!--要使用thymeleaf行内表达式则上面需要使用:th:inline="javascript" 标识-->
    $(function () {
        var isCheck = false;
        <!--原密码失去焦点-->
        $("#oldPassword").blur(function () {
            var oldPassword = $(this).val().trim();
            if(!oldPassword) {
                $('#pwdText').css('color', 'red');
                isCheck = false;
                return ;
            }
            <!--theymeleaf行内表达式-->
            var url = [[@{/user/pwd/}]] + oldPassword;
            <!--异步判断密码是否正确-->
            $.ajax({
                url: url,
                dataType: 'json',
                method: 'GET',
                success: function (data) {
                    isCheck = data;
                    data ? $("#pwdText").replaceWith("<span id='pwdText'>*原密码正确</span>")
                         : $("#pwdText").replaceWith("<span id='pwdText' style='color: red'>*原密码错误</span>");
                    return;
                },
                error: function () {
                    $('#pwdText').html("校验原密码异常");
                    isCheck = false;
                    return;
                }
            });
        });
        $("#save").click(function () {
            if(isCheck) {
                if($("#newPassword").val() && $("#reNewPassword").val()
                    && $("#newPassword").val() == $("#reNewPassword").val()) {
                    $("#pwdForm").submit();
                }else{
                    $("#reNewPwdText").replaceWith("<span id='reNewPwdText' style='color: red'>*保证和新密码一致</span>");
                }
            }
        });
    });
</script>
4.控制层
@Controller
public class UserController {
    //前往密码修改页面
    @GetMapping("user/pwd")
    public String toPwdUpdatePage() {
        return "/main/password";
    }
    //校验密码是否正确
    @ResponseBody
    @GetMapping("user/pwd/{oldPwd}")
    public Boolean checkPwd(@PathVariable("oldPwd") String oldPwd, HttpSession session) {
        logger.info("输入的旧密码为:" + oldPwd);
        User user = (User) session.getAttribute("loginUser");
        if(user.getPassword().equals(oldPwd)) {
            return true;
        }
        return false;
    }
    @PostMapping("/user/pwd")
    public String updatePwd(HttpSession session, String password) {
        //获取session中的登录信息
        User user = (User) session.getAttribute("loginUser");
        //更新密码
        user.setPassword(password);
        userMapper.updateUser(user);
        //注销重新登录
        return "redirect:/logout";
    }
}
第12章 Spring Boot异步任务与定时任务实战
12.1 Spring Boot异步任务实战
在项目开发中,绝大多数情况下都是通过同步方式处理业务逻辑的,但是比如批量处理数据,批量发送邮 件,批量发送短信等操作 容易造成阻塞的情况,之前大部分都是使用多线程来完成此类任务。
而在Spring 3+之后,就已经内置了@Aysnc注解来完美解决这个问题,从而提高效率。
使用的注解:
@EnableAysnc 启动类上开启基于注解的异步任务
@Aysnc 标识的方法会异步执行
异步任务实战操作如下: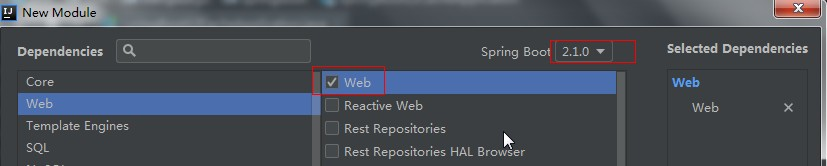
/**
 * 异步任务批量处理
 */
@Service
public class AsyncService {
    //批量新增操作
    @Async
    public void batchAdd() {
        try {
            Thread.sleep(3*1000);
        } catch (InterruptedException e) {
            e.printStackTrace();
        }
        System.out.println("批量保存数据中....");
    }
}
@RestController
public class AsyncController {
@Autowired
AsyncService asyncService;
@GetMapping("/hello")
public String hello() {
asyncService.batchAdd();
return "success";
}
}@EnableAsync //开启基于注解的异步处理
@SpringBootApplication
public class SpringBoot11TaskApplication {
public static void main(String[] args) {
SpringApplication.run(SpringBoot12TaskApplication.class, args);
}
}
12.2 Spring Boot 定时任务调度实战
在项目开发中,经常需要执行一些定时任务,比如 每月1号凌晨需要汇总上个月的数据分析报表; 每天凌晨分析前一天的日志信息等定时操作。Spring 为我们提供了异步执行定时任务调度的方式。
使用的注解:
@EnableScheduling启动类上开启基于注解的定时任务
@Scheduled标识的方法会进行定时处理
需要通过 cron 属性来指定 cron 表达式:秒 分 时 日 月 星期几
@Service
public class ScheduledService {
private static int count = 1;
/**
* 秒 分 时 日 月 星期几
* 比如: "0 * * * * MON-FRI" 周一到周五, 每次0秒执行(即每分钟执行一次)
*/
@Scheduled(cron = "*/3 * * * * MON-FRI")
public void dataCount() {
System.out.println("数据统计第" + count++ + "次");
}
}cron表达式
| 位置 | 取值范围 | 可指定的特殊字符 |
|---|---|---|
| 秒 | 0-59 | , - * / |
| 分 | 0-59 | , - * / |
| 小时 | 0-23 | , - * / |
| 日期 | 1-31 | , - * ? / L W C |
| 月份 | 1-12 | , - * / |
| 星期 | 0-7或SUN-SAT 0和7都是周日,1-6是周一到周六 | , - * ? / L C # |
| 特殊字符 | 代表含义 |
|---|---|
| , | 枚举,一个位置上指定多个值,以逗号 , 分隔 |
| - | 区间 |
| * | 任意 |
| / | 步长,每隔多久执行一次 |
| ? | 日/星期冲突匹配 ,指定哪个值,另外个就是?,比如: * * * ? * 1 每周1执行,则日用 ? 不能用 * ,不是每一天都是周一; * * * * 2 * ? 每月2号,则星期不能用* |
| L | 最后 |
| W | 工作日 |
| C | 和calendar联系后计算过的值 |
| # | 这个月的第几个星期几,4#2,第2个星期四 |
在线生成cron表达式 http://cron.qqe2.com/
1-5 * * * * 1到5秒,每秒都触发任务
*/5 * * * * 每隔5秒执行一次
0 */1 * * * 每隔1分钟执行一次
0 0 5-15 * * 每天5-15点整点触发
0 0-5 14 * * 在每天下午2点到下午2:05期间的每1分钟触发
0 0/5 14 * * 在每天下午2点到下午2:55期间的每5分钟触发
0 0/5 14,18 * * 在每天下午2点到2:55期间和下午6点到6:55期间的每5分钟触发
0 0/30 9-17 * * 朝九晚五工作时间内每半小时
0 0 12 ? * WED 表示每个星期三中午12点
0 10,44 14 ? 3 WED 每年三月的星期三的下午2:10和2:44触发
0 0 23 L * ? 每月最后一天23点执行一次
0 15 10 LW * ? 每个月最后一个工作日的10点15分0秒触发任务
0 15 10 ? * 5#3 每个月第三周的星期五的10点15分0秒触发任务第13章 Spring Boot 邮件发送实战
13.1 邮件发送环境准备

实战操作步骤:
1.引入邮件启动器:spring-boot-starter-mail
<dependency>
<groupId>org.springframework.boot</groupId>
<artifactId>spring-boot-starter-mail</artifactId>
</dependency>2.Spring Boot 提供了自动配置类MailSenderAutoConfiguration
3.在application.properties 中配置邮箱信息, 参考 MailProperties
spring.mail.username=736486962@qq.com
spring.mail.password= “指定qq生成的授权码”
spring.mail.host=smtp.qq.com
#需要开启ssl安全连接
spring.mail.properties.smtp.ssl.enable=true4.密码不写明文在配置中,在QQ邮箱中进行获取制授权码,如下操作
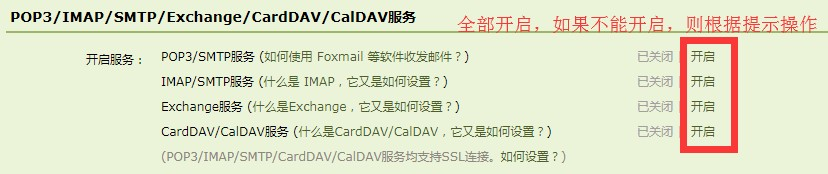
上面开通后,点击 “生成授权码”,根据提示发送短信验证,会生成邮件密码, 修改密码会重新生成
13.2 邮件发送实战操作
1.Spring Boot 自动装配 JavaMailSenderImpl进行发送邮件
@RunWith(SpringRunner.class)
@SpringBootTest
public class SpringBoot12TaskApplicationTests {
@Autowired
JavaMailSenderImpl javaMailSender;
@Test
public void testSimpleMail() {
//封装简单的邮件内容
SimpleMailMessage message = new SimpleMailMessage();
//邮件主题
message.setSubject("放假通知");
message.setText("春节放假7天");
//发件人
message.setFrom("736486962@qq.com");
message.setTo("mengxuegu666@163.com");
javaMailSender.send(message);
}
//发送复杂邮件带附件和html的邮件
@Test
public void testMimeMail() throws MessagingException {
//创建一个发送复杂消息对象
MimeMessage mimeMessage = javaMailSender.createMimeMessage();
//通过消息帮助对象,来设置发送的内容
MimeMessageHelper messageHelper = new MimeMessageHelper(mimeMessage, true);
//邮件主题
messageHelper.setSubject("放假通知");
//第2个参数为true表示是html
messageHelper.setText("<h2 style='color:red'>春节放假7天</h2>", true);
//上传文件 (文件名,File或IO对象)
messageHelper.addAttachment("1.jpg", new File("D:\\images\\1.jpg"));
messageHelper.addAttachment("2.jpg", new File("D:\\images\\2.jpg"));
messageHelper.addAttachment("3.jpg", new File("D:\\images\\3.jpg"));
//发件人
messageHelper.setFrom("736486962@qq.com");
messageHelper.setTo("mengxuegu666@163.com");
javaMailSender.send(mimeMessage);
}
} 第14章 Spring Boot整合缓存实战
14.1 缓存简介
缓存是每一个系统都应该考虑的功能,它用于加速系统的访问,以及提速系统的性能。比如:
经常访问的高频热点数据:
电商网站的商品信息:每次查询数据库耗时,可以引入缓存。
微博阅读量、点赞数、热点话题等
临时性的数据:发送手机验证码,1分钟有效,过期则删除,存数据库负担有点大,这些临时性的数据也 可以放到缓存中, 直接从缓存中存取数据。
14.2 SpringBoot 整合缓存
Spring从3.1后定义了 org.springframework.cache.CacheManager 和 org.springframework.cache.Cache接口来统一不同的缓存技术;
CacheManager缓存管理器,用于管理各种Cache缓存组件
Cache定义了缓存的各种操作, Spring在Cache接口下提供了各种xxxCache的实现; 比如EhCacheCache,RedisCache,ConcurrentMapCache……
Spring 提供了缓存注解:@EnableCaching、@Cacheable、@CachePut
整合缓存步骤: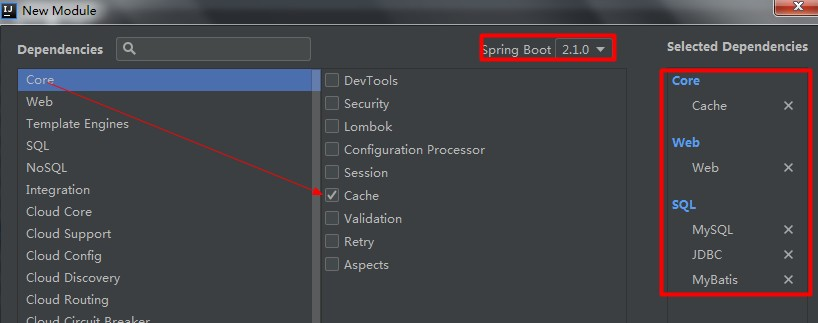
1.引入缓存启动器:spring-boot-starter-cache
2.创建 cache 数据库,导入 bill.sql 与 实体对象,创建注解版 mapper 、service 与 Controller
3.@EnableCaching:在启动类上,开启基于注解的缓存
4.@Cacheable : 标在方法上,返回的结果会进行缓存(先查缓存中的结果,没有则调用方法并将结果放到缓存中)
属性:value/cacheNames: 缓存的名字 key : 作为缓存中的Key值,可自已使用 SpEL表达式指定(不指定就是参数值), 缓存结果是方法返回值
| 名字 | 描述 | 示例 |
|---|---|---|
| methodName | 当前被调用的方法名 | #root.methodName |
| target | 当前被调用的目标对象 | #root.target |
| targetClass | 当前被调用的目标对象类 | #root.targetClass |
| args | 当前被调用的方法的参数列表 | #root.args[0] |
| caches | 当前方法调用使用的缓存列表(如@Cacheable(value={“cache1”, “cache2”})),则有两个cache | #root.caches[0].name |
| argument name | 方法参数的名字. 可以直接 #参数名 , 也可以使用 #p0或#a0 的形式,0代表参数的索引; | #iban 、 #a0 、 #p0 |
| result | 方法执行后的返回值(仅当方法执行之后的判断有效,在@CachePut 使用于更新数据后可用) | #result |
5.@CachePut :保证方法被调用后,又将对应缓存中的数据更新(先调用方法,调完方法再将结果放到缓存) 比如:修改了表中某条数据后,同时更新缓存中的数据,使得别人查询这条更新的数据时直接从缓存中获取
测试更新User数据效果:
1先查询id=1的用户,放在缓存中;
2后面查询id=1的用户直接从缓存中查询;
3更新id=1的用户,同时会更新缓存数据;
4再查询id=1的用户应该是更新后的数据,是从缓存中查询,因为在更新时同时再新了缓存数据
5.注意:需要指定key属性 key=”#user.id” 参数对象的id key = “#result.id” 返回值对象id
6.@CacheEvict :清除缓存属性
属性
key:指要清除的数据,如 key=”#id”
allEntries =true : 指定清除这个缓存中所有数据。
beforeInvocation = true : true在方法之前执行;默认false在方法之后执行,出现异常则不会清除缓存
7.@CacheConfig 指定缓存公共属性值
@CacheConfig(cacheNames = “user”) 指定在类上,其他方法上就不需要写缓存名。
底层原理分析 :
/**
* 0 = "org.springframework.boot.autoconfigure.cache.GenericCacheConfiguration"
* 1 = "org.springframework.boot.autoconfigure.cache.JCacheCacheConfiguration"
* 2 = "org.springframework.boot.autoconfigure.cache.EhCacheCacheConfiguration"
* 3 = "org.springframework.boot.autoconfigure.cache.HazelcastCacheConfiguration"
* 4 = "org.springframework.boot.autoconfigure.cache.InfinispanCacheConfiguration"
* 5 = "org.springframework.boot.autoconfigure.cache.CouchbaseCacheConfiguration"
* 6 = "org.springframework.boot.autoconfigure.cache.RedisCacheConfiguration"
* 7 = "org.springframework.boot.autoconfigure.cache.CaffeineCacheConfiguration"
* 8 = "org.springframework.boot.autoconfigure.cache.SimpleCacheConfiguration"[默认缓存]
* 9 = "org.springframework.boot.autoconfigure.cache.NoOpCacheConfiguration"
* 分析源码:
* 1.默认采用的是SimpleCacheConfiguration 使用 ConcurrentMapCacheManager
* 2. getCache 获取的是 ConcurrentMapCache 缓存对象进行存取数据,它使用ConcurrentMap<Object, Object>对象进行缓存数据
* @Cacheable(cacheNames = "user")
*
* 第一次请求时:
* 3.当发送第一次请求时,会从cacheMap.get(name)中获取有没有ConcurrentMapCache缓存对象,如果没有则创建出来,并且创建出来的key就是通过
* @Cacheable(cacheNames = "user")标识的name值
* 4.接着会从ConcurrentMapCache里面调用lookup获取缓存数据,通过key值获取的,默认采用的是service方法中的参数值,如果缓存中没有获取到,
* 则调用目标方法进行获取数据,获取之后则再将它放到缓存中(key=参数值,value=返回值)
*
* 第二次请求:
* 5. 如果再次调用 则还是先ConcurrentMapCacheManager.getCache()获取缓存对象,如果有则直接返回,如果没有则创建
* 6. 然后再调用 ConcurrentMapCache.lookup方法从缓存中获取数据, 如果缓存有数据则直接响应回去,不会再去调用目标方法,
*
* 第三次请求与第二次请求一样.
* 如果缓存中没有缓存管理器,则与第一次请求一致
*
*/
@EnableCaching //开启注解版的缓存
@MapperScan("com.mengxuegu.springboot.mapper")
@SpringBootApplication
public class SpringBoot13CacheApplication {
public static void main(String[] args) {
SpringApplication.run(SpringBoot13CacheApplication.class, args);
}
}
第15章 Spring Boot整合Redis实战
在实际开发中,一般使用缓存中间件:redis、ehcache、memcache;导入了对应的组件依赖,就可以使用 对应的缓存。
我们使用 Spring Boot 整合 Redis 作为缓存
15.1 安装 Redis 服务与客户端
Redis 中文官网:http://www.redis.cn/
Redis 下载:
Linux 版 本 :http://download.redis.io/releases/
Windows(微软开发维护的):https://github.com/MicrosoftArchive/redis/releases
Redis直接解压 Redis-x64-3.2.100.zip 即可,点击以下 redis-server.exe, 默认端口号:6379
安装 Redis 可视化客户端 redis-desktop-manager-0.8.8.384.exe
连接 redis 服务器
打开操作 Redis命令行窗口
15.2 Redis 五种数据类型
Redis中所有的数据都是字符串。命令不区分大小写,key是区分大小写的。
五种数据类型:
String:<key, value>
Hash: <key,fields-values>
List:有顺序可重复
Set:无顺序不可重复
Sorted Sets (zset) :有顺序,不能重复
String:<key, value>
set 、 get incr:
加一(生成id)
decr:减一
append:追加内容winRedis:0>set id 5
"OK"
winRedis:0>get id
"5"
winRedis:0>incr id
"6"
winRedis:0>decr id
"5"
winRedis:0>set desc hello
"OK"
winRedis:0>append desc world
"10"
winRedis:0>get desc
"helloworld"del key_name :删除指定
keys * : 查看所有的 key
Hash:<key,fields-values>
相当于一个key对于一个Map,Map中还有key-value, 使用hash对key进行归类。
Hset:向hash中添加内容
Hget:从hash中取内容winRedis:0> HSET myhash f1 hello
(integer) 1
winRedis:0>List:有顺序可重复
lpush:向List中左边添加元素lrange:查询指定范围的所有元素
rpush:向List中右边添加元素
lpop:弹出List左边第一个元素
rpop:弹出List右边第一个元素winRedis:0>lpush list1 a b
"2"
winRedis:0>lrange list1 0 -1
1) "b"
2) "a"
winRedis:0>rpush list1 1 2
"4"
winRedis:0>lrange list1 0 -1
1) "b"
2) "a"
3) "1"
4) "2"
winRedis:0>lpop list1
"b"
winRedis:0>lrange list1 0 -1
1) "a"
2) "1"
3) "2"
winRedis:0>rpop list1
"2"
winRedis:0>lrange list1 0 -1
1) "a"
2) "1"Set:元素无顺序,不能重复
sadd:添加一个或多个元素到集合中
smembers:获取所有元素
srem:移除指定的元素winRedis:0>sadd set1 a b c
"3"
winRedis:0>smembers set1
1) "b"
2) "a"
3) "c"
winRedis:0>srem set1 a
"1"
winRedis:0>smembers set1
1) "b"
2) "c"SortedSet(zset):有顺序,不能重复
zadd :key值元素得分元素: 添加一个或多个元素到有序列set中,按元素得分由小到大排列
zrange:查询指定范围的所有元素
zrem:移除指定的元素winRedis:0>zadd zset1 3 a 5 b 1 c 4 d
"4"
winRedis:0>zrange zset1 0 -1
1) "c"
2) "a"
3) "d"
4) "b"
winRedis:0>zrem zset1 a
"1"
winRedis:0>zrange zset1 0 -1
1) "c"
2) "d"
3) "b"
#查询所有的元素并显示得分
winRedis:0>zrange zset1 0 -1 withscores
1) "c"
2) "1"
3) "d"
4) "4"
5) "b"
6) "5"15.3 Spring Boot 整合 Redis
1.引入 Redis 启动器: spring-boot-starter-data-redis
2.在 application.properties 中配置 redis 连接地址
3.使用RedisTemplate操作 Redis , 参考RedisAutoConfiguration
- redisTemplate.opsForValue(); // 操 作 String
- redisTemplate.opsForHash(); // 操 作 Hash
- redisTemplate.opsForList(); //操作List集合
- redisTemplate.opsForSet(); //操作Set集合
- redisTemplate.opsForZSet(); //操作有序Set集合
4.自定义 Redis 配置类,指定Json序列化器
package com.mengxuegu.springboot;
import com.mengxuegu.springboot.entities.User;
import com.mengxuegu.springboot.service.UserService;
import org.junit.Test;
import org.junit.runner.RunWith;
import org.springframework.beans.factory.annotation.Autowired;
import org.springframework.boot.test.context.SpringBootTest;
import org.springframework.data.redis.core.RedisTemplate;
import org.springframework.data.redis.core.StringRedisTemplate;
import org.springframework.test.context.junit4.SpringRunner;
import java.util.List;
@RunWith(SpringRunner.class)
@SpringBootTest
public class SpringBoot13CacheApplicationTests {
//操作的是复杂类型,User
@Autowired
RedisTemplate redisTemplate;
//针对 的都是操作字符串
@Autowired
StringRedisTemplate stringRedisTemplate;
//自定义的json序列化器
@Autowired
RedisTemplate jsonRedisTemplate;
@Autowired
UserService userService;
/**
* 五大数据类型
* stringRedisTemplate.opsForValue();//操作字符串
* stringRedisTemplate.opsForList();//操作List
* stringRedisTemplate.opsForSet();//操作Set
* stringRedisTemplate.opsForZSet();//操作ZSet
* stringRedisTemplate.opsForHash();//操作Hash
*/
@Test
public void contextLoads() {
// stringRedisTemplate.opsForValue().set("name", "mengxuegu");
String name = stringRedisTemplate.opsForValue().get("name");
System.out.println(name);//mengxuegu
// stringRedisTemplate.opsForList().leftPush("myList", "a");
// stringRedisTemplate.opsForList().leftPushAll("myList", "b", "c", "d");
List<String> myList = stringRedisTemplate.opsForList().range("myList", 0, -1);
System.out.println(myList);//[d, c, b, a]
}
@Test
public void testRedis() {
//当我们导入了reids的启动器之后 ,springboot会采用redis作为 默认缓存,simple缓存就没有匹配上了
User user = userService.getUserById(4);
//保存的数据对象必须序列化 implements Serializable
//因为redisTemplate默认采用的是jdk序列化器
// redisTemplate.opsForValue().set("user", user);
User user1 = (User) redisTemplate.opsForValue().get("user");
System.out.println(user1);
jsonRedisTemplate.opsForValue().set("user2", user);
}
}5.RedisConfig
package com.mengxuegu.springboot.config;
import org.springframework.boot.autoconfigure.condition.ConditionalOnMissingBean;
import org.springframework.context.annotation.Bean;
import org.springframework.context.annotation.Configuration;
import org.springframework.data.redis.connection.RedisConnectionFactory;
import org.springframework.data.redis.core.RedisTemplate;
import org.springframework.data.redis.serializer.Jackson2JsonRedisSerializer;
import java.net.UnknownHostException;
@Configuration
public class RedisConfig {
@Bean
public RedisTemplate<Object, Object> jsonRedisTemplate(
RedisConnectionFactory redisConnectionFactory) throws
UnknownHostException {
RedisTemplate<Object, Object> template = new RedisTemplate<>();
template.setDefaultSerializer(new Jackson2JsonRedisSerializer(Object.class));
template.setConnectionFactory(redisConnectionFactory);
return template;
}
}Redis工具类
package com.mengxuegu.springboot.utils;
import org.springframework.beans.factory.annotation.Autowired;
import org.springframework.data.redis.core.RedisTemplate;
import org.springframework.stereotype.Component;
import org.springframework.util.CollectionUtils;
import java.util.List;
import java.util.Map;
import java.util.Set;
import java.util.concurrent.TimeUnit;
/**
* Redis工具类
*/
@Component
public class RedisClient {
@Autowired
private RedisTemplate redisTemplate;
/**
* 指定缓存失效时间
*
* @param key 键
* @param time 时间(秒)
* @return
*/
public boolean expire(String key, long time) {
try {
if (time > 0) {
redisTemplate.expire(key, time, TimeUnit.SECONDS);
}
return true;
} catch (Exception e) {
e.printStackTrace();
return false;
}
}
/**
* 根据key 获取过期时间
*
* @param key 键 不能为null
* @return 时间(秒) 返回0代表为永久有效
*/
public long getExpire(String key) {
return redisTemplate.getExpire(key, TimeUnit.SECONDS);
}
/**
* 判断key是否存在
*
* @param key 键
* @return true 存在 false不存在
*/
public boolean hasKey(String key) {
try {
return redisTemplate.hasKey(key);
} catch (Exception e) {
e.printStackTrace();
return false;
}
}
/**
* 删除缓存
*
* @param key 可以传一个值 或多个
*/
@SuppressWarnings("unchecked")
public void del(String... key) {
if (key != null && key.length > 0) {
if (key.length == 1) {
redisTemplate.delete(key[0]);
} else {
redisTemplate.delete(CollectionUtils.arrayToList(key));
}
}
}
public void del(Integer key) {
this.del(String.valueOf(key));
}
// ============================String=============================
/**
* 普通缓存获取
*
* @param key 键
* @return 值
*/
public Object get(String key) {
return key == null ? null : redisTemplate.opsForValue().get(key);
}
public Object get(Integer key) {
return this.get(String.valueOf(key));
}
/**
* 普通缓存放入
*
* @param key 键
* @param value 值
* @return true成功 false失败
*/
public boolean set(String key, Object value) {
try {
redisTemplate.opsForValue().set(key, value);
return true;
} catch (Exception e) {
e.printStackTrace();
return false;
}
}
public boolean set(Integer key, Object value) {
return this.set(String.valueOf(key), value);
}
/**
* 普通缓存放入并设置时间
*
* @param key 键
* @param value 值
* @param time 时间(秒) time要大于0 如果time小于等于0 将设置无限期
* @return true成功 false 失败
*/
public boolean set(String key, Object value, long time) {
try {
if (time > 0) {
redisTemplate.opsForValue().set(key, value, time, TimeUnit.SECONDS);
} else {
set(key, value);
}
return true;
} catch (Exception e) {
e.printStackTrace();
return false;
}
}
/**
* 递增
*
* @param key 键
* @param delta 要增加几(大于0)
* @return
*/
public long incr(String key, long delta) {
if (delta < 0) {
throw new RuntimeException("递增因子必须大于0");
}
return redisTemplate.opsForValue().increment(key, delta);
}
/**
* 递减
*
* @param key 键
* @param delta 要减少几(小于0)
* @return
*/
public long decr(String key, long delta) {
if (delta < 0) {
throw new RuntimeException("递减因子必须大于0");
}
return redisTemplate.opsForValue().increment(key, -delta);
}
// ================================Map=================================
/**
* HashGet
*
* @param key 键 不能为null
* @param item 项 不能为null
* @return 值
*/
public Object hget(String key, String item) {
return redisTemplate.opsForHash().get(key, item);
}
/**
* 获取hashKey对应的所有键值
*
* @param key 键
* @return 对应的多个键值
*/
public Map<Object, Object> hmget(String key) {
return redisTemplate.opsForHash().entries(key);
}
/**
* HashSet
*
* @param key 键
* @param map 对应多个键值
* @return true 成功 false 失败
*/
public boolean hmset(String key, Map<String, Object> map) {
try {
redisTemplate.opsForHash().putAll(key, map);
return true;
} catch (Exception e) {
e.printStackTrace();
return false;
}
}
/**
* HashSet 并设置时间
*
* @param key 键
* @param map 对应多个键值
* @param time 时间(秒)
* @return true成功 false失败
*/
public boolean hmset(String key, Map<String, Object> map, long time) {
try {
redisTemplate.opsForHash().putAll(key, map);
if (time > 0) {
expire(key, time);
}
return true;
} catch (Exception e) {
e.printStackTrace();
return false;
}
}
/**
* 向一张hash表中放入数据,如果不存在将创建
*
* @param key 键
* @param item 项
* @param value 值
* @return true 成功 false失败
*/
public boolean hset(String key, String item, Object value) {
try {
redisTemplate.opsForHash().put(key, item, value);
return true;
} catch (Exception e) {
e.printStackTrace();
return false;
}
}
/**
* 向一张hash表中放入数据,如果不存在将创建
*
* @param key 键
* @param item 项
* @param value 值
* @param time 时间(秒) 注意:如果已存在的hash表有时间,这里将会替换原有的时间
* @return true 成功 false失败
*/
public boolean hset(String key, String item, Object value, long time) {
try {
redisTemplate.opsForHash().put(key, item, value);
if (time > 0) {
expire(key, time);
}
return true;
} catch (Exception e) {
e.printStackTrace();
return false;
}
}
/**
* 删除hash表中的值
*
* @param key 键 不能为null
* @param item 项 可以使多个 不能为null
*/
public void hdel(String key, Object... item) {
redisTemplate.opsForHash().delete(key, item);
}
/**
* 判断hash表中是否有该项的值
*
* @param key 键 不能为null
* @param item 项 不能为null
* @return true 存在 false不存在
*/
public boolean hHasKey(String key, String item) {
return redisTemplate.opsForHash().hasKey(key, item);
}
/**
* hash递增 如果不存在,就会创建一个 并把新增后的值返回
*
* @param key 键
* @param item 项
* @param by 要增加几(大于0)
* @return
*/
public double hincr(String key, String item, double by) {
return redisTemplate.opsForHash().increment(key, item, by);
}
/**
* hash递减
*
* @param key 键
* @param item 项
* @param by 要减少记(小于0)
* @return
*/
public double hdecr(String key, String item, double by) {
return redisTemplate.opsForHash().increment(key, item, -by);
}
// ============================set=============================
/**
* 根据key获取Set中的所有值
*
* @param key 键
* @return
*/
public Set<Object> sGet(String key) {
try {
return redisTemplate.opsForSet().members(key);
} catch (Exception e) {
e.printStackTrace();
return null;
}
}
/**
* 根据value从一个set中查询,是否存在
*
* @param key 键
* @param value 值
* @return true 存在 false不存在
*/
public boolean sHasKey(String key, Object value) {
try {
return redisTemplate.opsForSet().isMember(key, value);
} catch (Exception e) {
e.printStackTrace();
return false;
}
}
/**
* 将数据放入set缓存
*
* @param key 键
* @param values 值 可以是多个
* @return 成功个数
*/
public long sSet(String key, Object... values) {
try {
return redisTemplate.opsForSet().add(key, values);
} catch (Exception e) {
e.printStackTrace();
return 0;
}
}
/**
* 将set数据放入缓存
*
* @param key 键
* @param time 时间(秒)
* @param values 值 可以是多个
* @return 成功个数
*/
public long sSetAndTime(String key, long time, Object... values) {
try {
Long count = redisTemplate.opsForSet().add(key, values);
if(time > 0){
expire(key, time);
}
return count;
} catch (Exception e) {
e.printStackTrace();
return 0;
}
}
/**
* 获取set缓存的长度
*
* @param key 键
* @return
*/
public long sGetSetSize(String key) {
try {
return redisTemplate.opsForSet().size(key);
} catch (Exception e) {
e.printStackTrace();
return 0;
}
}
/**
* 移除值为value的
*
* @param key 键
* @param values 值 可以是多个
* @return 移除的个数
*/
public long setRemove(String key, Object... values) {
try {
Long count = redisTemplate.opsForSet().remove(key, values);
return count;
} catch (Exception e) {
e.printStackTrace();
return 0;
}
}
// ===============================list=================================
/**
* 获取list缓存的内容
*
* @param key 键
* @param start 开始
* @param end 结束 0 到 -1代表所有值
* @return
*/
public List<Object> lGet(String key, long start, long end) {
try {
return redisTemplate.opsForList().range(key, start, end);
} catch (Exception e) {
e.printStackTrace();
return null;
}
}
/**
* 获取list缓存的长度
*
* @param key 键
* @return
*/
public long lGetListSize(String key) {
try {
return redisTemplate.opsForList().size(key);
} catch (Exception e) {
e.printStackTrace();
return 0;
}
}
/**
* 通过索引 获取list中的值
*
* @param key 键
* @param index 索引 index>=0时, 0 表头,1 第二个元素,依次类推;index<0时,-1,
* 表尾,-2倒数第二个元素,依次类推
* @return
*/
public Object lGetIndex(String key, long index) {
try {
return redisTemplate.opsForList().index(key, index);
} catch (Exception e) {
e.printStackTrace();
return null;
}
}
/**
* 将list放入缓存
*
* @param key 键
* @param value 值
* @return
*/
public boolean lSet(String key, Object value) {
try {
redisTemplate.opsForList().rightPush(key, value);
return true;
} catch (Exception e) {
e.printStackTrace();
return false;
}
}
/**
* 将list放入缓存
*
* @param key 键
* @param value 值
* @param time 时间(秒)
* @return
*/
public boolean lSet(String key, Object value, long time) {
try {
redisTemplate.opsForList().rightPush(key, value);
if (time > 0){
expire(key, time);
}
return true;
} catch (Exception e) {
e.printStackTrace();
return false;
}
}
/**
* 将list放入缓存
*
* @param key 键
* @param value 值
* @return
*/
public boolean lSet(String key, List<Object> value) {
try {
redisTemplate.opsForList().rightPushAll(key, value);
return true;
} catch (Exception e) {
e.printStackTrace();
return false;
}
}
/**
* 将list放入缓存
*
* @param key 键
* @param value 值
* @param time 时间(秒)
* @return
*/
public boolean lSet(String key, List<Object> value, long time) {
try {
redisTemplate.opsForList().rightPushAll(key, value);
if (time > 0){
expire(key, time);
}
return true;
} catch (Exception e) {
e.printStackTrace();
return false;
}
}
/**
* 根据索引修改list中的某条数据
*
* @param key 键
* @param index 索引
* @param value 值
* @return
*/
public boolean lUpdateIndex(String key, long index, Object value) {
try {
redisTemplate.opsForList().set(key, index, value);
return true;
} catch (Exception e) {
e.printStackTrace();
return false;
}
}
/**
* 移除N个值为value
*
* @param key 键
* @param count 移除多少个
* @param value 值
* @return 移除的个数
*/
public long lRemove(String key, long count, Object value) {
try {
Long remove = redisTemplate.opsForList().remove(key, count, value);
return remove;
} catch (Exception e) {
e.printStackTrace();
return 0;
}
}
}ProviderService
package com.mengxuegu.springboot.service;
import com.mengxuegu.springboot.entities.Provider;
import com.mengxuegu.springboot.mapper.ProviderMapper;
import com.mengxuegu.springboot.utils.RedisClient;
import org.springframework.beans.factory.annotation.Autowired;
import org.springframework.stereotype.Service;
/**
* http://localhost:8080/updateProvider?
* providerCode=123&providerName=aaa&people=xxx&phone=8888&address=99&pid=4
*/
@Service
public class ProviderService {
@Autowired
RedisClient redisClient;
@Autowired
ProviderMapper providerMapper;
public Provider getProviderByPid(Integer pid) {
Object obj = redisClient.get(pid);
if (obj != null) {
return (Provider) obj;
}
Provider provider = providerMapper.getProviderByPid(pid);
redisClient.set(pid, provider);
return provider;
}
public Integer updateProvider(Provider provider) {
int size = providerMapper.updateProvider(provider);
if (size > 0) {
redisClient.set(provider.getPid(), provider);
}
return size;
}
public Integer addProvider(Provider provider) {
int size = providerMapper.addProvider(provider);
if (size > 0) {
redisClient.set(provider.getPid(), provider);
}
return size;
}
public Integer deleteProviderByPid(Integer pid) {
int size = providerMapper.deleteProviderByPid(pid);
if (size > 0) {
redisClient.del(pid);
}
return pid;
}
}
第16章 阿里云服务器部署项目与MySQL
登录: https://account.aliyun.com/login/login.htm
16.1 介绍阿里云ESC服务器
停止、重启服务器
16.2 服务器与域名绑定


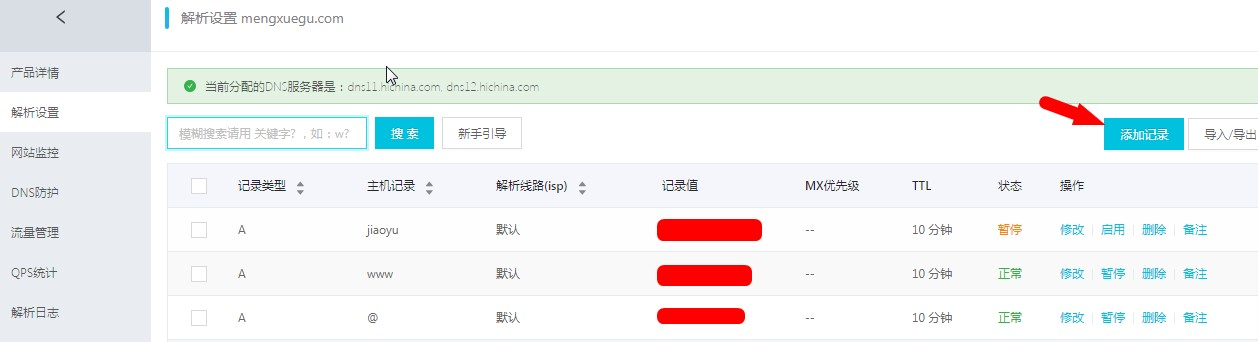
16.3 打包常见错误
1.如果 maven projects 找不到Module ,看下pom.xml的名字是否正确 1542455686286
1.如果测试类中有错误,则无法正常打包,可在 pom.xml 中忽略测试类
在
<properties>
<project.build.sourceEncoding>UTF-8</project.build.sourceEncoding>
<project.reporting.outputEncoding>UTF-8</project.reporting.outputEncoding>
<java.version>1.8</java.version>
<!--springboot打包时跳过test-->
<maven.test.skip>true</maven.test.skip>
</properties>
16.4 打包本地部署项目
打成 jar包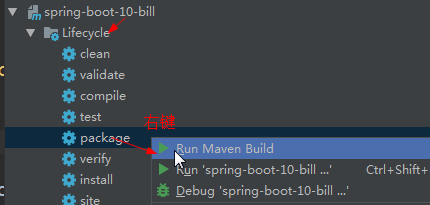
如下效果,则打包成功
本地测试
cmd 进入jar包所在目录,运行jar包启动项目,指定80端口号,直接访问ip即可
...\spring-boot-10-bill\target>java -jar spring-boot-10-bill-0.0.1-SNAPSHOT.jar --server.port=8016.5 阿里云部署 MySql 服务
参考文档: 软件\mysql相关安装包\阿里云服务器CentOS7.x安装MySql5.7.2版本.doc
16.6 阿里云服务器安装JDK
上传解压:
1.用FileZilla 上传将 JDK安装包上传到服务器 /opt目录里面 , 这里安装jdk1.8
2.解压文件:
cd /opt
tar -zxvf jdk的文件名3.ls 查看解压后的jdk
4.将jdk移动到/home目录
mv jdk1.8.0_171/ /home/
vim /etc/profile配置环境变量
在末尾行添加,打开后按i编辑, 按ctrl+c停止编辑,然后 :wq 保存退出
export JAVA_HOME=/home/jdk1.8.0_171
export PATH=$PATH:$JAVA_HOME/bin:使更改的配置立即生效
source /etc/profile查看JDK版本信息,如果显示出1.8.0证明成功
java -version16.7 阿里云发布项目
向mysql服务器执行项目sql脚本
添加安全组规则-开放端口号8080端口与80端口
官网手册: https://help.aliyun.com/document_detail/25471.html?spm=5176.100241.0.0.IneJPl
后台进程进行项目
nohup java -jar spring-boot-10-bill-0.0.1-SNAPSHOT.jar --server.port=80 &停止运行项目
# 查看进程
[root@izwz9e7 opt]# ps -ef|grep java
root 4903 4876 23 19:35 pts/1 00:00:13 java -jar spring-boot-10-bill-
0.0.1-SNAPSHOT.jar
root 4939 4876 0 19:36 pts/1 00:00:00 grep --color=auto java
# 结束进程
[root@izwz9e7 opt]# kill -9 4903第17章 Spring Boot与docker
17.1 在虚拟机上安装docker
参见: Docker.md文档
17.2 Docker常用命令&操作
17.2.1 镜像操作
| 操作 | 命令 | 说明 |
|---|---|---|
| 检索 | docker search 关键字 eg:docker search redis | 我们经常去docker hub上检索镜像的详细信息,如镜像的TAG |
| 拉取 | docker pull 镜像名:tag | :tag是可选的,tag表示标签,多为软件的版本,默认是latest |
| 列表 | docker images | 查看所有本地镜像 |
| 删除 | docker rmi image-id | 删除指定的本地镜像 |
17.2.2 容器操作
1、搜索镜像
docker search tomcat2、拉取镜像
docker pull tomcat3、根据镜像启动容器
docker run ‐‐name mytomcat ‐d tomcat:latest4、查看运行中的容器
docker ps5、 停止运行中的容器
docker stop 容器的id6、查看所有的容器
docker ps ‐a7、启动容器
docker start 容器id8、删除一个容器
docker rm 容器id9、启动一个做了端口映射的tomcat
‐d:后台运行
‐p: 将主机的端口映射到容器的一个端口 主机端口:容器内部的端口
docker run ‐d ‐p 8888:8080 tomcat10、为了演示简单关闭了linux的防火墙
service firewalld status # 查看防火墙状态
service firewalld stop # 关闭防火墙11、查看容器的日志
docker logs container‐name/container‐id更多命令参看
https://docs.docker.com/engine/reference/commandline/docker/
可以参考每一个镜像的文档
17.3 安装MySQL示例
docker pull mysql错误的启动
[root@localhost ~]# docker run ‐‐name mysql01 ‐d mysql
42f09819908bb72dd99ae19e792e0a5d03c48638421fa64cce5f8ba0f40f5846
mysql退出了
[root@localhost ~]# docker ps ‐a
CONTAINER ID IMAGE COMMAND CREATED STATUS PORTS NAMES
42f09819908b mysql "docker‐entrypoint.sh" 34 seconds ago Exited
(1) 33 seconds ago mysql01
538bde63e500 tomcat "catalina.sh run" About an hour ago Exited
(143) About an hour ago compassionate_
goldstine
c4f1ac60b3fc tomcat "catalina.sh run" About an hour ago Exited
(143) About an hour ago lonely_fermi
81ec743a5271 tomcat "catalina.sh run" About an hour ago Exited
(143) About an hour ago sick_ramanujan
//错误日志
[root@localhost ~]# docker logs 42f09819908b
error: database is uninitialized and password option is not specified
You need to specify one of MYSQL_ROOT_PASSWORD, MYSQL_ALLOW_EMPTY_PASSWORD and
MYSQL_RANDOM_ROOT_PASSWORD;这个三个参数必须指定一个正确的启动
[root@localhost ~]# docker run ‐‐name mysql01 ‐e MYSQL_ROOT_PASSWORD=123456 ‐d mysql
b874c56bec49fb43024b3805ab51e9097da779f2f572c22c695305dedd684c5f
[root@localhost ~]# docker ps
CONTAINER ID IMAGE COMMAND CREATED STATUS
PORTS NAMES
b874c56bec49 mysql "docker‐entrypoint.sh" 4 seconds ago Up 3
seconds 3306/tcp mysql01做了端口映射
[root@localhost ~]# docker run ‐p 3306:3306 ‐‐name mysql02 ‐e MYSQL_ROOT_PASSWORD=123456 ‐d
mysql
ad10e4bc5c6a0f61cbad43898de71d366117d120e39db651844c0e73863b9434
[root@localhost ~]# docker ps
CONTAINER ID IMAGE COMMAND CREATED STATUS
PORTS NAMES
ad10e4bc5c6a mysql "docker‐entrypoint.sh" 4 seconds ago Up 2
seconds 0.0.0.0:3306‐>3306/tcp mysql02几个其他的高级操作
docker run ‐‐name mysql03 ‐v /conf/mysql:/etc/mysql/conf.d ‐e MYSQL_ROOT_PASSWORD=my‐secret‐pw
‐d mysql:tag
把主机的/conf/mysql文件夹挂载到 mysqldocker容器的/etc/mysql/conf.d文件夹里面
改mysql的配置文件就只需要把mysql配置文件放在自定义的文件夹下(/conf/mysql)
docker run ‐‐name some‐mysql ‐e MYSQL_ROOT_PASSWORD=my‐secret‐pw ‐d mysql:tag ‐‐character‐setserver=
utf8mb4 ‐‐collation‐server=utf8mb4_unicode_ci
指定mysql的一些配置参数第18章 Spring Boot应用启动配置原理
几个重要的事件回调机制
配置在META-INF/spring.factories
ApplicationContextInitializer
SpringApplicationRunListener
只需要放在ioc容器中
ApplicationRunner
CommandLineRunner章 Spring Boot启动配置原理
启动流程:
1.创建SpringApplication对象
private void initialize(Object[]sources){
//保存主配置类
if(sources!=null&&sources.length>0){
this.sources.addAll(Arrays.asList(sources));
}
//判断当前是否一个web应用
this.webEnvironment=deduceWebEnvironment();
//从类路径下找到META‐INF/spring.factories配置的所有ApplicationContextInitializer;然后保存起来
setInitializers((Collection)getSpringFactoriesInstances(ApplicationContextInitializer.class));
//从类路径下找到ETA‐INF/spring.factories配置的所有ApplicationListener
setListeners((Collection)getSpringFactoriesInstances(ApplicationListener.class));
//从多个配置类中找到有main方法的主配置类
this.mainApplicationClass=deduceMainApplicationClass();
} 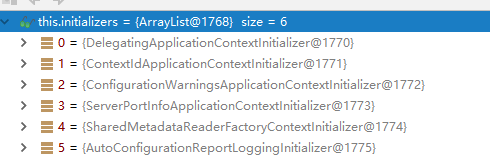

2.运行run方法
public ConfigurableApplicationContext run(String...args){
StopWatch stopWatch = new StopWatch();
stopWatch.start();
ConfigurableApplicationContext context = null;
FailureAnalyzers analyzers = null;
configureHeadlessProperty();
//获取SpringApplicationRunListeners;从类路径下META‐INF/spring.factories
SpringApplicationRunListeners listeners = getRunListeners(args);
//回调所有的获取SpringApplicationRunListener.starting()方法
listeners.starting();
try{
//封装命令行参数
ApplicationArguments applicationArguments = new DefaultApplicationArguments(args);
//准备环境
ConfigurableEnvironment environment = prepareEnvironment(listeners,applicationArguments);
//创建环境完成后回调SpringApplicationRunListener.environmentPrepared();表示环境准备完成
Banner printedBanner = printBanner(environment);
//创建ApplicationContext;决定创建web的ioc还是普通的ioc
context = createApplicationContext();
analyzers = new FailureAnalyzers(context);
//准备上下文环境;将environment保存到ioc中;而且applyInitializers();
//applyInitializers():回调之前保存的所有的ApplicationContextInitializer的initialize方法
//回调所有的SpringApplicationRunListener的contextPrepared();
prepareContext(context,environment,listeners,applicationArguments,printedBanner);
//prepareContext运行完成以后回调所有的SpringApplicationRunListener的contextLoaded();
//s刷新容器;ioc容器初始化(如果是web应用还会创建嵌入式的Tomcat);Spring注解版
//扫描,创建,加载所有组件的地方;(配置类,组件,自动配置)
refreshContext(context);
//从ioc容器中获取所有的ApplicationRunner和CommandLineRunner进行回调
//ApplicationRunner先回调,CommandLineRunner再回调
afterRefresh(context,applicationArguments);
//所有的SpringApplicationRunListener回调finished方法
listeners.finished(context,null);
stopWatch.stop();
if(this.logStartupInfo){
new StartupInfoLogger(this.mainApplicationClass).logStarted(getApplicationLog(),stopWatch);
}
//整个SpringBoot应用启动完成以后返回启动的ioc容器;
return context;
}catch(Throwable ex){
handleRunFailure(context,listeners,analyzers,ex);
throw new IllegalStateException(ex);
}
}3.时间监听机制
配置在META-INF/spring.factories
ApplicationContextInitializer
public class HelloApplicationContextInitializer implements ApplicationContextInitializer<ConfigurableApplicationContext> {
@Override
public void initialize(ConfigurableApplicationContext applicationContext) {
System.out.println("ApplicationContextInitializer...initialize..."+applicationContext);
}
} SpringApplicationRunListener
public class HelloSpringApplicationRunListener implements SpringApplicationRunListener {
//必须有的构造器
public HelloSpringApplicationRunListener(SpringApplication application, String[] args) {
}
@Override
public void starting() {
System.out.println("SpringApplicationRunListener...starting...");
}
@Override
public void environmentPrepared(ConfigurableEnvironment environment) {
Object o = environment.getSystemProperties().get("os.name");
System.out.println("SpringApplicationRunListener...environmentPrepared.." + o);
}
@Override
public void contextPrepared(ConfigurableApplicationContext context) {
System.out.println("SpringApplicationRunListener...contextPrepared...");
}
@Override
public void contextLoaded(ConfigurableApplicationContext context) {
System.out.println("SpringApplicationRunListener...contextLoaded...");
}
@Override
public void finished(ConfigurableApplicationContext context, Throwable exception) {
System.out.println("SpringApplicationRunListener...finished...");
}
} 配置(META-INF/spring.factories)
org.springframework.context.ApplicationContextInitializer=\
com.atguigu.springboot.listener.HelloApplicationContextInitializer
org.springframework.boot.SpringApplicationRunListener=\
com.atguigu.springboot.listener.HelloSpringApplicationRunListener只需要放在ioc容器中
ApplicationRunner
@Component
public class HelloApplicationRunner implements ApplicationRunner {
@Override
public void run(ApplicationArguments args) throws Exception {
System.out.println("ApplicationRunner...run....");
}
} CommandLineRunner
@Component
public class HelloCommandLineRunner implements CommandLineRunner {
@Override
public void run(String... args) throws Exception {
System.out.println("CommandLineRunner...run..."+ Arrays.asList(args));
}
} 第19章 Spring Boot自定义starters
starter:
1.这个场景需要使用到的依赖是什么?
2.如何编写自动配置
@Configuration //指定这个类是一个配置类
@ConditionalOnXXX //在指定条件成立的情况下自动配置类生效
@AutoConfigureAfter //指定自动配置类的顺序
@Bean //给容器中添加组件
@ConfigurationPropertie结合相关xxxProperties类来绑定相关的配置
@EnableConfigurationProperties //让xxxProperties生效加入到容器中
自动配置类要能加载
将需要启动就加载的自动配置类,配置在META‐INF/spring.factories
org.springframework.boot.autoconfigure.EnableAutoConfiguration=\
org.springframework.boot.autoconfigure.admin.SpringApplicationAdminJmxAutoConfiguration,\
org.springframework.boot.autoconfigure.aop.AopAutoConfiguration,\3.模式
启动器只用来做依赖导入;
专门来写一个自动配置模块;
启动器依赖自动配置;别人只需要引入启动器(starter)
mybatis-spring-boot-starter;自定义启动器名-spring-boot-starter
步骤:
1)、启动器模块
<?xml version="1.0" encoding="UTF‐8"?>
<project xmlns="http://maven.apache.org/POM/4.0.0"
xmlns:xsi="http://www.w3.org/2001/XMLSchema‐instance"
xsi:schemaLocation="http://maven.apache.org/POM/4.0.0
http://maven.apache.org/xsd/maven‐4.0.0.xsd">
<modelVersion>4.0.0</modelVersion>
<groupId>com.atguigu.starter</groupId>
<artifactId>atguigu‐spring‐boot‐starter</artifactId>
<version>1.0‐SNAPSHOT</version>
<!--启动器-->
<dependencies>
<!--引入自动配置模块-->
<dependency>
<groupId>com.atguigu.starter</groupId>
<artifactId>atguigu‐spring‐boot‐starter‐autoconfigurer</artifactId>
<version>0.0.1‐SNAPSHOT</version>
</dependency>
</dependencies>
</project>2)、自动配置模块
<?xml version="1.0" encoding="UTF‐8"?>
<project xmlns="http://maven.apache.org/POM/4.0.0"
xmlns:xsi="http://www.w3.org/2001/XMLSchema‐instance"
xsi:schemaLocation="http://maven.apache.org/POM/4.0.0
http://maven.apache.org/xsd/maven‐4.0.0.xsd">
<modelVersion>4.0.0</modelVersion>
<groupId>com.atguigu.starter</groupId>
<artifactId>atguigu‐spring‐boot‐starter‐autoconfigurer</artifactId>
<version>0.0.1‐SNAPSHOT</version>
<packaging>jar</packaging>
<name>atguigu‐spring‐boot‐starter‐autoconfigurer</name>
<description>Demo project for Spring Boot</description>
<parent>
<groupId>org.springframework.boot</groupId>
<artifactId>spring‐boot‐starter‐parent</artifactId>
<version>1.5.10.RELEASE</version>
<relativePath/>
</parent>
<properties>
<project.build.sourceEncoding>UTF‐8</project.build.sourceEncoding>
<project.reporting.outputEncoding>UTF‐8</project.reporting.outputEncoding>
<java.version>1.8</java.version>
</properties>
<dependencies>
<!--引入spring‐boot‐starter;所有starter的基本配置-->
<dependency>
<groupId>org.springframework.boot</groupId>
<artifactId>spring‐boot‐starter</artifactId>
</dependency>
</dependencies>
</project>package com.atguigu.starter;
import org.springframework.boot.context.properties.ConfigurationProperties;
@ConfigurationProperties(prefix = "atguigu.hello")
public class HelloProperties {
private String prefix;
private String suffix;
public String getPrefix() {
return prefix;
}
public void setPrefix(String prefix) {
this.prefix = prefix;
}
public String getSuffix() {
return suffix;
}
public void setSuffix(String suffix) {
this.suffix = suffix;
}
}package com.atguigu.starter;
public class HelloService {
HelloProperties helloProperties;
public HelloProperties getHelloProperties() {
return helloProperties;
}
public void setHelloProperties(HelloProperties helloProperties) {
this.helloProperties = helloProperties;
}
public String sayHellAtguigu(String name) {
return helloProperties.getPrefix() + "‐" + name + helloProperties.getSuffix();
}
}package com.atguigu.starter;
import org.springframework.beans.factory.annotation.Autowired;
import org.springframework.boot.autoconfigure.condition.ConditionalOnWebApplication;
import org.springframework.boot.context.properties.EnableConfigurationProperties;
import org.springframework.context.annotation.Bean;
import org.springframework.context.annotation.Configuration;
@Configuration
@ConditionalOnWebApplication //web应用才生效
@EnableConfigurationProperties(HelloProperties.class)
public class HelloServiceAutoConfiguration {
@Autowired
HelloProperties helloProperties;
@Bean
public HelloService helloService() {
HelloService service = new HelloService();
service.setHelloProperties(helloProperties);
return service;
}
}第20章 Spring Boot与消息
20.1 概述
大多应用中,可通过消息服务中间件来提升系统异步通信、扩展解耦能力
消息服务中两个重要概念:
消息代理(message broker)和目的地(destination)
当消息发送者发送消息以后,将由消息代理接管,消息代理保证消息传递到指定目的地。
- 消息队列主要有两种形式的目的地
队列(queue):点对点消息通信(point-to-point)
主题(topic):发布(publish)/订阅(subscribe)消息通信
- 消息队列的应用
异步处理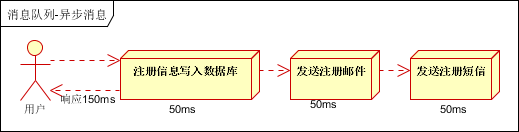
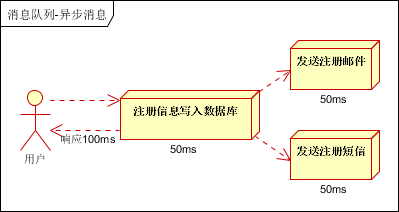
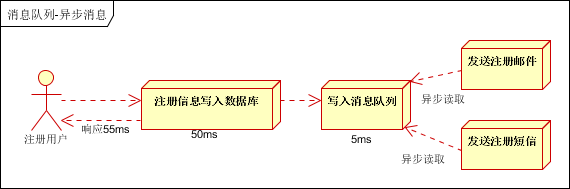
应用解耦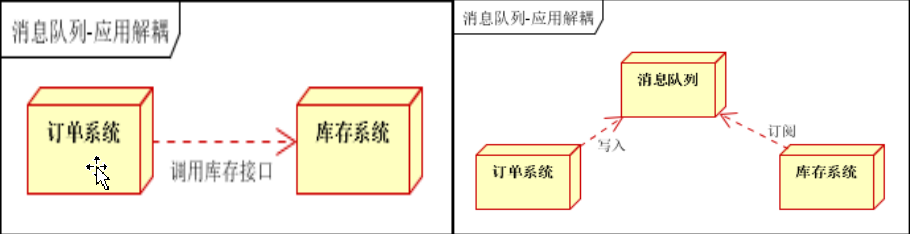
流量削峰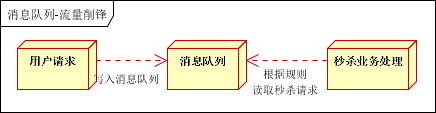
- 消息的传递方式
点对点式:
消息发送者发送消息,消息代理将其放入一个队列中,消息接收者从队列中获取消息内容,消息读取后被移出队列
消息只有唯一的发送者和接受者,但并不是说只能有一个接收者
发布订阅式:
发送者(发布者)发送消息到主题,多个接收者(订阅者)监听(订阅)这个主题,那么就会在消息到达时同时收到消息
- 消息规范
JMS(Java Message Service)JAVA消息服务:基于JVM消息代理的规范。ActiveMQ、HornetMQ是JMS实现
AMQP(Advanced Message Queuing Protocol)高级消息队列协议,也是一个消息代理的规范,兼容JMS RabbitMQ是AMQP的实现
- 两种消息规范的对比
| JMS | AMQP | |
|---|---|---|
| 定义 | Java api | 网络线级协议 |
| 跨语言 | 否 | 是 |
| 跨平台 | 否 | 是 |
| Model | 提供两种消息模型: (1)、Peer-2-Peer (2)、Pub/sub |
提供了五种消息模型: (1)、direct exchange (2)、fanout exchange (3)、topic change (4)、headers exchange (5)、system exchange 本质来讲,后四种和JMS的pub/sub模型没有太大差别,仅是在路由机制上做了更详细的划分 |
| 支持消息类型 | 多种消息类型: TextMessage MapMessage BytesMessage StreamMessage ObjectMessage Message (只有消息头和属性) |
byte[] 当实际应用时,有复杂的消息,可以将消息序列化后发送 |
| 综合评价 | JMS 定义了JAVA API层面的标准;在java体系中,多个client均可以通过JMS进行交互,不需要应用修改代码,但是其对跨平台的支持较差 | AMQP定义了wire-level层的协议标准;天然具有跨平台、跨语言特性 |
8.SpringBoot对消息的支持
spring-jms提供了对JMS的支持
spring-rabbit提供了对AMQP的支持
需要ConnectionFactory的实现来连接消息代理
提供JmsTemplate、RabbitTemplate来发送消息
@JmsListener(JMS)、@RabbitListener(AMQP)注解在方法上监听消息代理发布的消息
@EnableJms、@EnableRabbit开启支持
9.Spring Boot自动配置
JmsAutoConfiguration
RabbitAutoConfiguration
20.2 SpringBoot整合RabbitMQ
- 引入 spring-boot-starter-amqp
- application.yml配置
- 测试RabbitMQ
AmqpAdmin:管理组件
RabbitTemplate:消息发送处理组件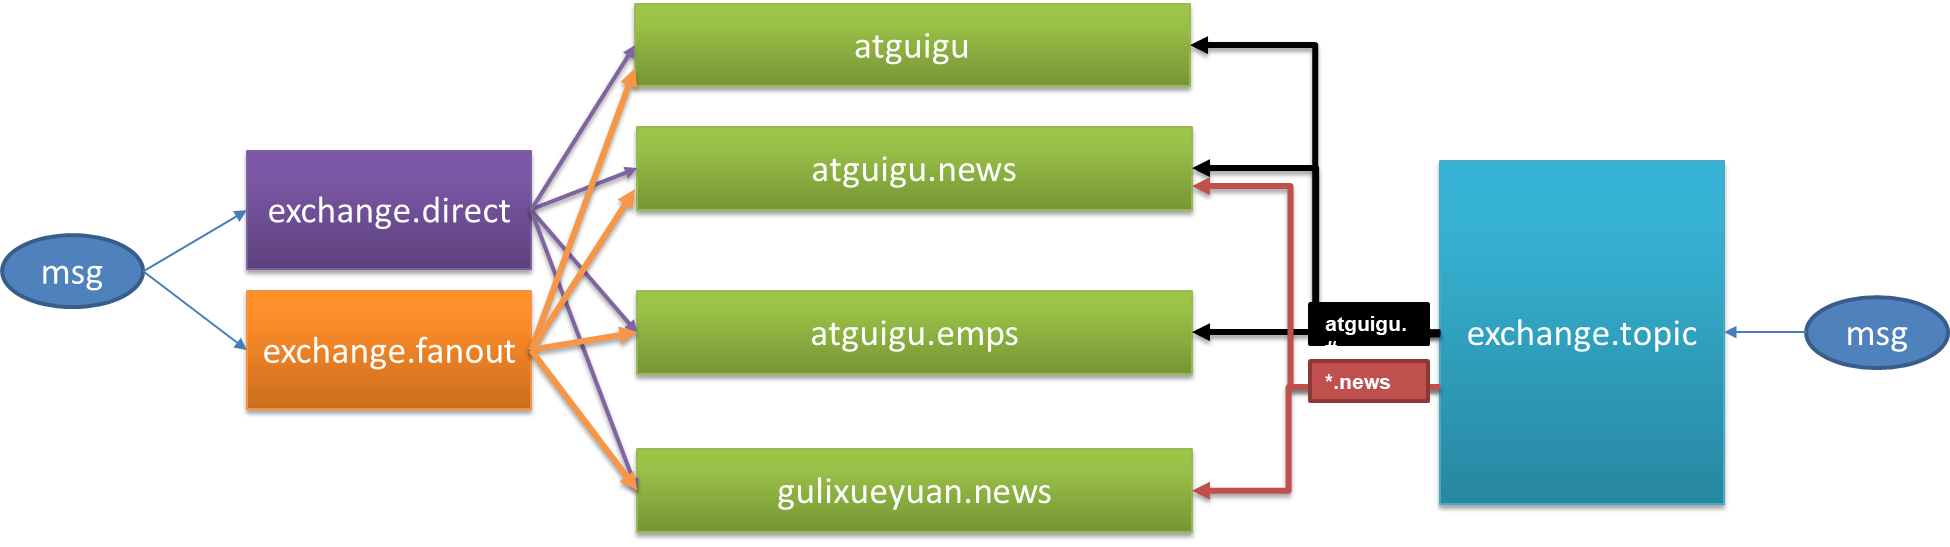
第21章 Spring Boot整合ElasticSearch
引入spring-boot-starter-data-elasticsearch
安装Spring Data 对应版本的ElasticSearch
application.yml配置
Spring Boot自动配置的
ElasticsearchRepository、ElasticsearchTemplate、Jest
测试ElasticSearch
第22章 Spring Boot整合Spring Security
22.1 安全
Spring Security是针对Spring项目的安全框架,也是Spring Boot底层安全模块默认的技术选型。他可以实现强大的web安全控制。对于安全控制,我们仅需引入spring-boot-starter-security模块,进行少量的配置,即可实现强大的安全管理。
几个类:
WebSecurityConfigurerAdapter:自定义Security策略
AuthenticationManagerBuilder:自定义认证策略
@EnableWebSecurity:开启WebSecurity模式
应用程序的两个主要区域是“认证”和“授权”(或者访问控制)。这两个主要区域是Spring Security 的两个目标。
“认证”(Authentication),是建立一个他声明的主体的过程(一个“主体”一般是指用户,设备或一些可以在你的应用程序中执行动作的其他系统)。
“授权”(Authorization)指确定一个主体是否允许在你的应用程序执行一个动作的过程。为了抵达需要授权的店,主体的身份已经有认证过程建立。
这个概念是通用的而不只在Spring Security中。
22.2 Web&安全
登陆/注销
HttpSecurity配置登陆、注销功能
Thymeleaf提供的SpringSecurity标签支持
需要引入thymeleaf-extras-springsecurity4
sec:authentication=“name”获得当前用户的用户名
sec:authorize=“hasRole(‘ADMIN’)”当前用户必须拥有ADMIN权限时才会显示标签内容
remember me
表单添加remember-me的checkbox
配置启用remember-me功能
CSRF(Cross-site request forgery)跨站请求伪造
HttpSecurity启用csrf功能,会为表单添加_csrf的值,提交携带来预防CSRF;
第23章 Spring Boot与分布式
23.1 SpringBoot整合Dubbo/Zookeper
安装zookeeper作为注册中心
2、编写服务提供者
3、编写服务消费者
4、整合dubbo
<dependency>
<groupId>com.alibaba.spring.boot</groupId>
<artifactId>dubbo-spring-boot-starter</artifactId>
<version>2.0.0</version>
</dependency>
23.2 SpringBoot整合SpringCloud
参见SpringCloud文档
第24章 Spring Boot与监控管理
通过引入spring-boot-starter-actuator,可以使用Spring Boot为我们提供的准生产环境下的应用监控和管理功能。我们可以通过HTTP,JMX,SSH协议来进行操作,自动得到审计、健康及指标信息等
步骤:
引入spring-boot-starter-actuator
通过http方式访问监控端点
可进行shutdown(POST 提交,此端点默认关闭)
监控和管理端点
| 端点名 | 描述 |
|---|---|
| autoconfig | 所有自动配置信息 |
| auditevents | 审计事件 |
| beans | 所有Bean的信息 |
| configprops | 所有配置属性 |
| dump | 线程状态信息 |
| env | 当前环境信息 |
| health | 应用健康状况 |
| info | 当前应用信息 |
| metrics | 应用的各项指标 |
| mappings | 应用@RequestMapping映射路径 |
| shutdown | 关闭当前应用(默认关闭) |
| trace | 追踪信息(最新的http请求) |
定制端点信息
定制端点一般通过endpoints+端点名+属性名来设置。
修改端点id(endpoints.beans.id=mybeans)
开启远程应用关闭功能(endpoints.shutdown.enabled=true)
关闭端点(endpoints.beans.enabled=false)
开启所需端点
endpoints.enabled=false
endpoints.beans.enabled=true
定制端点访问根路径
management.context-path=/manage
关闭http端点
management.port=-1
更多SpringBoot整合示例参见
https://github.com/spring-projects/spring-boot/tree/master/spring-boot-samples
第25章 Spring Boot常见问题
Springboot使用thymeleaf打成jar包,访问静态资源报500错误
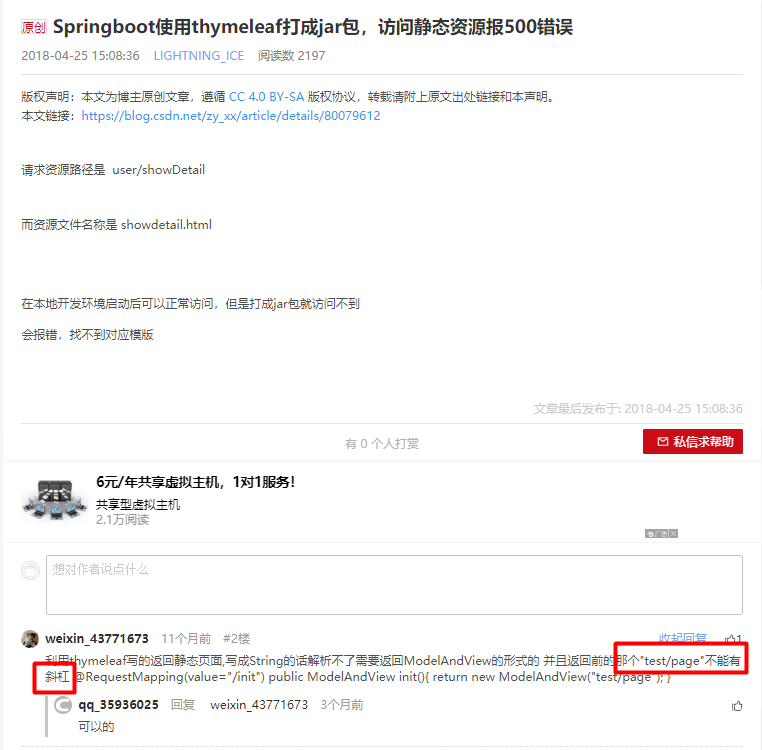
spring-boot项目打包时候出现boot-inf文件夹的问题
spring-boot子模块打包去掉BOOT-INF文件夹
1.spring-boot maven打包,一般pom.xml文件里会加
<plugin>
<groupId>org.springframework.boot</groupId>
<artifactId>spring-boot-maven-plugin</artifactId>
</plugin>这样打的jar里会多一个目录BOOT-INF。
2.引起问题,程序包不存在。
3.解决办法,如果A子模块包依赖了B子模块包,在B子模块的pom文件,加入
<plugin>
<groupId>org.springframework.boot</groupId>
<artifactId>spring-boot-maven-plugin</artifactId>
<configuration>
<skip>true</skip>
</configuration>
</plugin>这个问题在我们稽核系统打包的时候出现过
UnifyReport-associationjh模块依赖于UnifyReport-Common模块, 需要在UnifyReport-Common的pom文件中的maven插件部分加上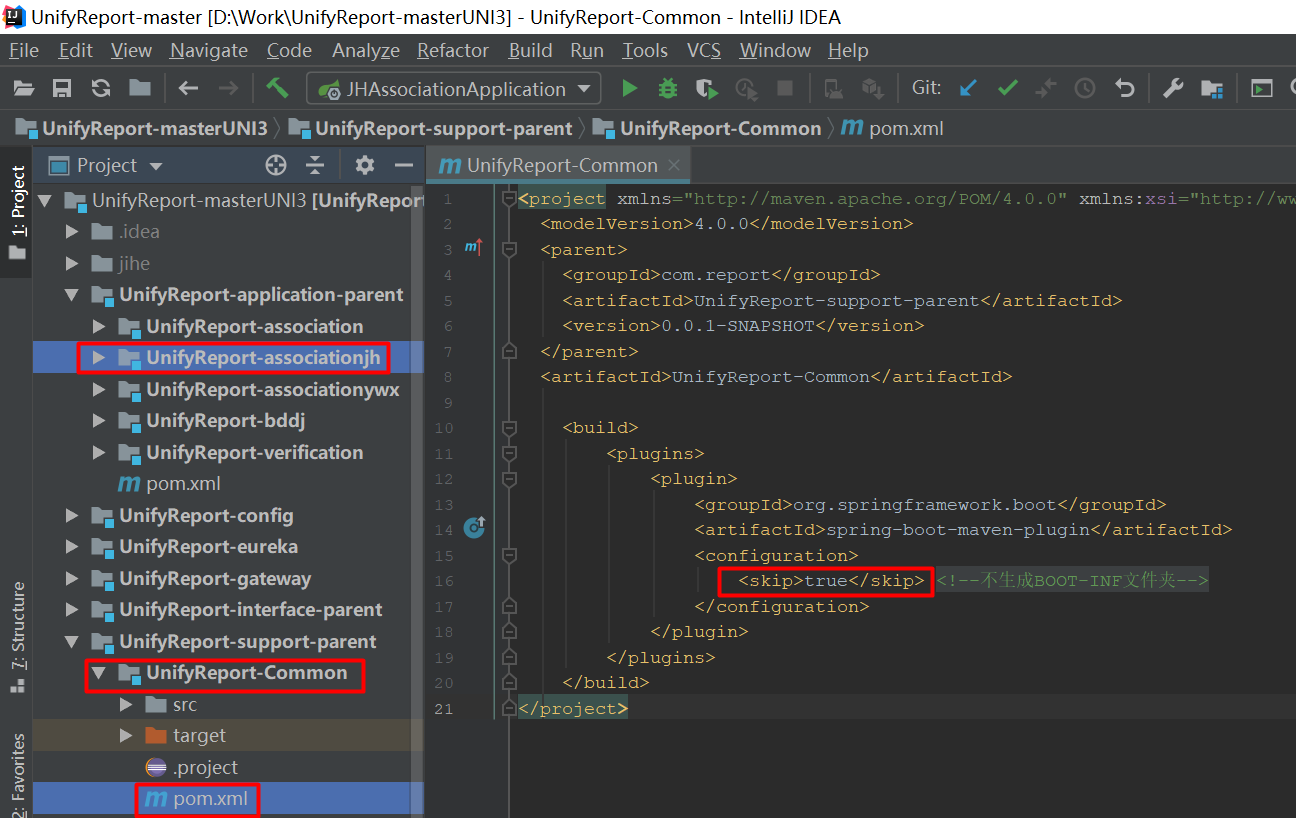
25.1 SpringBoot项目打包成jar后获取classpath下文件失败
25.1 前言
公司的一个SpringBoot项目中,有需要下载文件模板的需求,按理来说分布式项目文件都应该上传到文件服务器,但是由于文件不是太多于是就放在了classpath下,在本地开发的时候发现都能正常下载文件,但是打包成jar上传到Linxu测试环境上就报错,找不到classpath路径。
25.2 原因
原因是项目打包后Spring试图访问文件系统路径,但无法访问JAR包中的路径。
我们使用ResourceUtils.getFile(“classpath:”);这样的方式是获取不到路径的。
25.3 解决方案
我们虽然不能直接获取文件资源路径,但是我们可以通过流的方式读取资源,拿到输入流过后我们就可以对其做操作了。
关键代码如下:
ClassPathResource resource = new ClassPathResource("\\static\\pattern\\test.txt"); // static/pattern下的 test.txt文件
InputStream in = resource.getInputStream(); //获取文件输入流25.4 示例Demo
1. 在static下新建pattern目录,并新建一个名为 test.txt的文件
2. 新建DownloadController.java
package com.example.jekins.controller;
import org.springframework.core.io.ClassPathResource;
import org.springframework.web.bind.annotation.GetMapping;
import org.springframework.web.bind.annotation.RestController;
import javax.servlet.http.HttpServletRequest;
import javax.servlet.http.HttpServletResponse;
import java.io.IOException;
import java.io.InputStream;
import java.io.OutputStream;
import java.net.URLEncoder;
@RestController
public class DownloadController {
@GetMapping("/download/pattern")
public void downloadPattern(HttpServletRequest request, HttpServletResponse response){
System.out.println("开始下载文件.....");
ClassPathResource resource = new ClassPathResource("\\static\\pattern\\test.txt");
try {
//获取文件输入流
InputStream in = resource.getInputStream();
//下载文件
downFile("test文件.txt",request,response,in);
} catch (IOException e) {
e.printStackTrace();
}
}
/**
* 下载文件
* @param fileName 下载文件名称
* @param response 响应
* @throws IOException 异常
*/
public static void downFile(String fileName,HttpServletRequest request,
HttpServletResponse response,InputStream in) throws IOException {
//输出流自动关闭,java1.7新特性
try(OutputStream os = response.getOutputStream()) {
fileName = URLEncoder.encode(fileName, "UTF-8");
response.reset();
response.setHeader("Content-Disposition", "attachment; filename=" + fileName);
response.setContentType("application/octet-stream; charset=UTF-8");
byte[] b = new byte[in.available()];
in.read(b);
os.write(b);
os.flush();
} catch (Exception e) {
System.out.println("fileName=" + fileName);
e.printStackTrace();
} finally {
if (in != null) {
in.close();
}
}
}
}3. 测试
使用Maven工具把项目打成jar包
在target下生成了jar包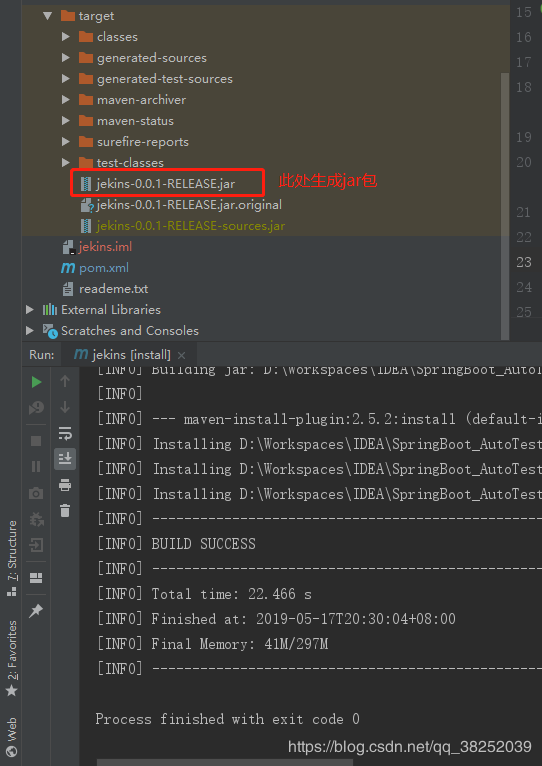
进入jar包所在的文件夹,按住shift并右击,点击在此处打开命令行窗口。输入命令启动项目 java -jar 打包后的文件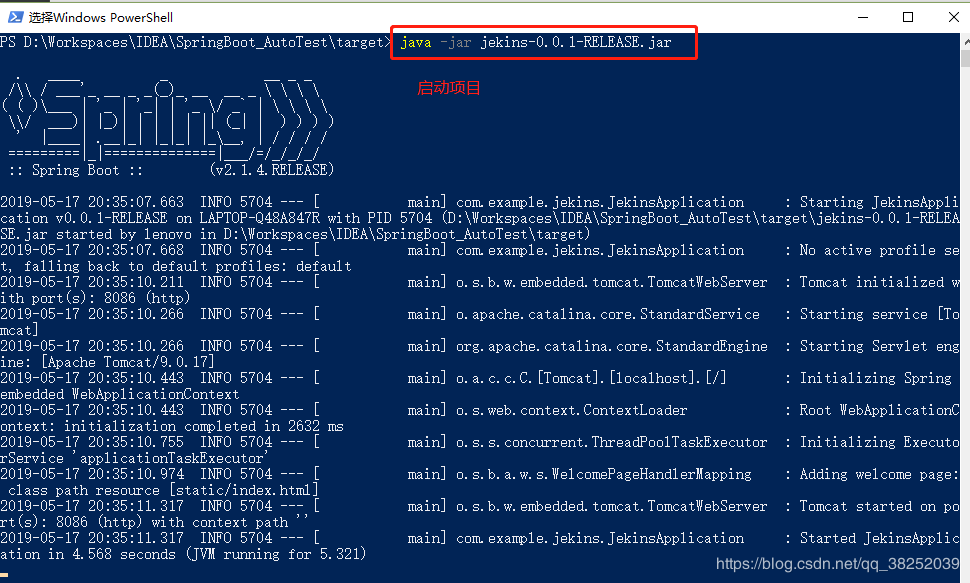
我设置的端口是8086,浏览器地址栏输入http://127.0.0.1:8086/download/pattern
此时我们可以卡看到test.txt文件下载成功
这个在稽核系统中出现过: 之前下载员工导入模板的时候, 最开始用的方法是先获取到staff_info. xlsx路径的路径然后读取下载, 但后来部署到服务器就失败了, 后来代码就参照上面进行了修改, 修改成以流的方式读取jar包中的staff_info.xlsx文件
修改后的代码如下:
/**
* 员工导入模板下载
*/
@RequestMapping("/nb/downloadStaffInfoTemplate")
public void downloadStaffInfoTemplate(HttpServletRequest request, HttpServletResponse response) {
ClassPathResource resource = new ClassPathResource("/StaffInfoTemplate/Staff_Info.xls");
try {
//获取文件输入流
InputStream in = resource.getInputStream();
String fileName = URLEncoder.encode("Staff_Info.xls", "UTF-8");
//下载文件
//输出流自动关闭,java1.7新特性
try (OutputStream os = response.getOutputStream()) {
response.reset();
response.setHeader("Content-Disposition", "attachment; filename=" + fileName);
response.setContentType("application/octet-stream; charset=UTF-8");
byte[] b = new byte[in.available()];
in.read(b);
os.write(b);
os.flush();
} catch (Exception e) {
System.out.println("fileName=" + fileName);
e.printStackTrace();
} finally {
if (in != null) {
in.close();
}
}
} catch (IOException e) {
e.printStackTrace();
}
}25.2 SpringBoot读取Resource下文件的几种方式
最近在项目中涉及到Excle的导入功能,通常是我们定义完模板供用户下载,用户按照模板填写完后上传;这里模板位置resource/excelTemplate/test.xlsx,尝试了四种读取方式,并且测试了四种读取方式分别的windows开发环境下(IDE中)读取和生产环境(linux下jar包运行读取)。
第一种:
ClassPathResource classPathResource = new ClassPathResource("excleTemplate/test.xlsx");
InputStream inputStream =classPathResource.getInputStream();第二种:
InputStream inputStream = Thread.currentThread().getContextClassLoader().getResourceAsStream("excleTemplate/test.xlsx");第三种:
InputStream inputStream = this.getClass().getResourceAsStream("/excleTemplate/test.xlsx");第四种:(不要用这种方式)
File file = ResourceUtils.getFile("classpath:excleTemplate/test.xlsx");
InputStream inputStream = new FileInputStream(file);经测试:
前三种方法在开发环境(IDE中)和生产环境(linux部署成jar包)都可以读取到,第四种只有开发环境 时可以读取到,生产环境读取失败。
推测主要原因是springboot内置tomcat,打包后是一个jar包,因此通过文件读取获取流的方式行不通,因为无法直接读取压缩包中的文件,读取只能通过类加载器读取。
前三种都可以读取到其实殊途同归,直接查看底层代码都是通过类加载器读取文件流,类加载器可以读取jar包中的编译后的class文件,当然也是可以读取jar包中的文件流了。
用解压软件打开jar包查看结果如下:
其中cst文件中是编译后class文件存放位置,excleTemplate是模板存放位置,类加载器读取的是cst下class文件,同样可以读取excleTemplate下的模板的文件流了。